

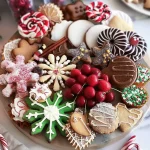
Christmas Dessert Board is the perfect way to celebrate the holiday season with family and friends. These boards are not just visually stunning; they also offer a variety of flavors and textures that cater to every palate. Imagine gathering around a beautifully arranged spread of desserts, each one a little piece of joy crafted for your celebration. From chocolates and cookies to fruits and candies, a Christmas Dessert Board can create an atmosphere filled with warmth and togetherness.
If you’re looking to add a touch of magic to your holiday gatherings, you’re in the right place. A Christmas Dessert Board allows you to combine beloved seasonal treats and serve them in a fun, interactive way. Guests can choose their favorites, and there’s something for everyone to enjoy. In this guide, we will explore why you’ll love creating a Christmas Dessert Board, the preparation and cooking time required, the ingredients you’ll need, step-by-step instructions for assembling it, and tips on how to serve it perfectly.
Let’s dive deeper into the world of Christmas Dessert Boards and discover how to make your holiday celebration truly special!
Why You’ll Love This Recipe
Creating a Christmas Dessert Board is a delightful and rewarding experience. Here’s why you’ll fall in love with this festive creation:
1. Endless Variety: You can include a wide range of desserts, catering to all tastes. From rich chocolate truffles to light fruit tarts, there’s something for everyone.
2. Interactive Experience: Guests can customize their dessert choices, making it a fun activity as they mix and match flavors.
3. Aesthetic Appeal: A well-arranged dessert board is a feast for the eyes. It adds a vibrant and festive touch to your holiday table.
4. Easy to Assemble: With a bit of planning, putting together a Christmas Dessert Board is simple and enjoyable.
5. Perfect for Sharing: It encourages communal eating, fostering warmth and connection among your guests.
6. Leftover-Friendly: Any leftover items can be stored easily, allowing you to enjoy the treats well after your celebration.
These reasons showcase the charm and appeal of a Christmas Dessert Board, making it a must-try for your holiday festivities.
Preparation and Cooking Time
Creating your Christmas Dessert Board will take approximately 1 hour, depending on the complexity of your selections. Here’s a breakdown of the time involved:
– Preparation Time: 30-45 minutes
– Assembly Time: 15-20 minutes
These times may vary based on your experience and the number of items you choose to include, but this framework should give you a solid estimate.
Ingredients
– Assorted chocolates (truffles, bars, or bonbons)
– Variety of cookies (sugar cookies, gingerbread cookies, chocolate chip cookies)
– Fresh fruits (strawberries, raspberries, grapes, apple slices)
– Dried fruits (apricots, cranberries, figs)
– Nuts (almonds, walnuts, pecans)
– Cheese (brie, cheddar, or goat cheese)
– Marshmallows (mini or large)
– Whipped cream or chocolate sauce (for dipping)
– Edible decorations (sprinkles, edible glitter)
Step-by-Step Instructions
Creating your Christmas Dessert Board can be a straightforward and enjoyable process. Follow these steps to assemble your festive masterpiece:
1. Choose Your Board: Select a large wooden or ceramic board as your base. A charcuterie board works perfectly for this.
2. Plan Your Layout: Before placing items, visualize how you want to arrange them. Consider grouping similar items together.
3. Start with Larger Items: Begin by placing larger items like cheese and bowls of sauces in strategic positions on the board.
4. Add Assorted Chocolates: Scatter chocolates around the board, ensuring they are evenly distributed for visual appeal.
5. Include Cookies: Arrange cookies in clusters, alternating types for a colorful display.
6. Incorporate Fresh Fruits: Fill gaps with fresh fruits, creating bursts of color. Make sure to wash and cut them as needed.
7. Add Dried Fruits and Nuts: Sprinkle dried fruits and nuts to provide texture and additional flavor. They can fill small spaces beautifully.
8. Finish with Marshmallows: Place marshmallows in a fun and casual manner, inviting guests to grab them easily.
9. Garnish and Decorate: If desired, finish with edible decorations like sprinkles or edible glitter for a festive touch.
10. Serve with Utensils: Include small tongs or spoons for guests to use. You can also provide napkins and plates nearby for convenience.
These steps will guide you in creating your amazing Christmas Dessert Board effortlessly.
How to Serve
To ensure your Christmas Dessert Board is a hit, consider the following tips when serving:
1. Presentation: Elevate the board by placing it on a decorative tablecloth or using a cake stand for added height.
2. Accompaniments: Provide a selection of beverages like hot cocoa, mulled wine, or festive cocktails to enhance the experience.
3. Slice Sizes: If you include larger items like cakes or pies, ensure they are pre-sliced for easy serving.
4. Encourage Interaction: Invite guests to customize their dessert plates, mixing and matching items from the board.
5. Consider Dietary Preferences: Clearly label items that contain common allergens, such as nuts or gluten, to keep everyone informed.
By putting thought into how you serve your Christmas Dessert Board, you’ll create an enjoyable and memorable experience for all your guests. Spread the joy this holiday season with a delightful dessert spread that brings everyone together!
Additional Tips
– Use Seasonal Ingredients: Incorporate seasonal fruits like pomegranates or citrus for a festive touch.
– Layer Flavors: Consider pairing complementary flavors, such as chocolate and peppermint, for a delightful surprise.
– Create Themed Boards: Tailor your dessert board to match your holiday theme, like a winter wonderland or a traditional Christmas.
Recipe Variation
Feel free to customize your Christmas Dessert Board with these fun variations:
1. Gourmet Cheese Board: Include artisanal cheeses paired with honey and figs for a sophisticated twist.
2. Chocolate Lovers Board: Focus on different types of chocolates, including dark, milk, and white, along with chocolate-covered fruits.
3. Baked Goods Board: Add mini pastries, cupcakes, and brownies for a more substantial dessert experience.
Freezing and Storage
– Storage: Cover any leftovers with plastic wrap or place them in airtight containers. This will help maintain freshness for about 3-4 days.
– Freezing: You can freeze certain items, like cookies and brownies, for up to 3 months. Ensure they are well-wrapped to prevent freezer burn.
Special Equipment
To create your Christmas Dessert Board, you will need a few essential items:
– A large serving board or platter
– Small bowls for sauces and dips
– Tongs or serving utensils for easy access
– A sharp knife for cutting fruits and cheeses
Frequently Asked Questions
Can I make a Christmas Dessert Board in advance?
Yes, you can prepare many components in advance. However, it’s best to assemble the board on the day of serving for optimal freshness.
What if I have guests with dietary restrictions?
Consider including a few gluten-free or vegan options to accommodate various dietary needs. Clearly label items to avoid confusion.
How should I store leftovers?
Store leftover items separately in airtight containers to maintain their quality. Fruits should be consumed quickly, while cookies and chocolates can last longer.
Is it necessary to include cheese?
No, cheese is optional. You can create a dessert board that focuses exclusively on sweets if you prefer.
How do I ensure a balanced flavor profile on the board?
Aim to include a mix of sweet, salty, crunchy, and creamy items. This variety will create an exciting tasting experience for your guests.
Conclusion
Creating a Christmas Dessert Board is a delightful way to celebrate the holidays. With its vibrant colors and diverse flavors, it brings joy and interaction to your gatherings. The combination of sweet treats, fruits, and festive decorations makes it a centerpiece that everyone can enjoy. Whether you opt for traditional cookies or gourmet chocolates, your Christmas Dessert Board is sure to leave a lasting impression this holiday season.
Christmas Dessert Board: An Incredible Ultimate Guide for 5 Amazing Ideas
- Total Time: 15 minutes
Ingredients
– Assorted chocolates (truffles, bars, or bonbons)
– Variety of cookies (sugar cookies, gingerbread cookies, chocolate chip cookies)
– Fresh fruits (strawberries, raspberries, grapes, apple slices)
– Dried fruits (apricots, cranberries, figs)
– Nuts (almonds, walnuts, pecans)
– Cheese (brie, cheddar, or goat cheese)
– Marshmallows (mini or large)
– Whipped cream or chocolate sauce (for dipping)
– Edible decorations (sprinkles, edible glitter)
Instructions
Creating your Christmas Dessert Board can be a straightforward and enjoyable process. Follow these steps to assemble your festive masterpiece:
1. Choose Your Board: Select a large wooden or ceramic board as your base. A charcuterie board works perfectly for this.
2. Plan Your Layout: Before placing items, visualize how you want to arrange them. Consider grouping similar items together.
3. Start with Larger Items: Begin by placing larger items like cheese and bowls of sauces in strategic positions on the board.
4. Add Assorted Chocolates: Scatter chocolates around the board, ensuring they are evenly distributed for visual appeal.
5. Include Cookies: Arrange cookies in clusters, alternating types for a colorful display.
6. Incorporate Fresh Fruits: Fill gaps with fresh fruits, creating bursts of color. Make sure to wash and cut them as needed.
7. Add Dried Fruits and Nuts: Sprinkle dried fruits and nuts to provide texture and additional flavor. They can fill small spaces beautifully.
8. Finish with Marshmallows: Place marshmallows in a fun and casual manner, inviting guests to grab them easily.
9. Garnish and Decorate: If desired, finish with edible decorations like sprinkles or edible glitter for a festive touch.
10. Serve with Utensils: Include small tongs or spoons for guests to use. You can also provide napkins and plates nearby for convenience.
These steps will guide you in creating your amazing Christmas Dessert Board effortlessly.
- Prep Time: 15 minutes
- Cook Time: 0 minutes
Nutrition
- Serving Size: 8
- Calories: 320 kcal
- Fat: 15g
- Protein: 5g