
Easter is all about bright colors, festive treats, and adorable food presentations. If you’re looking for a show-stopping appetizer that’s not only delicious but also irresistibly cute, these Deviled Egg Chicks are the perfect choice. They bring a creative twist to the classic deviled eggs by turning them into charming little baby chicks, complete with tiny carrot beaks and black olive eyes. Whether you’re hosting an Easter brunch, a spring gathering, or simply want to impress your family with a playful snack, these deviled eggs are guaranteed to be a hit.
What makes these Deviled Egg Chicks so special is that they’re just as easy to make as regular deviled eggs but way more fun to serve. The creamy yolk filling, seasoned to perfection with mustard and mayonnaise, gets piped back into the egg whites, creating an adorable chick face. A little garnish, a few easy decorations, and suddenly, you have an appetizer that will have everyone reaching for their phones to snap a picture before taking a bite.
I still remember the first time I made these for an Easter family gathering. My nieces and nephews couldn’t stop giggling as they picked up each little chick, pretending to make them “talk” before popping them into their mouths. Even the adults were charmed, asking how something so simple could look so impressive. Since then, these have become a yearly tradition, and I love seeing the excitement they bring to the table.
These Deviled Egg Chicks aren’t just for Easter, though! They make a fantastic addition to baby showers, spring picnics, and even kids’ birthday parties. Plus, they are incredibly easy to customize with different seasonings, making them a fun and flexible recipe that can fit any flavor preference.
Why You’ll Love This Recipe
There are so many reasons why these Deviled Egg Chicks deserve a spot on your table. Here’s what makes them irresistible:
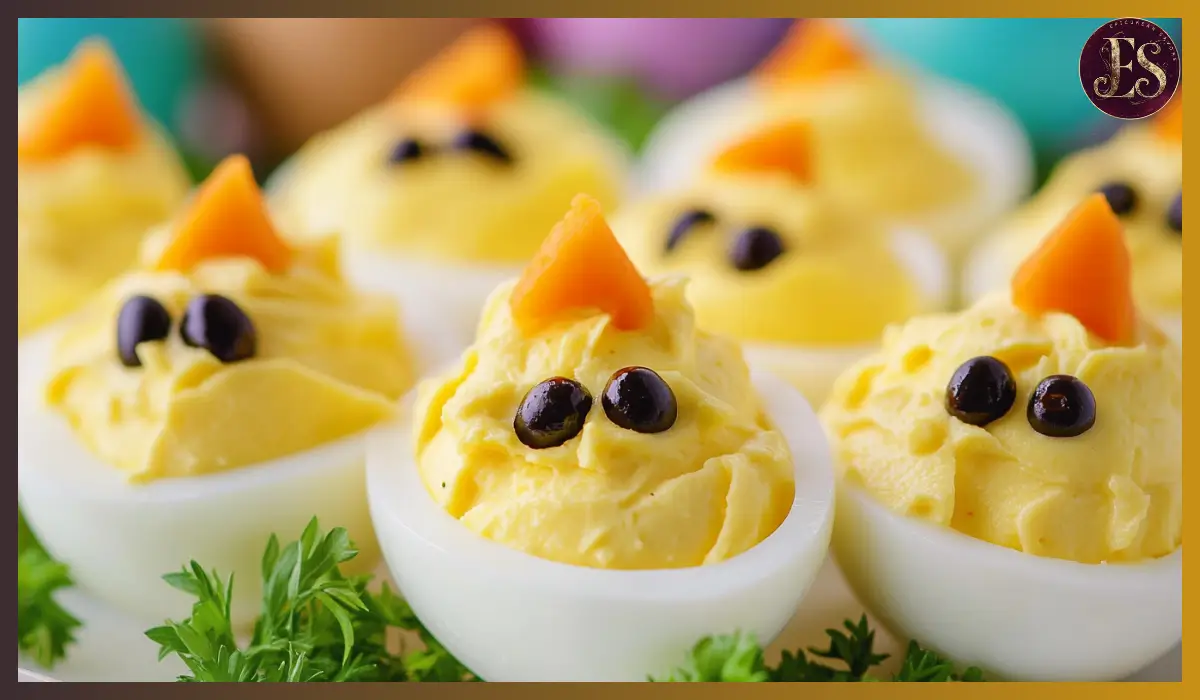
- Adorable Presentation: These little chicks are almost too cute to eat! Their bright yellow yolk centers, tiny carrot beaks, and little black olive eyes make them the perfect centerpiece for an Easter or spring-themed gathering.
- Easy to Make: Despite their impressive appearance, these deviled eggs are simple to prepare. You don’t need any fancy tools—just a sharp knife, a piping bag (or a plastic bag with the tip cut off), and a little creativity.
- Crowd-Pleasing Flavor: The creamy, tangy yolk filling is a classic combination that everyone loves. The mustard adds just the right amount of zing, while the mayonnaise makes everything smooth and rich.
- Kid-Friendly Fun: If you’re looking for a way to get kids involved in the kitchen, this recipe is a great choice. Let them help decorate the chicks’ faces—it’s a fun and creative activity that turns snack time into playtime.
Health Benefits
These Deviled Egg Chicks aren’t just fun to eat—they’re also packed with nutrition. Eggs are a powerhouse of essential nutrients, making this appetizer a healthy and protein-rich snack that can be enjoyed guilt-free. Here’s why they’re good for you:
- High in Protein: Eggs are an excellent source of high-quality protein, which is essential for muscle repair, immune function, and overall body strength. One deviled egg provides a satisfying protein boost that keeps you feeling full.
- Rich in Healthy Fats: The yolk contains heart-healthy unsaturated fats that support brain function and hormone balance. The added mayonnaise also contributes to the creamy texture while providing essential fats.
- Great Source of Vitamins: Eggs contain Vitamin B12, which is crucial for brain health, and Vitamin D, which helps maintain strong bones and a healthy immune system.
- Choline for Brain Health: Choline, found in egg yolks, plays a vital role in brain development, memory function, and liver health. It’s especially important for pregnant women and growing children.
Preparation Time, Servings, and Nutritional Information
- Prep Time: 20 minutes
- Cook Time: 10 minutes (boiling eggs)
- Total Time: 30 minutes
- Servings: 12 deviled egg chicks
- Calories per serving: 80 kcal
- Protein: 6g
- Carbohydrates: 1g
- Fat: 6g
Ingredients List
To make these adorable Deviled Egg Chicks, you’ll need:
- 12 large eggs (hard-boiled and peeled)
- ¼ cup mayonnaise (or Greek yogurt for a healthier option)
- 1 ½ teaspoons Dijon mustard (or yellow mustard for a milder taste)
- ½ teaspoon salt
- ¼ teaspoon black pepper
- 1 large carrot (peeled and washed, for the beaks and feet)
- 2 black olives (for the eyes)
- Curly parsley or lettuce (for garnish)
Optional Add-Ins for Extra Flavor:
- 1 teaspoon sweet pickle relish (for a tangy kick)
- ½ teaspoon smoked paprika (for a smoky flavor)
- ½ teaspoon garlic powder (for a savory depth)
- 1 teaspoon chopped chives or dill (for fresh herby notes)
Step-By-Step Cooking Instructions
1. Boil and Prepare the Eggs
- Place the eggs in a single layer in a pot and cover them with cold water.
- Bring the water to a gentle boil, then reduce the heat to low and let the eggs simmer for 10 minutes.
- Immediately transfer the eggs to a bowl of ice water to cool for at least 10 minutes. This stops the cooking process and makes peeling easier.
- Gently tap each egg on a hard surface and roll it between your hands to loosen the shell. Peel carefully to keep the egg whites intact.
2. Slice and Scoop Out the Yolks
- Cut a small flat slice off the bottom of each egg so they can stand upright.
- Carefully cut the top third off each egg and set aside the tops.
- Gently remove the egg yolks and place them in a mixing bowl.
3. Make the Deviled Egg Filling
- Mash the egg yolks with a fork until smooth and crumbly.
- Add mayonnaise, mustard, salt, and pepper, mixing until creamy and well combined.
- If desired, mix in any optional seasonings for extra flavor.
4. Pipe the Filling into the Egg Whites
- Spoon the filling into a piping bag or a plastic bag with the corner snipped off.
- Pipe the yolk mixture into each egg base, letting it mound slightly over the top.
5. Assemble the Chick Faces
- Use a vegetable peeler to slice thin carrot rounds, then cut small triangles for the beaks.
- Use a straw to punch out tiny olive circles for the eyes.
- Gently press the carrot beak and olive eyes into the yolk filling to create faces.
6. Attach the “Eggshell Hats”
- Place the reserved egg tops slightly askew on each chick’s head.
7. Serve & Enjoy!
- Arrange the chicks on a platter lined with lettuce or parsley for a festive presentation.
- Serve chilled or at room temperature.

How to Serve
These Deviled Egg Chicks are not just an appetizer; they’re a conversation starter. Their adorable appearance makes them the highlight of any spring gathering, and they pair well with a variety of dishes. Here are some creative ways to serve them:
- On a Bed of Greens: Arrange the chicks on a platter lined with curly parsley, fresh spinach, or shredded lettuce to mimic a nest. This adds a pop of color and makes them look even more festive.
- With Fresh Veggies: Serve them alongside a vegetable platter with carrots, cucumbers, celery, and cherry tomatoes for a healthy and crunchy contrast.
- As Part of a Brunch Spread: Pair them with other brunch favorites like mini quiches, croissants, or fruit salad for a well-rounded meal.
Pairing Suggestions
Since Deviled Egg Chicks have a creamy, tangy flavor, they pair wonderfully with both light and savory dishes. Here are some ideas to complement them:
Beverage Pairings
- Fresh Lemonade or Iced Tea: The acidity of lemon or citrus balances out the richness of the deviled eggs.
- Sparkling Water with Herbs: Infused water with mint, basil, or cucumber is a refreshing choice.
- Fresh Smoothies: A berry or citrus-based smoothie adds a fruity contrast to the creamy eggs.
Main Course Pairings
- Grilled Chicken or Turkey Sliders: A protein-packed main dish that complements the eggs.
- Spring Salads: A light arugula or spinach salad with a lemon vinaigrette keeps the meal fresh and balanced.
- Pasta Primavera: A light, vegetable-packed pasta works well with the creamy deviled egg filling.
Side Dish Pairings
- Roasted Asparagus or Brussels Sprouts: A side of crispy, roasted vegetables brings out the savory notes in the deviled eggs.
- Sweet Potato Fries: The natural sweetness of roasted or baked sweet potato fries balances the tanginess of the eggs.
- Cheese & Crackers: If serving as an appetizer, a cheese platter with mild and creamy cheeses like mozzarella or goat cheese pairs well with the deviled eggs.
Storage, Freezing & Reheating Instructions
How to Store Leftover Deviled Eggs
If you have leftovers, it’s important to store them properly to maintain freshness and prevent spoilage:
- Refrigeration: Place the deviled eggs in an airtight container and store them in the fridge for up to 3 days.
- Keep Them Upright: If possible, store them in an egg container or on a plate lined with parchment paper to keep them from tipping over.
- Avoid Strong Odors: Eggs can absorb odors from other foods in the fridge, so keep them away from strong-smelling ingredients like onions or garlic.
Can You Freeze Deviled Eggs?
Freezing deviled eggs isn’t recommended, as the texture of the egg whites can become rubbery once thawed. However, if you want to prepare them in advance:
- Freeze Only the Yolk Filling: Scoop out the yolk mixture and freeze it in a sealed container for up to 1 month. When ready to use, thaw in the refrigerator and re-pipe into freshly boiled egg whites.
How to Reheat (If Needed)
Deviled eggs are best served cold or at room temperature, so there’s no need to reheat them. However, if they’ve been in the fridge for several hours and you prefer them slightly less chilled, let them sit at room temperature for 10–15 minutes before serving.
Common Mistakes to Avoid
Making deviled eggs might seem simple, but there are a few common mistakes that can affect their appearance and taste. Here’s how to avoid them:
- Overcooking the Eggs: If eggs are boiled too long, the yolks can turn grayish-green due to sulfur buildup. To prevent this, use a timed cooking method and immediately transfer them to an ice bath.
- Not Peeling the Eggs Properly: If the shells stick, it can ruin the smooth look of the egg whites. To make peeling easier, use older eggs (7-10 days old), shock them in ice water after boiling, and roll them gently on a hard surface before peeling.
- Using Too Much or Too Little Filling: The key to a perfect deviled egg chick is balancing the amount of filling. Don’t overfill or underfill—make sure it’s just enough to form a round face for decorating.
- Cutting the Eggs Incorrectly: Instead of slicing the eggs in half lengthwise, which is traditional for deviled eggs, remember to cut off the top third so they can stand upright.
Pro Tips for Perfect Deviled Egg Chicks
- Use a Piping Bag for Clean Presentation: A ziplock bag with the corner snipped off works in place of a piping bag, ensuring smooth and even yolk filling.
- Prep the Eggs in Advance: Boil and peel the eggs a day ahead to save time. Store them in an airtight container in the fridge until ready to use.
- Chill Before Serving: Let the finished deviled eggs chill for at least 30 minutes before serving for the best flavor and texture.
- Get Creative with Decorations: Instead of black olives, try using black sesame seeds or peppercorns for the eyes. For a fun variation, swap the carrot beak for a tiny red bell pepper triangle.
- Make Extra – They Disappear Fast! These little chicks are so cute and delicious that they tend to go quickly, so consider making a double batch if serving a large crowd.
Frequently Asked Questions (FAQs)
1. Can I make these Deviled Egg Chicks ahead of time?
Yes! You can boil and peel the eggs up to 2 days in advance and store them in the fridge. Assemble the deviled eggs a few hours before serving for the best texture and appearance.
2. What if I don’t have Dijon mustard?
You can use yellow mustard, spicy mustard, or even honey mustard as a substitute. Each type will slightly change the flavor but still taste delicious.
3. Can I use store-bought hard-boiled eggs?
Yes, if you’re short on time, pre-cooked and peeled eggs from the store can be a great shortcut. Just make sure they’re fresh and firm before using.
4. How do I prevent the filling from being too runny?
If your filling is too loose, add a little more mashed yolk or reduce the amount of mayonnaise to thicken it.
5. Can I use a food processor to mix the filling?
Yes! A food processor makes the yolk mixture extra smooth and creamy, but be careful not to overblend, or it may become too thin.
Conclusion & Call to Action
These Deviled Egg Chicks are the perfect way to bring fun and creativity to your Easter table. Not only do they look adorable, but they also taste fantastic with their creamy, flavorful filling. Whether you’re making them for a festive gathering, a brunch party, or just to brighten up a spring day, they are sure to bring smiles all around.
Now it’s your turn! Try making these Deviled Egg Chicks and let me know how they turn out. Do you have any fun variations or creative decorating ideas? Share your experience in the comments or tag me on social media with your egg-cellent creations! Happy cooking!
Print
Deviled Egg Chicks
- Total Time: 30 minutes
- Yield: 12 deviled egg chicks 1x
- Diet: Gluten Free
Description
These Deviled Egg Chicks are a fun and festive twist on classic deviled eggs, perfect for Easter brunch or spring gatherings. With a creamy, tangy yolk filling and adorable chick decorations, they are easy to make and guaranteed to impress!
Ingredients
- 12 large eggs (hard-boiled and peeled)
- ¼ cup mayonnaise
- 1 ½ teaspoons Dijon mustard
- ½ teaspoon salt
- ¼ teaspoon black pepper
- 1 large carrot (for beaks and feet)
- 2 black olives (for eyes)
- Curly parsley or lettuce (for garnish)
Instructions
- Boil & Peel Eggs: Hard-boil eggs, cool them in an ice bath, and peel carefully.
- Cut & Remove Yolks: Slice off the top third of each egg and remove the yolks.
- Make Filling: Mash yolks with mayonnaise, mustard, salt, and pepper.
- Pipe the Mixture: Fill a piping bag and pipe the yolk mixture back into the egg bases.
- Decorate Chicks: Use small carrot triangles for beaks and olive circles for eyes.
- Attach Eggshell Hats: Place the cut tops back on at an angle.
- Serve & Enjoy: Arrange on a platter with greens and serve chilled.
Notes
- For extra flavor, add paprika, chives, or pickle relish to the yolk mixture.
- Store leftovers in an airtight container in the fridge for up to 3 days.
- Use a food processor for an ultra-smooth yolk filling.
- Prep Time: 20 minutes
- Cook Time: 10 minutes
- Category: Appetizer
- Method: No-bake (after boiling)
- Cuisine: American