
There’s something about Oreo Dirt Pie that brings out the kid in all of us. Maybe it’s the playful name, maybe it’s the way layers of chocolate, cream, and crushed cookies come together in the most indulgent way possible. Either way, this dessert is an absolute showstopper. Every time I make it—whether for a family potluck, a holiday dinner, or a casual weekend treat—it disappears in minutes. No exaggeration.
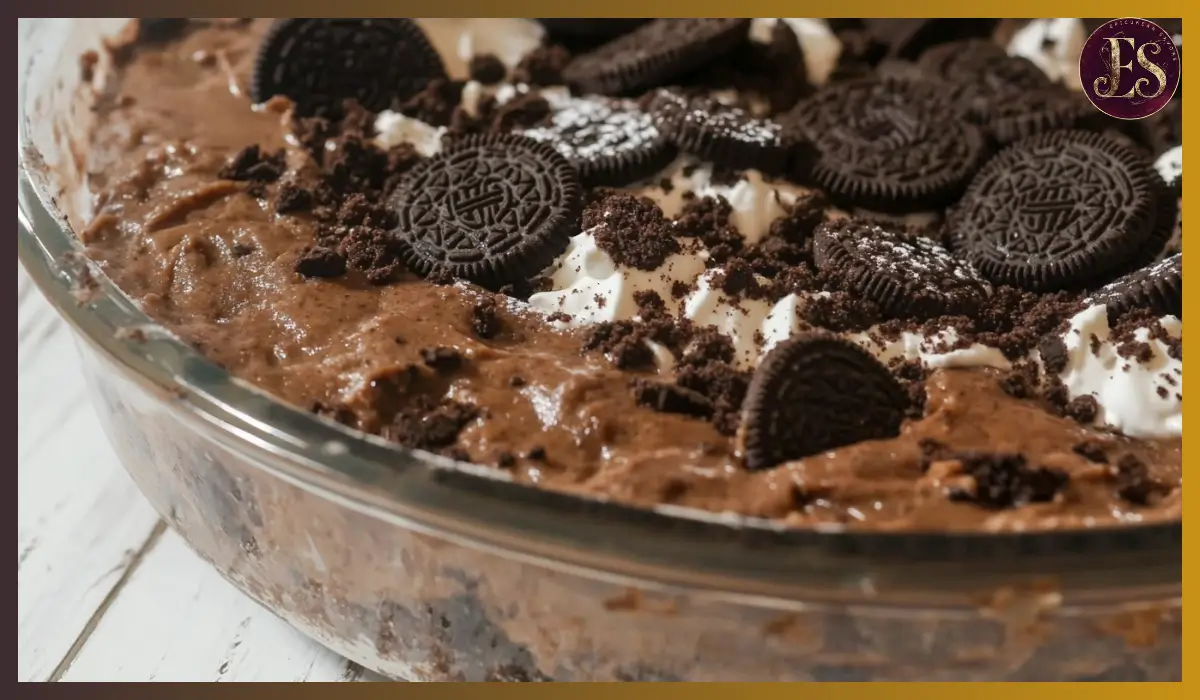
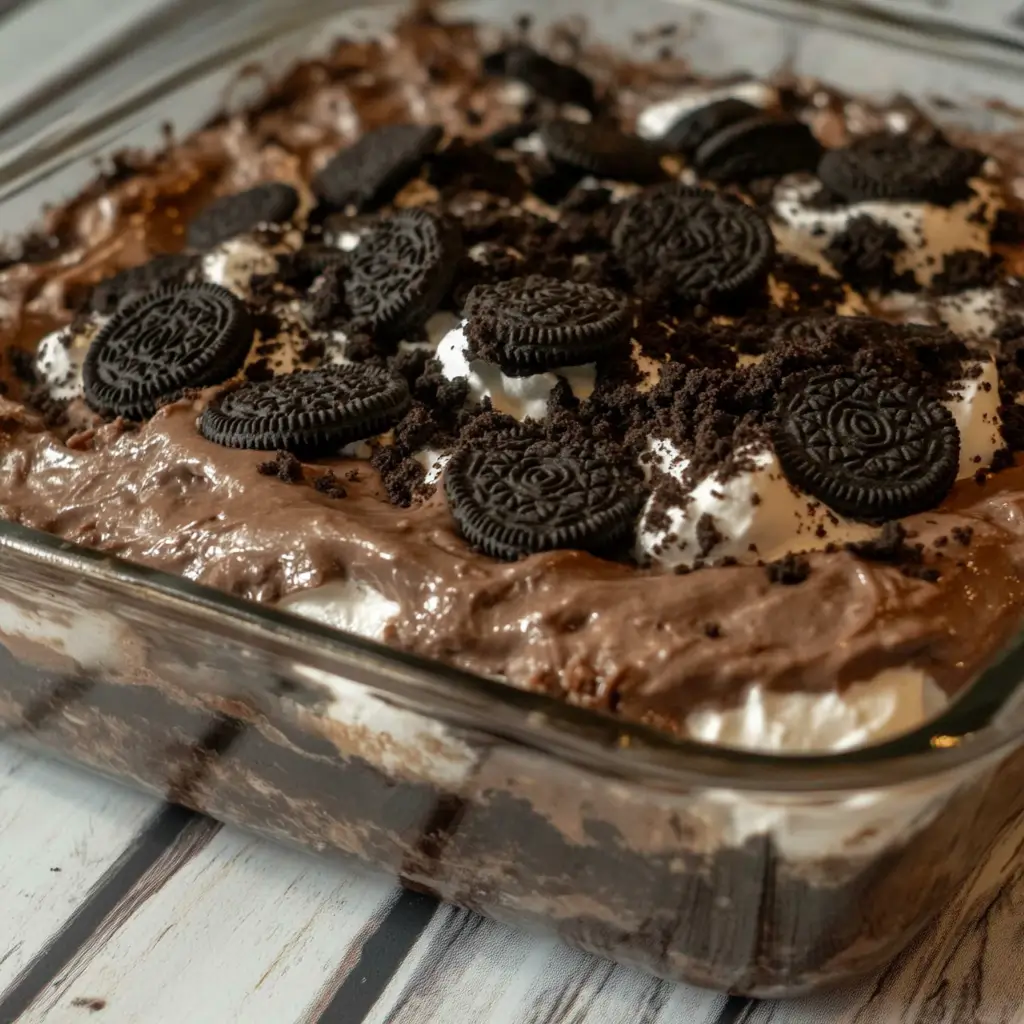
What makes this version truly addicting is its luscious layers: a moist chocolate fudge cake base soaked in hot fudge, topped with velvety chocolate pudding, a cloud-like Cool Whip and pudding mixture, and finally, a generous sprinkle of crushed Oreos to resemble “dirt.” It’s nostalgic, rich, creamy, crunchy, and downright irresistible.
This Oreo Dirt Pie recipe is inspired by a classic from The Frugal Navy Wife, but I’ve added a few tips and personal touches to make it even more foolproof and family-friendly. It’s simple enough for beginner bakers yet impressive enough to be the highlight of your dessert table. And the best part? There’s no need for complicated techniques or hard-to-find ingredients. Just good old-fashioned chocolatey goodness that layers up beautifully and delivers every time.
So whether you’re planning a birthday bash, a picnic, or a midweek treat for the kids, this Oreo Dirt Pie will have everyone asking for seconds—and maybe even thirds.
Why You’ll Love This Recipe
There are a hundred reasons to fall in love with Oreo Dirt Pie, but here are a few of the top ones:
- It’s incredibly easy to make. The steps are straightforward and beginner-friendly, with no special skills required. If you can mix, pour, and spread, you can totally handle this.
- It’s a visual and textural treat. The contrasting textures are what make this dessert so special—moist cake, silky pudding, airy whipped topping, and crunchy Oreos.
- It’s crowd-pleasing. Kids and adults alike go crazy for it. The familiar flavors of chocolate and Oreos hit all the right notes for just about any occasion.
- It’s make-ahead friendly. This dessert actually tastes better after sitting in the fridge for a few hours, which makes it perfect for prepping in advance.
- No fancy ingredients needed. You’ll find most of the components at your regular grocery store, and you can even substitute a few things based on what you have on hand.
- Customizable for every craving. Whether you want to use different flavored Oreos, add in chocolate chips, or make a lighter version, there’s plenty of room for creativity.
This dessert hits that sweet spot (literally and figuratively) where comfort meets decadence. It’s like a layered chocolate hug in a pan.
Health Benefits
Let’s be honest—this dessert is more about indulgence than nutrition. That said, enjoying treats in moderation is a healthy part of a balanced lifestyle, especially when you’re sharing them with people you love.
Still, here are a few things worth noting:
- Calcium boost: Thanks to the pudding and whipped topping, you’re getting a small serving of calcium, which supports strong bones and teeth.
- Mood booster: Chocolate contains compounds like serotonin and dopamine that can help lift your mood and provide a comforting, feel-good experience.
- No artificial food coloring: Unlike many store-bought desserts, this homemade treat doesn’t rely on artificial dyes or preservatives.
While this isn’t a low-calorie dessert, it’s one of those feel-good foods that can be part of your celebration or cheat day. And honestly, what’s a celebration without a little chocolate?
Preparation Time, Servings, and Nutritional Information
Total Time:
- Prep time: 25 minutes
- Cook time: 25 minutes
- Chill time: 30–60 minutes
- Total: Around 1.5 hours (mostly passive time)
Servings:
- Serves 12–15 people
Nutrition (per serving):
- Calories: 420
- Protein: 4g
- Carbohydrates: 55g
- Fat: 20g
- Sugar: 35g
- Fiber: 2g
Ingredients List
The Cake Base:
- 1 box of chocolate fudge cake mix (prepare according to package instructions)
- Eggs, oil, and water (as required by cake mix)
The Fudge Layer:
- 1 jar of Hershey’s hot fudge sauce (about 11–12 oz)
The First Pudding Layer:
- 1 box (3.9 oz) of dark chocolate instant pudding mix (Godiva brand recommended)
- 1¾ cups of cold milk
The “Dirt” Layer:
- 1 box (3.9 oz) of dark chocolate instant pudding mix
- 1¾ cups of cold milk
- 1 container (8 oz) of Cool Whip, thawed
- 1 package of Double Stuf Oreo cookies (crushed)
Optional Garnish:
- Extra hot fudge sauce for drizzling
- Whole or crushed Oreos for topping
Step-By-Step Cooking Instructions
1. Bake the Chocolate Cake
- Preheat your oven to 350°F (175°C).
- Prepare the chocolate fudge cake mix according to package directions.
- Pour the batter into a 9×13-inch baking pan and smooth out the top.
- Bake for 22–28 minutes, or until a toothpick inserted into the center comes out clean.
- Let the cake cool in the pan for about 10–15 minutes.
2. Add the Fudge Layer
- While the cake is still warm, use the handle of a wooden spoon to poke holes all over the surface.
- Warm the hot fudge sauce in the microwave for 30–60 seconds, just until pourable.
- Slowly drizzle the fudge over the cake, letting it seep into the holes.
- Reserve a few tablespoons for garnishing later.
3. Layer the First Chocolate Pudding
- In a bowl, whisk one box of instant chocolate pudding with 1¾ cups of cold milk.
- As soon as the mixture thickens slightly (but before it fully sets), pour it over the fudge-soaked cake.
- Spread it out evenly using a spatula.
- Place the cake in the fridge for 15 minutes to allow the pudding to firm up.
4. Make the “Dirt” Layer
- While the cake chills, prepare the second box of pudding using the same method: mix with 1¾ cups cold milk and set aside.
- Once it begins to thicken, fold in the Cool Whip until well combined.
- Crush ¾ of the Oreo cookies in a zip-top bag using a rolling pin.
- Stir the crushed cookies into the pudding-Cool Whip mixture.
- Spread this layer evenly over the top of the chilled cake.
5. Final Touches
- Drizzle the reserved hot fudge sauce over the top in a zigzag or circular pattern.
- Garnish with the remaining whole or crushed Oreos for a fun, dirt-like texture.
- Chill for at least another 30 minutes before serving, or keep it refrigerated until ready.
How to Serve
This dessert is best served chilled, straight from the fridge. Here are a few serving ideas:
- Scoop it into bowls for a rustic, casual vibe.
- Slice it into neat squares for a more elegant presentation.
- Serve with a dollop of extra whipped cream if you’re feeling fancy.
- Add a scoop of vanilla or cookies-and-cream ice cream for an over-the-top indulgence.
Pairing Suggestions
Since this dessert is ultra-rich and chocolatey, pair it with something light or slightly tangy to balance the sweetness:
- Beverages:
- A glass of cold milk
- Freshly brewed coffee
- Iced matcha or green tea for contrast
- Side treats:
- Fresh berries like strawberries or raspberries
- A small scoop of fruit sorbet
- Crisp butter cookies for a crunch contrast
Storage, Freezing & Reheating Instructions
Storage:
- Store leftover Oreo Dirt Pie in an airtight container in the refrigerator. It stays fresh for up to 4 days.
- Keep it covered to prevent it from absorbing any fridge odors.
Freezing:
- This dessert can be frozen, but the texture of the whipped topping and pudding may slightly change.
- If freezing, wrap the dish tightly with plastic wrap and foil.
- Freeze for up to 1 month. Thaw overnight in the fridge before serving.
Reheating:
- This dessert is meant to be served cold, so no reheating necessary.
- If you want to warm up individual portions, do so very briefly in the microwave—10 seconds max—just enough to soften the fudge.
Common Mistakes to Avoid
- Overbaking the cake: Keep a close eye on the oven, and test for doneness with a toothpick. Overbaking will make the base dry.
- Not poking enough holes: Fewer holes mean less fudge and pudding seeping into the cake, which takes away from that gooey goodness.
- Using warm pudding: Make sure the pudding starts to set before adding it; otherwise, it can become runny and messy.
- Skipping the chill time: Each layer needs time to set. Rushing the process may cause the layers to mix together.
- Not draining whipped topping: If your Cool Whip is too watery, the topping won’t hold its shape. Let it thaw completely and gently stir before using.
Pro Tips
- Chill your mixing bowl and whisk: This helps the pudding set faster and creates a smoother texture.
- Crush the Oreos in batches: For better control over texture, don’t turn them to dust—leave some small chunks for extra crunch.
- Use a piping bag for the fudge drizzle: This adds a professional touch and makes garnishing neater.
- Switch up the flavors: Try mint Oreos or peanut butter Oreos for a fun twist.
- Double the batch: This dessert goes fast. If you’re serving a crowd, make two pans—trust me, you’ll be glad you did.
Frequently Asked Questions (FAQs)
Can I make this dessert in advance?
Yes, in fact, it tastes even better the next day. Just keep it refrigerated and covered until ready to serve.
Can I use homemade whipped cream instead of Cool Whip?
Yes, but make sure it’s stabilized with a bit of gelatin or cornstarch so it holds up well.
Can I use regular Oreos instead of Double Stuf?
Absolutely! The Double Stuf just adds more creaminess, but regular Oreos work just fine.
Can I make it gluten-free?
Yes, use a gluten-free chocolate cake mix and gluten-free sandwich cookies.
Can I use chocolate syrup instead of hot fudge?
You can, but hot fudge has a thicker consistency and richer flavor that works better for soaking into the cake.
What if I don’t have instant pudding?
Unfortunately, regular stovetop pudding doesn’t set the same way. Instant pudding is key for this recipe’s texture.
Can kids help make this?
Definitely! They’ll love crushing the Oreos and layering everything together. Just supervise when it comes to the hot fudge.
How long does it last in the fridge?
Up to 4 days, but it’s usually gone well before that.
Can I serve this warm?
This dessert is meant to be chilled. If you prefer a warm version, serve the cake layer freshly baked and top with ice cream and crushed Oreos.
Can I skip the pudding layer?
You could, but it adds so much creaminess and moisture. It’s worth keeping in!
Conclusion & Call to Action
And there you have it—your new favorite dessert, the Oreo Dirt Pie that brings joy to every bite. It’s creamy, crunchy, rich, and oh-so-simple to make. Whether you’re whipping it up for a family dinner or surprising friends at your next gathering, it’s guaranteed to impress.
So go ahead and treat yourself. Bake it, chill it, and watch it vanish from the table in minutes. Don’t forget to snap a pic and tag your masterpiece online—I’d love to see how your Oreo Dirt Pie turns out.
Ready to dig in? Let’s get baking!
Print
Oreo Dirt Pie
- Total Time: 1 hour 30 minutes (including chilling)
- Yield: 12–15 servings 1x
- Diet: Vegetarian
Description
This no-fuss Oreo Dirt Pie combines layers of moist chocolate cake, rich chocolate pudding, whipped topping, and crushed Oreos for the ultimate indulgent dessert. It’s the perfect make-ahead treat for birthdays, potlucks, or family get-togethers.
Ingredients
-
1 box chocolate fudge cake mix (plus required eggs, oil, water)
-
1 jar hot fudge sauce
-
2 boxes (3.9 oz each) dark chocolate instant pudding
-
3½ cups cold milk
-
1 container Cool Whip (8 oz)
-
1 pack Double Stuf Oreos, crushed (reserve some for topping)
Instructions
-
Bake chocolate fudge cake in a 9×13-inch pan; cool slightly.
-
Poke holes in the cake and pour heated hot fudge sauce over it.
-
Mix 1 box pudding with 1¾ cups milk, pour over cake. Chill 15 mins.
-
Mix second box pudding with 1¾ cups milk. Fold in Cool Whip and crushed Oreos.
-
Spread Oreo mixture over pudding layer. Garnish with more fudge and Oreos.
-
Chill 30+ mins before serving.
Notes
- Chill time is crucial for setting the layers.
- Use Double Stuf Oreos for extra creaminess.
- Best served cold straight from the fridge.
- Prep Time: 25 minutes
- Cook Time: 25 minutes
- Category: Dessert
- Method: Baking, Layering
- Cuisine: American