
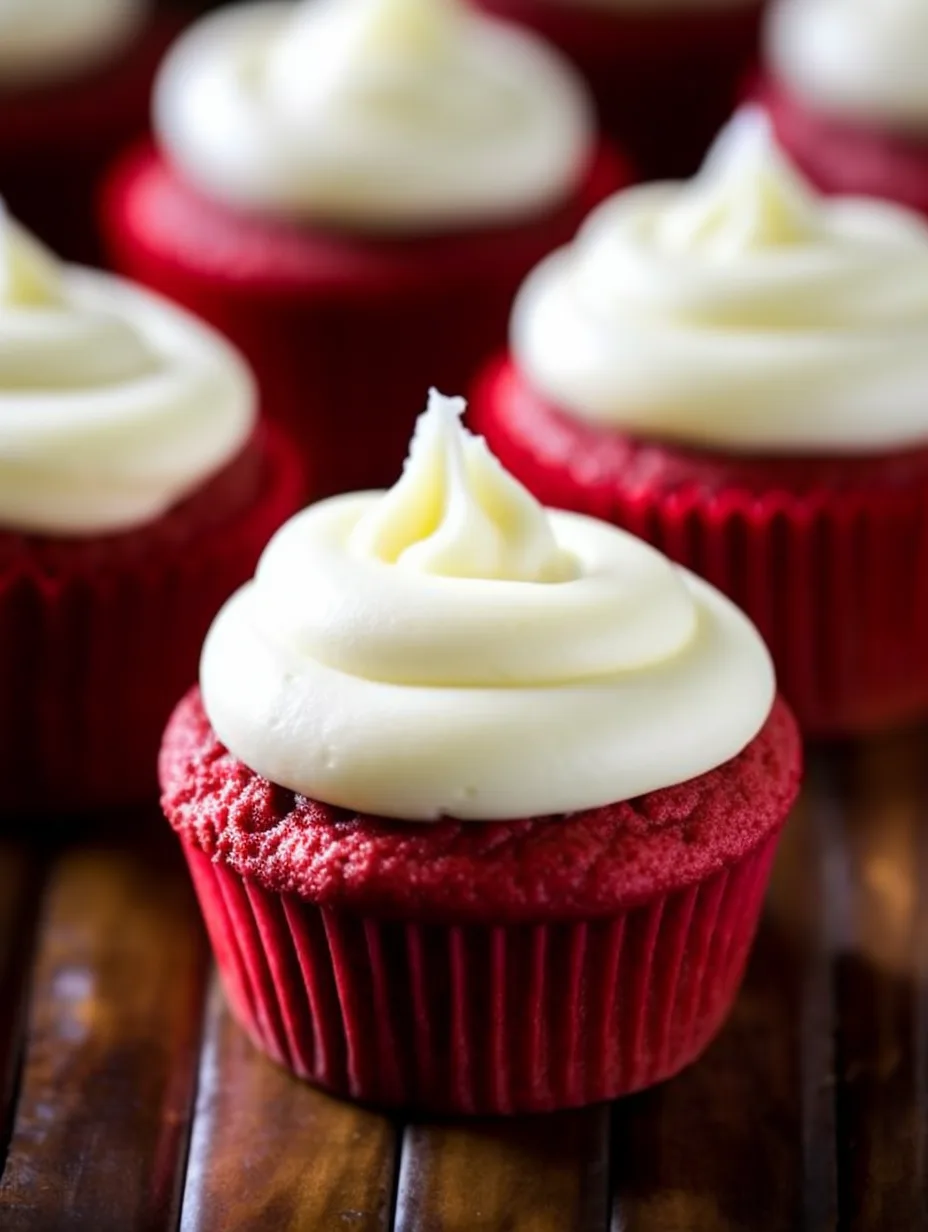
Red Velvet Cupcakes are simply irresistible treats that blend rich flavors with a stunning visual appeal. Their vibrant color, combined with a light, fluffy texture and a hint of cocoa, makes them a favorite among dessert enthusiasts. These delightful cupcakes are not just a feast for the eyes; they offer a unique balance of sweetness and a slight tang, often accompanied by creamy frosting. Whether it’s a birthday party, a wedding, or simply a gathering of friends, these cupcakes steal the spotlight every time.
If you’ve ever experienced the pleasure of digging into a perfectly baked Red Velvet Cupcake, you know how amazing they can be. The first bite reveals a moist interior that melts in your mouth, often luxuriously topped with a swirl of cream cheese frosting. This delightful combination makes these cupcakes a timeless classic that everyone seems to adore. In this guide, you’ll discover why this recipe is so special, how to create your own scrumptious Red Velvet Cupcakes, and tips for serving them perfectly. The incredible flavors and textures of these cupcakes guarantee that you’ll make them again and again.
Let’s dive deeper into what makes Red Velvet Cupcakes a must-try recipe for all occasions and why they truly capture hearts and taste buds alike.
Why You’ll Love This Recipe
Red Velvet Cupcakes deliver an explosion of flavors and textures that’s hard to replicate. Here are some reasons why you will fall in love with this recipe:
1. Easy Preparation: With just a few key ingredients, making Red Velvet Cupcakes is a straightforward process.
2. Perfect for Any Occasion: These cupcakes are ideal for birthdays, holidays, or casual gatherings.
3. Stunning Presentation: Their vibrant red color topped with creamy white frosting creates a striking visual that delights guests.
4. Fluffy and Moist: The texture of each cupcake is incredibly soft, often leaving people wanting more.
5. Rich Flavor Profile: The unique blend of cocoa and buttermilk provides a subtle yet rich taste that pairs perfectly with cream cheese frosting.
6. Customizable Options: You can easily tweak the recipe to make it gluten-free or incorporate different frosting flavors.
With these attributes in mind, you’ll certainly understand why Red Velvet Cupcakes hold a special place in the world of desserts. Each bite is bliss!
Preparation and Cooking Time
Creating these delightful Red Velvet Cupcakes takes some time, but every minute is worth it. Here’s a breakdown of the time required:
– Preparation Time: 20 minutes
– Cooking Time: 18-20 minutes
– Cooling Time: 30 minutes
– Total Time: Approximately 1 hour
These estimated times may vary slightly based on your baking experience and kitchen setup, but this outline should give you a clear idea of what to expect.
Ingredients
– 2 ½ cups all-purpose flour
– 1 ½ cups granulated sugar
– 1 teaspoon baking soda
– 1 teaspoon salt
– 1 teaspoon cocoa powder
– 1 ½ cups vegetable oil
– 1 cup buttermilk, room temperature
– 2 large eggs, room temperature
– 2 tablespoons red food coloring
– 1 teaspoon vanilla extract
– 1 teaspoon white vinegar
– Cream cheese frosting (recipe follows)
Step-by-Step Instructions
Creating delightful Red Velvet Cupcakes can be simple and fun if you follow these steps:
1. Preheat your oven: Set your oven to 350°F (175°C) and line a muffin tin with cupcake liners.
2. Combine Dry Ingredients: In a large bowl, sift together the flour, sugar, baking soda, salt, cocoa powder, and set aside.
3. Mix Wet Ingredients: In another bowl, whisk together the vegetable oil, buttermilk, eggs, red food coloring, vanilla extract, and vinegar until smooth.
4. Combine Mixtures: Gradually add the wet mixture to the dry ingredients, stirring gently until just combined. Do not overmix.
5. Fill the Cups: Pour the cupcake batter evenly into the prepared muffin tin, filling each liner about two-thirds full.
6. Bake: Place in the preheated oven and bake for 18-20 minutes, or until a toothpick inserted in the center comes out clean.
7. Cool: Once baked, remove the cupcakes from the oven and allow them to cool in the tin for about 5 minutes. Then transfer them to a wire rack to cool completely.
8. Frost: Once the cupcakes are cool, generously pipe cream cheese frosting on top of each cupcake.
How to Serve
To make your Red Velvet Cupcakes truly shine when served, consider the following tips:
1. Presentation: Arrange the cupcakes on an elegant cake stand or a decorative platter to showcase their beautiful colors.
2. Garnishing: Adding sprinkles or a dusting of cocoa powder can increase visual appeal and give your cupcakes a polished finish.
3. Serving Temperature: Serve the cupcakes at room temperature to ensure the frosting maintains its delightful consistency.
4. Accompaniments: Pair your cupcakes with coffee, hot chocolate, or a glass of cold milk to enhance the serving experience.
5. Portion Control: Offer smaller portions to encourage guests to indulge in seconds without guilt.
With these serving tips, your Red Velvet Cupcakes will surely create a lasting impression at any gathering! Enjoy baking and savoring these delicious treats with family and friends.
Additional Tips
– Use Quality Cocoa Powder: Selecting high-quality cocoa powder can greatly enhance the rich flavor of your cupcakes.
– Room Temperature Ingredients: Ensure that your eggs and buttermilk are at room temperature. This helps them combine more easily and affects the final texture.
– Don’t Overmix: When combining the wet and dry ingredients, mix just until combined. Overmixing can lead to dense cupcakes.
– Test for Doneness: Use a toothpick or cake tester; when it comes out clean or with a few crumbs, your cupcakes are ready.
– Experiment with Sprinkles: For festive occasions, try adding colored sprinkles on top of your cream cheese frosting for extra flair.
Recipe Variation
Get creative with these Red Velvet Cupcake variations:
1. Red Velvet with Chocolate Chips: Add a half cup of semisweet chocolate chips to the batter for an additional burst of chocolatey goodness.
2. Mini Cupcakes: Reduce the baking time to about 12-15 minutes to create bite-sized mini versions that are perfect for parties.
3. Different Frosting Flavors: Instead of standard cream cheese frosting, consider using vanilla buttercream or a chocolate ganache for a twist on taste.
4. Gluten-Free Option: Use a gluten-free flour blend to make these cupcakes suitable for gluten-sensitive friends and family.
Freezing and Storage
– Storage: Keep your Red Velvet Cupcakes in an airtight container at room temperature for 3-4 days.
– Refrigeration: If topped with cream cheese frosting, store them in the fridge to prevent spoilage, but allow them to come to room temperature before serving.
– Freezing: Allow the cupcakes to cool completely before wrapping them in plastic wrap and aluminum foil. They can be frozen for up to 3 months. Thaw them in the fridge overnight before serving.
Special Equipment
To create the perfect Red Velvet Cupcakes, consider using the following tools:
– Muffin tin: Ensure it has 12 cups for standard-sized cupcakes, or use a mini muffin tin for smaller treats.
– Cupcake liners: Choose colorful or themed liners to add a personal touch to your cupcakes.
– Mixing bowls: Use separate bowls for dry and wet ingredients to streamline the mixing process.
– Electric mixer: A stand or hand mixer will make creaming ingredients easier and fluffier.
– Piping bags and tips: For a beautiful and professional frosting application, invest in piping bags and different tips for creative designs.
Frequently Asked Questions
How can I make my cupcakes more moist?
Using buttermilk is key, as it contributes to the moisture and tender texture. Make sure you also don’t overbake them.
Can I use regular milk instead of buttermilk?
Yes, you can. Simply add one tablespoon of vinegar or lemon juice to a cup of milk, let it sit for a few minutes, and use it as a substitute for buttermilk.
What’s the best way to frost my cupcakes?
Fill a piping bag with your frosting and use a large round tip for a beautiful swirl. Start from the edges and work your way inward to achieve a nicely shaped frosting peak.
Can I make a cake instead of cupcakes with this recipe?
Absolutely! You can convert it into a cake by pouring the batter into a greased cake pan. Adjust the baking time to around 25-30 minutes, checking for doneness with a toothpick.
How do I keep my frosting from melting?
Frost the cupcakes when they have completely cooled. If your kitchen is warm, consider refrigerating the frosted cupcakes for a short time to set the frosting before serving.
Conclusion
Red Velvet Cupcakes are a delightful dessert that combines rich flavor with stunning presentation. Their unique taste and vibrant color make them ideal for any occasion. By exploring variations and following storage tips, you can enjoy these cupcakes for days. Don’t hesitate to experiment and create your own spin on this classic recipe. With every bite, you’ll understand why these cupcakes are an enduring favorite!
Red Velvet Cupcakes: The Amazing Ultimate Recipe to Try
- Total Time: 26 minute
Ingredients
– 2 ½ cups all-purpose flour
– 1 ½ cups granulated sugar
– 1 teaspoon baking soda
– 1 teaspoon salt
– 1 teaspoon cocoa powder
– 1 ½ cups vegetable oil
– 1 cup buttermilk, room temperature
– 2 large eggs, room temperature
– 2 tablespoons red food coloring
– 1 teaspoon vanilla extract
– 1 teaspoon white vinegar
– Cream cheese frosting (recipe follows)
Instructions
Creating delightful Red Velvet Cupcakes can be simple and fun if you follow these steps:
1. Preheat your oven: Set your oven to 350°F (175°C) and line a muffin tin with cupcake liners.
2. Combine Dry Ingredients: In a large bowl, sift together the flour, sugar, baking soda, salt, cocoa powder, and set aside.
3. Mix Wet Ingredients: In another bowl, whisk together the vegetable oil, buttermilk, eggs, red food coloring, vanilla extract, and vinegar until smooth.
4. Combine Mixtures: Gradually add the wet mixture to the dry ingredients, stirring gently until just combined. Do not overmix.
5. Fill the Cups: Pour the cupcake batter evenly into the prepared muffin tin, filling each liner about two-thirds full.
6. Bake: Place in the preheated oven and bake for 18-20 minutes, or until a toothpick inserted in the center comes out clean.
7. Cool: Once baked, remove the cupcakes from the oven and allow them to cool in the tin for about 5 minutes. Then transfer them to a wire rack to cool completely.
8. Frost: Once the cupcakes are cool, generously pipe cream cheese frosting on top of each cupcake.
- Prep Time: 15 minutes
- Cook Time: 18-20 minutes
Nutrition
- Serving Size: 12 cupcakes
- Calories: 350 kcal
- Fat: 16g
- Protein: 4g