

There is something magical about the combination of creamy cheesecake, tender spiced apples, and a crisp oat topping. It brings together the best of two classic desserts—apple crisp and New York-style cheesecake—into one rich and indulgent treat. Whether you’re a seasoned baker or a beginner in the kitchen, this recipe is simple to follow and guarantees a dessert that impresses every time.
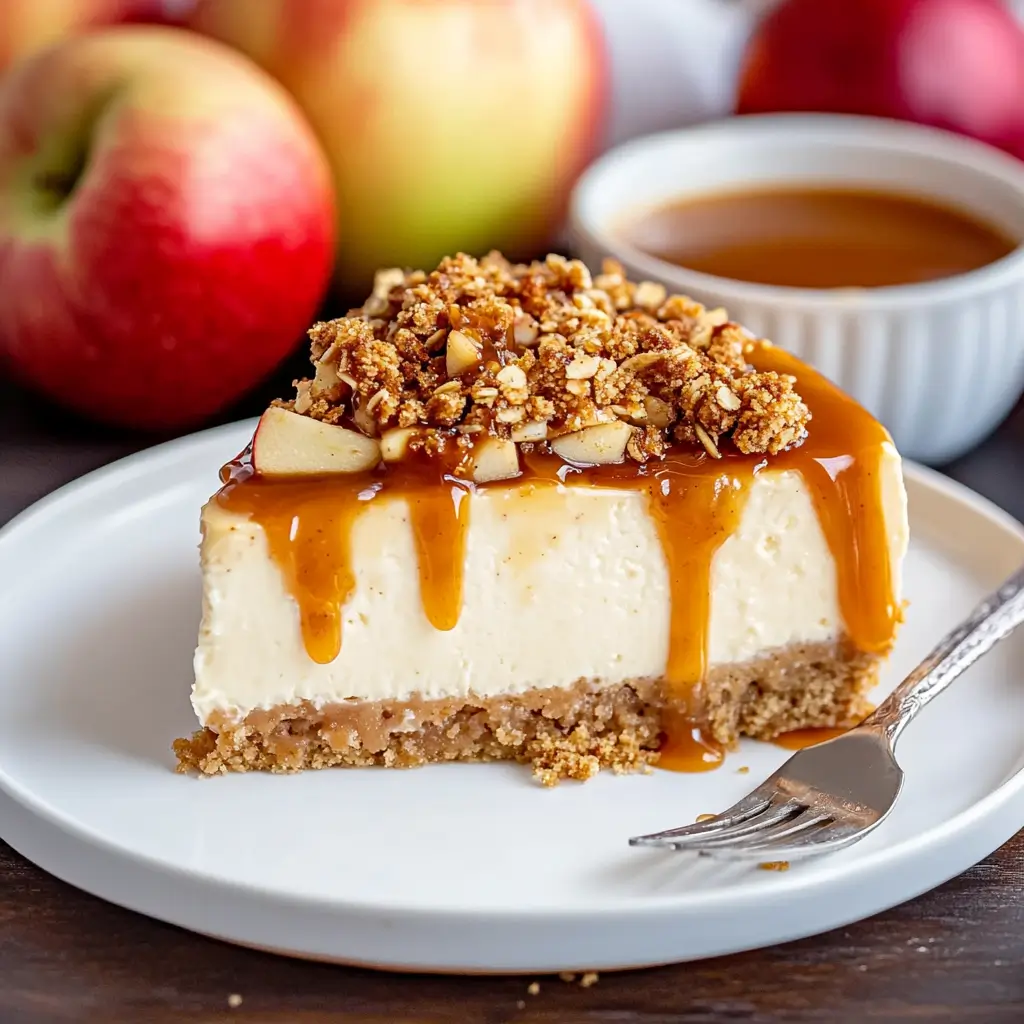
Apple Crisp Cheesecake is the perfect fall dessert, capturing the warm, comforting flavors of cinnamon-spiced apples and the smooth richness of cheesecake. The balance of textures makes it irresistible. The crisp oat topping provides a satisfying crunch, the apples add a juicy sweetness, and the cheesecake itself is luxuriously creamy. And, of course, it all rests on a buttery graham cracker crust that holds everything together beautifully.
The first time I made this dessert was for a family gathering in autumn. I wanted to create something unique but still comforting and familiar. Traditional apple pie felt too predictable, and classic cheesecake—while delicious—was missing the warmth of fall spices. Combining the two into one dessert turned out to be the best decision. Everyone loved it, and it quickly became a seasonal favorite in our home.
This cheesecake is not only delicious but also a showstopper at any gathering. The layers create a visually stunning dessert, and the flavors blend harmoniously. Whether you serve it at Thanksgiving, a holiday party, or just as a special weekend treat, it’s bound to become a recipe you return to again and again.
Why You’ll Love This Recipe
This Apple Crisp Cheesecake is an absolute must-try, and here’s why:
- Perfect Flavor Combination – It merges two beloved desserts into one, giving you the best of both worlds. The spiced apples and crisp topping balance the rich cheesecake beautifully.
- Texture Heaven – The crunchy oat topping contrasts with the silky-smooth cheesecake filling and the soft, cinnamon-infused apples, creating a dessert with a perfect mouthfeel.
- Ideal for Fall & Holidays – With warm cinnamon, nutmeg, and baked apples, this cheesecake screams autumn and makes an excellent centerpiece for Thanksgiving or any holiday dinner.
- Make-Ahead Friendly – Cheesecake always tastes better the next day, making it a stress-free dessert when entertaining guests. You can prepare it in advance and let it chill overnight.
- Versatile & Customizable – You can tweak this recipe to fit your preferences. Prefer a gluten-free version? Swap out the flour and use gluten-free oats. Want a caramel twist? Drizzle it with salted caramel before serving.
- No-Fail Recipe – With detailed instructions, this recipe is beginner-friendly. It walks you through the process, ensuring a creamy, crack-free cheesecake with a crisp topping every time.
- Great for Any Occasion – Whether you’re celebrating a birthday, hosting a dinner party, or just want to treat yourself, this cheesecake is the perfect dessert for any event.
Health Benefits
While Apple Crisp Cheesecake is undoubtedly a treat, it still offers some nutritional benefits thanks to its wholesome ingredients.
- Apples: A Great Source of Fiber and Antioxidants – Apples are loaded with dietary fiber, particularly when you leave the skin on. They also contain antioxidants like quercetin, which can help reduce inflammation and support heart health.
- Oats: Heart-Healthy and Nutrient-Rich – The crisp topping contains oats, which provide a good source of fiber and essential nutrients like iron and magnesium. Oats help lower cholesterol levels and promote digestive health.
- Cinnamon: A Powerful Anti-Inflammatory Spice – Cinnamon does more than add warmth and spice to this recipe. It’s packed with antioxidants and has anti-inflammatory properties that support overall wellness.
- Protein from Cream Cheese and Eggs – The cheesecake filling contains cream cheese and eggs, both of which are excellent sources of protein, essential for muscle repair and overall energy levels.
- Balanced Sweetness – While this dessert does contain sugar, the natural sweetness from the apples allows for slightly less added sugar compared to other cheesecake recipes. You can also substitute coconut sugar or honey if you prefer a more natural sweetener.
Preparation Time, Servings, and Nutritional Information
- Preparation Time: 30 minutes
- Baking Time: 1 hour
- Chilling Time: At least 6 hours (preferably overnight)
- Total Time: 7 hours, 30 minutes (including chilling)
- Servings: 12 slices
Nutritional Information Per Serving:
- Calories: 420
- Carbohydrates: 50g
- Protein: 8g
- Fat: 22g
- Fiber: 3g
- Sugar: 32g
Ingredients List
The Graham Cracker Crust:
- 1 ½ cups graham cracker crumbs
- ¼ cup brown sugar
- 1 teaspoon cinnamon
- 6 tablespoons melted butter
The Cheesecake Filling:
- 24 oz (3 blocks) full-fat cream cheese, softened
- 1 cup granulated sugar
- 2 teaspoons vanilla extract
- 1 teaspoon cinnamon
- 1 tablespoon cornstarch (or flour)
- ½ cup sour cream
- 3 large eggs
The Cinnamon Apple Layer:
- 2 medium Granny Smith apples, thinly sliced
- ¼ cup brown sugar
- 1 teaspoon cinnamon
- ½ teaspoon nutmeg
- 1 teaspoon lemon juice
The Crisp Topping:
- ½ cup all-purpose flour
- ½ cup rolled oats
- ¼ cup brown sugar
- 1 teaspoon cinnamon
- 5 tablespoons melted butter
Optional Toppings:
- Salted caramel sauce
- Whipped cream
- Extra cinnamon for garnish
Step-By-Step Cooking Instructions
Prepare the Crust
- Preheat the oven to 325°F (163°C). Grease a 9-inch springform pan and line the bottom with parchment paper.
- In a medium bowl, mix graham cracker crumbs, brown sugar, and cinnamon. Stir in the melted butter until the mixture resembles wet sand.
- Press the mixture firmly into the bottom of the prepared pan. Use the back of a spoon or a flat-bottomed cup to ensure an even layer.
- Bake the crust for 10 minutes, then set it aside to cool.
Make the Cheesecake Filling
- In a large bowl, beat the cream cheese until smooth. Add sugar, cinnamon, and cornstarch, and mix until fully combined.
- Stir in the vanilla extract and sour cream, mixing until smooth.
- Add the eggs one at a time, beating just until incorporated. Do not overmix, as it can create air bubbles and cracks in the cheesecake.
Step 3: Prepare the Apple Layer
- In a separate bowl, toss the thinly sliced apples with brown sugar, cinnamon, nutmeg, and lemon juice. Let them sit for 5-10 minutes to release some juices.
Make the Crisp Topping
- In a bowl, combine flour, oats, brown sugar, and cinnamon. Pour in melted butter and mix until crumbs form.
Assemble the Cheesecake
- Pour the cheesecake batter over the cooled crust, spreading it evenly.
- Arrange the cinnamon apples on top in an even layer.
- Sprinkle the crisp topping over the apples.
Bake the Cheesecake
- Wrap the springform pan in foil and place it in a larger roasting pan. Pour hot water into the roasting pan to create a water bath.
- Bake for 55-65 minutes, until the edges are set but the center is slightly jiggly.
- Turn off the oven and leave the cheesecake inside with the door cracked for 1 hour.
Chill & Serve
- Refrigerate the cheesecake for at least 6 hours (preferably overnight).
- Slice and serve with caramel sauce or whipped cream.
How to Serve
Apple Crisp Cheesecake is a stunning dessert that deserves to be served in the best way possible. The combination of textures and flavors is already fantastic, but a few thoughtful serving touches can elevate the experience even more. Here are some ways to serve this indulgent treat:
- Chilled and Fresh from the Fridge – Cheesecake is best enjoyed when it’s properly chilled. Make sure to let it rest in the refrigerator for at least six hours, but overnight is ideal for the best texture and flavor. Before serving, let it sit at room temperature for about 10-15 minutes for easier slicing.
- With a Drizzle of Salted Caramel Sauce – There’s nothing quite like the rich, buttery taste of caramel melting into the crisp oat topping and creamy cheesecake. Drizzle some warm salted caramel over each slice just before serving.
- Topped with Whipped Cream – A dollop of fresh whipped cream adds lightness to each bite, balancing out the dense texture of the cheesecake. You can also sprinkle a bit of cinnamon on top for extra flavor.
- With a Dusting of Powdered Sugar or Cinnamon – A light sprinkle of powdered sugar or cinnamon makes for a beautiful presentation and adds a hint of extra sweetness.
- Served with Vanilla Ice Cream – The contrast between the cold, creamy ice cream and the rich cheesecake is simply delightful. Vanilla bean ice cream pairs perfectly with the spiced apples and oat topping.
- Plated with Fresh Apple Slices – If you want to enhance the apple flavor, serve a few fresh apple slices on the side. This adds a refreshing crunch and a natural sweetness that complements the dessert.
- Garnished with Chopped Pecans or Walnuts – For those who love a nutty crunch, adding some finely chopped pecans or walnuts on top of the crisp layer can add an extra depth of flavor.
Pairing Suggestions
A dessert as rich and flavorful as Apple Crisp Cheesecake pairs well with a variety of beverages and complementary side dishes. Whether you’re serving it after dinner or as an afternoon treat, here are some excellent pairings to consider:
Best Drinks to Pair With Apple Crisp Cheesecake
- Hot Coffee or Espresso – The slight bitterness of coffee balances the sweetness of the cheesecake, making it a perfect pairing. A cappuccino, latte, or even a strong black coffee works well.
- Chai Tea or Spiced Black Tea – The warm spices in chai tea complement the cinnamon and nutmeg in the cheesecake beautifully. You can also try a spiced black tea with honey for a cozy pairing.
- Apple Cider (Hot or Cold) – For a true fall-themed dessert experience, pair your cheesecake with fresh apple cider. The tartness of the cider enhances the apple flavors in the dessert.
- Milk or Almond Milk – A simple glass of milk—whether dairy or non-dairy—helps cleanse the palate and balance the richness of the cheesecake.
- Sparkling Water with Lemon – If you prefer a lighter drink, sparkling water with a splash of lemon adds a refreshing contrast to the creamy cheesecake.
Best Side Dishes to Serve Alongside
- Fruit Salad with Berries and Citrus – A light fruit salad with strawberries, blueberries, and orange slices can add a refreshing contrast to the heaviness of the cheesecake.
- Cinnamon Roasted Nuts – Serve a small bowl of roasted almonds, pecans, or walnuts with cinnamon and honey for an extra crunch.
- Shortbread or Butter Cookies – A plate of buttery shortbread cookies makes for a simple yet delicious side to accompany your cheesecake.
- Maple-Glazed Roasted Pears – If you want to serve something truly special, try roasting some pear slices with maple syrup and cinnamon to create a warm and flavorful side dish.
Storage, Freezing & Reheating Instructions
Since Apple Crisp Cheesecake is a layered dessert with both a creamy and crunchy texture, proper storage is essential to maintain its quality. Here’s how to store and reheat it properly:
Storing in the Refrigerator
- Store the cheesecake in an airtight container or cover it tightly with plastic wrap to prevent it from absorbing fridge odors.
- It will stay fresh for up to 4 days in the refrigerator.
- To maintain the crisp texture of the oat topping, store leftovers in a way that minimizes moisture exposure. If possible, place a paper towel inside the container to absorb excess moisture.
Freezing Instructions
If you want to freeze Apple Crisp Cheesecake, follow these steps:
- Allow the cheesecake to cool completely after baking. Then, chill it in the refrigerator for at least 6 hours.
- Once fully chilled, wrap the entire cheesecake (or individual slices) tightly in plastic wrap and then in aluminum foil.
- Place it in a freezer-safe container or a heavy-duty freezer bag.
- It can be stored in the freezer for up to 3 months.
How to Thaw and Serve After Freezing
- To thaw, transfer the cheesecake to the refrigerator and let it defrost slowly overnight.
- Avoid microwaving or leaving it at room temperature for too long, as this can cause the texture to become too soft.
- If the oat topping has softened, you can re-crisp it by placing a slice under the broiler for a minute or two before serving.
Reheating for a Warm Dessert Experience
While cheesecake is usually served chilled, you can slightly warm up individual slices if you prefer:
- Preheat your oven to 300°F (150°C) and warm a slice on a baking sheet for about 5 minutes.
- This method softens the apples and makes the crisp topping slightly crunchy again.
- Avoid using the microwave, as it can make the cheesecake too soft and alter its texture.
Frequently Asked Questions (FAQs)
Can I make this recipe gluten-free?
Yes! Use gluten-free graham crackers for the crust and swap the flour in the crisp topping with almond flour or a gluten-free blend.
Can I use different apples?
Absolutely! Granny Smith is preferred for its tartness, but Honeycrisp, Fuji, or Gala work well too.
How do I prevent cracks in my cheesecake?
Use a water bath, don’t overmix the batter, and let the cheesecake cool gradually in the oven after baking.
Conclusion & Call to Action
Apple Crisp Cheesecake is a delightful fusion of two beloved desserts, offering the best of both worlds. It’s creamy, crunchy, and full of warm spiced apple flavor, making it the ultimate fall treat. If you try this recipe, let me know how it turned out! Share your creations, leave a comment, or tag me on social media. Happy baking!
Print
Apple Crisp Cheesecake
- Total Time: 7 hours 30 minutes (including chilling)
- Yield: 12 slices
- Diet: Vegetarian
Description
Apple Crisp Cheesecake blends the rich creaminess of classic cheesecake with the comforting flavors of apple crisp. Featuring a buttery graham cracker crust, a smooth vanilla cheesecake filling, cinnamon-spiced apples, and a crunchy oat topping, this dessert is perfect for fall gatherings, holidays, or any special occasion.
Ingredients
- Graham Cracker Crust: Graham cracker crumbs, brown sugar, cinnamon, melted butter.
- Cheesecake Filling: Cream cheese, granulated sugar, vanilla extract, cinnamon, cornstarch, sour cream, eggs.
- Cinnamon Apple Layer: Granny Smith apples, brown sugar, cinnamon, nutmeg, lemon juice.
- Crisp Topping: Flour, oats, brown sugar, cinnamon, melted butter.
- Optional Toppings: Salted caramel sauce, whipped cream, powdered sugar.
Instructions
- Prepare the Crust: Mix graham cracker crumbs, brown sugar, cinnamon, and melted butter. Press into a springform pan and bake at 325°F (163°C) for 10 minutes.
- Make the Cheesecake Filling: Beat cream cheese, sugar, vanilla, cinnamon, cornstarch, and sour cream. Add eggs one at a time, mixing gently.
- Prepare the Apple Layer: Toss apple slices with brown sugar, cinnamon, nutmeg, and lemon juice. Let sit for 10 minutes.
- Make the Crisp Topping: Mix flour, oats, brown sugar, and cinnamon. Stir in melted butter until crumbly.
- Assemble the Cheesecake: Pour cheesecake filling over the crust. Add the apple layer, then sprinkle the crisp topping over it.
- Bake: Use a water bath and bake at 325°F for 55-65 minutes. Let cool in the oven for 1 hour, then chill for at least 6 hours.
- Serve: Garnish with caramel sauce, whipped cream, or extra cinnamon before serving.
Notes
- For best results, chill overnight before serving.
- To prevent cracks, do not overmix the batter and use a water bath.
- Store in the refrigerator for up to 4 days or freeze for up to 3 months.
- Prep Time: 30 minutes
- Cook Time: 1 hour
- Category: Dessert
- Method: Baking
- Cuisine: American