

There’s something about caramel and apples that just screams fall. Whether it’s a classic caramel apple on a stick or a warm slice of apple pie, the combination of sweet, gooey caramel and tart, spiced apples is simply irresistible. These Caramel Apple Dessert Cups bring all those nostalgic flavors together in a no-bake, individual-sized treat that is perfect for entertaining, meal prep, or just satisfying your sweet tooth.
These dessert cups are incredibly easy to make, requiring only a handful of simple ingredients. They start with a buttery vanilla wafer crust, followed by a layer of creamy salted caramel mousse, topped with cinnamon-spiced apples, and finished with a drizzle of rich caramel sauce. The best part? They come together quickly and don’t require an oven, making them a fantastic last-minute dessert option.
I first made these for a family gathering, and they were a total hit. Everyone loved that they were served in individual portions, making them easy to grab and enjoy without the mess of slicing and plating. Plus, they’re easy to store and transport, so they’ve become my go-to dessert for parties and potlucks.
Whether you’re looking for a crowd-pleasing treat for fall or just want to indulge in a comforting dessert, these Caramel Apple Dessert Cups will not disappoint. Let’s dive into why you’ll absolutely love this recipe!
Why You’ll Love This Recipe
These dessert cups are more than just a pretty treat—they are packed with flavor and texture that will have you coming back for more. Here’s why they deserve a spot on your dessert menu:
- No-Bake & Easy to Make – You don’t need to turn on the oven or spend hours in the kitchen. The simple layering method makes this recipe foolproof, even for beginner bakers.
- Perfect for Fall – Apples, cinnamon, and caramel make these cups the ultimate autumn dessert. They taste just like caramel apple pie but with a creamy twist.
- Individual Servings – These are great for parties and gatherings because they’re already portioned out. No slicing, no mess—just grab and enjoy.
- Make-Ahead Friendly – You can prepare them in advance, store them in the fridge, and serve them when needed. This makes them perfect for holiday meal prep.
- Rich and Creamy – The salted caramel mousse is light and fluffy, balancing perfectly with the tender apples and crunchy crust. Every bite has the perfect mix of creamy, crunchy, and sweet flavors.
- Customizable – You can easily swap ingredients based on your preferences. Use graham crackers instead of vanilla wafers, adjust the caramel sweetness, or even add nuts for an extra crunch.
Now that you’re convinced these dessert cups are a must-try, let’s talk about the health benefits of the ingredients!
Health Benefits
While this is undeniably a decadent dessert, it does contain some ingredients that offer nutritional benefits. Let’s break it down:
Apples: A Nutritious Star
Apples are the main ingredient in this dessert, and they come packed with fiber, vitamins, and antioxidants. Here’s why they’re good for you:
- Rich in fiber – Apples help support digestion and keep you full longer.
- Packed with Vitamin C – This vitamin boosts the immune system and promotes healthy skin.
- Full of antioxidants – Apples contain plant compounds that help fight inflammation and protect cells from damage.
Cinnamon: A Warm Spice with Benefits
Cinnamon doesn’t just add warm, cozy flavors—it also has several health benefits:
- Helps regulate blood sugar by improving insulin sensitivity.
- Contains antioxidants that reduce inflammation in the body.
- Has antibacterial properties, which can help boost overall health.
Dairy: A Source of Calcium & Protein
The salted caramel mousse is made with milk and heavy cream, which provide:
- Calcium for strong bones
- Protein to support muscle growth and repair
While this dessert is indulgent, it still includes ingredients that offer nutritional value. Now, let’s go over the preparation time, servings, and nutritional details.
Preparation Time, Servings, and Nutritional Information
Before diving into the ingredient list, let’s go over how long this dessert takes to prepare and how many servings it yields.
- Total Time: 30 minutes
- Prep Time: 20 minutes
- Chilling Time: 10 minutes
- Servings: 12 dessert cups
Estimated Nutrition per Serving
- Calories: 280
- Carbohydrates: 38g
- Sugar: 25g
- Protein: 3g
- Fat: 14g
These values will vary slightly based on the specific ingredients you use. Now, let’s get into what you’ll need to make these dessert cups!
Ingredients List
To make these Caramel Apple Dessert Cups, you’ll need the following ingredients:
The Cinnamon Apples:
- 3 large apples, peeled, cored, and diced
- 3 tablespoons brown sugar
- 1 teaspoon ground cinnamon
- ½ teaspoon vanilla extract
The Vanilla Wafer Crust:
- 2 cups crushed vanilla wafer cookies
- 4 tablespoons melted butter
The Salted Caramel Mousse:
- 1 package instant vanilla pudding mix (3.4 oz)
- 1 cup cold milk
- ½ cup salted caramel sauce (store-bought or homemade)
- 1 cup heavy whipping cream
The Topping:
- ¼ cup additional salted caramel sauce (for drizzling)
Now that you have all your ingredients, let’s move on to the step-by-step instructions!
Step-By-Step Cooking Instructions
Cook the Cinnamon Apples
- In a medium saucepan, combine diced apples, brown sugar, and cinnamon over medium heat.
- Stir frequently and cook until the apples become soft and slightly caramelized, about 5-7 minutes.
- Remove from heat and stir in vanilla extract. Let the apples cool while you prepare the crust.
Make the Vanilla Wafer Crust
- Place vanilla wafers in a food processor and pulse until finely crushed. If you don’t have a food processor, place the cookies in a zip-top bag and crush them with a rolling pin.
- In a bowl, mix the cookie crumbs with melted butter until the mixture resembles wet sand.
- Spoon about 1½ tablespoons of the crust mixture into each dessert cup, pressing it down gently with the back of a spoon.
Make the Salted Caramel Mousse
- In a large bowl, whisk together instant vanilla pudding mix and cold milk until smooth.
- Let the pudding mixture set for about 5 minutes in the fridge.
- Stir in salted caramel sauce until fully incorporated.
- Using an electric hand mixer, beat heavy whipping cream until soft peaks form.
- Gently fold the whipped cream into the pudding mixture until light and fluffy.
Assemble the Dessert Cups
- Pipe or spoon the salted caramel mousse over the crust in each cup.
- Spoon the cooled cinnamon apples on top of the mousse.
- Drizzle with extra salted caramel sauce for an extra indulgent finish.
- Cover and chill for at least 10 minutes before serving.

How to Serve
These dessert cups are best served chilled. Here are a few serving ideas:
- Garnish with whipped cream and a sprinkle of cinnamon.
- Add chopped pecans or walnuts for a crunchy texture.
- Serve alongside hot apple cider or a warm chai latte for the perfect fall treat.
Pairing Suggestions
These dessert cups pair beautifully with:
- A cup of spiced tea or coffee
- A scoop of vanilla bean ice cream
- A side of cinnamon sugar-dusted pastries
Storage, Freezing & Reheating Instructions
- Store in the refrigerator for up to 3 days in an airtight container.
- To freeze, wrap tightly and store for up to 1 month.
Creative Variations to Try
One of the best things about these Caramel Apple Dessert Cups is how easy they are to customize. Whether you want to experiment with different flavors, textures, or dietary adaptations, there are plenty of fun ways to switch things up.
For a chocolate twist, swap the vanilla wafers for crushed chocolate cookies and add a drizzle of melted dark chocolate on top. If you prefer a nutty crunch, sprinkle chopped pecans, walnuts, or almonds between the layers. A spiced version can include a dash of nutmeg and cloves in the apples for a deeper, warming flavor.
For a healthier take, try using Greek yogurt in place of heavy cream to make the mousse lighter while still maintaining creaminess. You can also substitute coconut sugar for brown sugar and use whole-grain graham crackers for the crust. Those who follow a gluten-free diet can use gluten-free cookies or a crushed oat-based crust.
To make this dessert even more special, experiment with different apple varieties. Granny Smith apples provide a tart contrast to the sweet caramel, while Honeycrisp apples offer extra juiciness. Mixing multiple types of apples can give the filling a more complex flavor.
No matter which variation you try, these dessert cups remain easy, fun, and delicious, making them the perfect sweet treat for any occasion.
How to Make These Dessert Cups for a Crowd
If you’re hosting a large gathering, these Caramel Apple Dessert Cups are a fantastic option. Their individual serving sizes make them easy to grab, and you can prepare them in advance to save time on the day of your event.
For a party-friendly approach, consider making mini versions using shot glasses or small plastic cups. This allows guests to enjoy a bite-sized dessert without feeling too full. If you want to serve a larger group without assembling multiple individual cups, layer everything in a trifle dish or a large baking pan, then scoop portions into bowls when serving.
Presentation is key when serving these at an event. Garnish each cup with whipped cream, extra caramel drizzle, and a cinnamon stick for a more elegant look. Placing the cups on a decorative serving tray will make them even more inviting.
If you’re transporting these dessert cups, make sure they are well-chilled before you leave, and store them in a cooler with ice packs to keep them fresh. Use cups with lids to avoid spills and make handling easier. These small touches can make all the difference in ensuring your dessert is beautifully presented and deliciously fresh for your guests.
Turning This Into a Warm Dessert
Even though these Caramel Apple Dessert Cups are traditionally served chilled, you can easily turn them into a warm, comforting treat with a few simple modifications.
To warm them up, prepare the layers as usual but skip the chilling step. Just before serving, gently warm the cinnamon apples in a saucepan or microwave until heated through. If you prefer a warmer mousse, let it sit at room temperature instead of chilling it in the fridge.
For an extra indulgent experience, serve these dessert cups with a warm caramel drizzle or a side of hot vanilla custard. You can also bake the crust for a few minutes before assembling the cups, which will give it a golden, toasty flavor that pairs perfectly with the warm filling.
These small adjustments make the dessert even more cozy and comforting, perfect for cold autumn nights when you’re craving something sweet and warming. Whether you serve them warm or chilled, these dessert cups are guaranteed to be a crowd-pleaser.
Why This Dessert Is Perfect Year-Round
Although these Caramel Apple Dessert Cups are especially popular in the fall, they can be enjoyed any time of year with just a few simple tweaks.
In the winter months, add a pinch of ginger and cloves to the apples for a spiced holiday twist. Serving these alongside hot chocolate or peppermint lattes makes them an ideal Christmas dessert. In spring, swap the apples for fresh strawberries or peaches, and replace the caramel drizzle with honey or berry compote.
For summer, consider making a lighter version by using a Greek yogurt mousse instead of caramel mousse and topping the dessert with chilled apple slices instead of cooked apples. These adjustments make the dessert refreshing, perfect for warm-weather gatherings and picnics.
Since this dessert is no-bake and easy to prepare, it’s great for any season and occasion. Whether you’re celebrating fall flavors or looking for a sweet treat in the summer, these Caramel Apple Dessert Cups always deliver a satisfying and delicious experience.
Frequently Asked Questions (FAQs)
Can I make these dessert cups ahead of time?
Yes! You can prepare them 1-2 days in advance and store them in the refrigerator. Just add the caramel drizzle right before serving for the best presentation.
What apples work best for this recipe?
Granny Smith apples are great for a tart contrast, while Honeycrisp and Fuji apples add natural sweetness. A mix of both works well too!
Can I freeze these dessert cups?
It’s not recommended to freeze them because the texture of the mousse and apples may change when thawed. They’re best enjoyed fresh.
How can I make this dessert gluten-free?
Simply use gluten-free cookies or graham crackers for the crust to make this recipe gluten-free. Everything else is naturally gluten-free.
What can I use instead of vanilla wafers?
You can use graham crackers, digestive biscuits, shortbread cookies, or even crushed pretzels for a salty-sweet contrast.
Can I make these dairy-free?
Yes! Use dairy-free pudding mix, almond milk, and coconut whipped cream to make a dairy-free version. The caramel sauce should also be dairy-free.
Can I reduce the sugar in this recipe?
Absolutely! Use unsweetened applesauce instead of brown sugar, and opt for a low-sugar caramel sauce to cut back on sweetness.
Conclusion & Call to Action
These Caramel Apple Dessert Cups are a delicious, easy-to-make dessert perfect for any occasion. Try making them today and share your results! Let me know in the comments how they turned out. Enjoy!
Print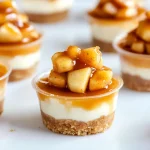
Caramel Apple Dessert Cups
- Total Time: 30 minutes
- Yield: 12 servings 1x
- Diet: Vegetarian
Description
These no-bake Caramel Apple Dessert Cups are the perfect individual fall treat! Layers of vanilla wafer crust, fluffy salted caramel mousse, and cinnamon-spiced apples come together in a quick, easy, and make-ahead dessert that’s great for parties, holidays, or meal prep.
Ingredients
-
For the Cinnamon Apples:
- 3 large apples, peeled, cored, and diced
- 3 tbsp brown sugar
- 1 tsp ground cinnamon
- ½ tsp vanilla extract
-
For the Vanilla Wafer Crust:
- 2 cups crushed vanilla wafers
- 4 tbsp melted butter
-
For the Salted Caramel Mousse:
- 1 package instant vanilla pudding mix (3.4 oz)
- 1 cup cold milk
- ½ cup salted caramel sauce
- 1 cup heavy whipping cream
-
For the Topping:
- ¼ cup salted caramel sauce (for drizzling)
Instructions
- Cook the Cinnamon Apples – In a saucepan over medium heat, cook diced apples with brown sugar and cinnamon until soft. Stir in vanilla extract and let cool.
- Make the Crust – Mix crushed vanilla wafers with melted butter. Press into small cups.
- Prepare the Mousse – Whisk pudding mix and milk, then let set for 5 minutes. Add caramel sauce and mix. Fold in whipped heavy cream until fluffy.
- Assemble – Layer caramel mousse over the crust, followed by cinnamon apples. Drizzle with extra caramel sauce.
Notes
- Use graham crackers instead of vanilla wafers for a different crust.
- Can be made up to 3 days ahead and stored in the fridge.
- Add chopped nuts or whipped cream for extra flavor.
- Prep Time: 20 minutes
- Cook Time: 10 minutes
- Category: Dessert
- Method: No-Bake
- Cuisine: American