

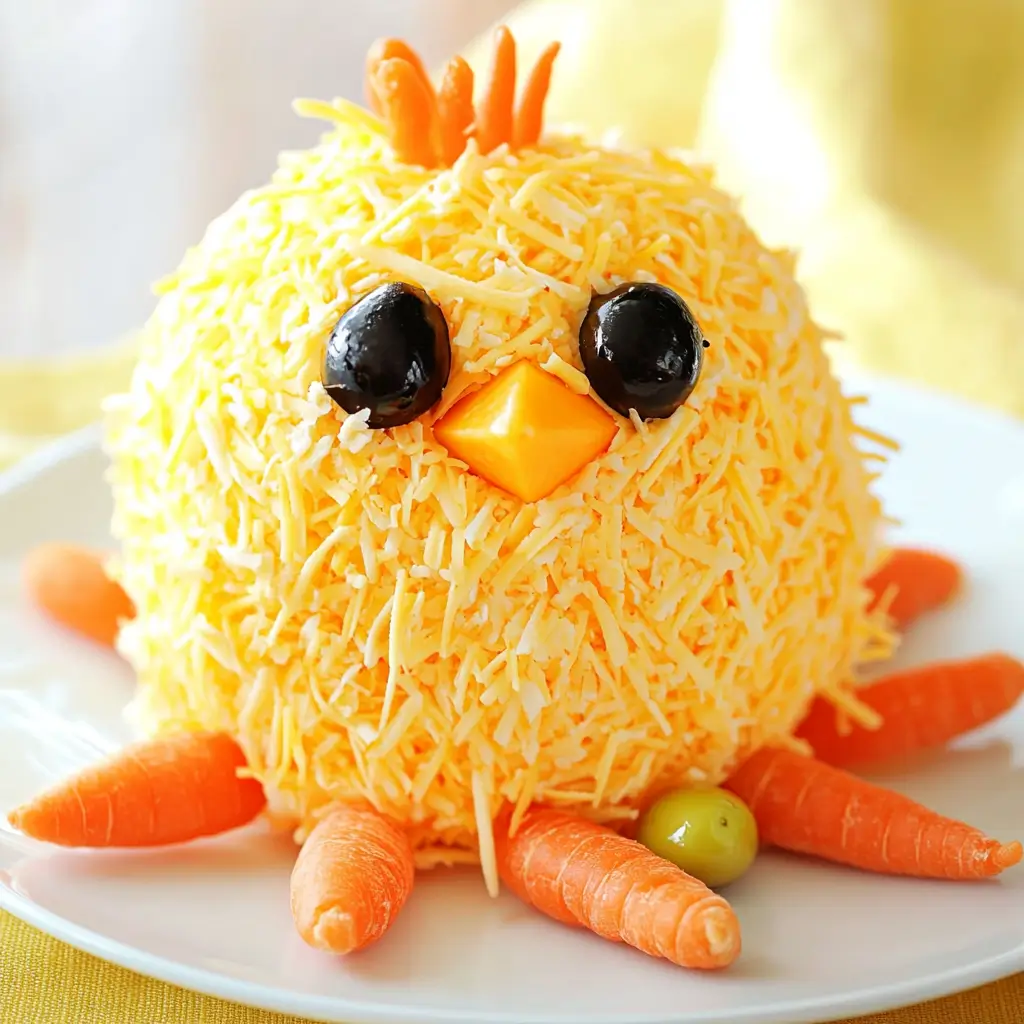
Easter is such a joyful time of year. Everything feels fresh, new, and full of possibilities. And let’s be real, the food is definitely a highlight. Sure, everyone loves the classic glazed ham, roasted chicken, and all those vibrant spring salads. But what if I told you that you can add a playful and delicious appetizer to your holiday table that will steal the show? Enter the Easter Chick Cheese Ball.
This adorable cheese ball shaped like a cheerful little chick is the perfect addition to your Easter spread. It’s made with simple, everyday ingredients, but the result is both charming and ridiculously tasty. And the best part? You only need 7 ingredients and a few minutes of prep time to make this delightful treat.
Whether you’re hosting a big family gathering or just having a cozy Easter brunch at home, this cheese ball is sure to be a hit with everyone, from kids to adults. And if you’re not exactly a kitchen pro, don’t worry—this recipe is practically foolproof. It’s a mix, shape, and decorate kind of deal that leaves plenty of room for creativity.
But this recipe isn’t just about how cute it looks. It’s also super versatile. You can adjust the ingredients to fit your taste, dietary preferences, or even what you have on hand. Vegetarian? Skip the beef deli meat. Want more flavor? Add a touch of roasted red bell pepper. This recipe is all about making it your own while keeping things easy and delicious.
Why You’ll Love This Recipe
There are so many reasons to fall in love with this Easter Chick Cheese Ball recipe. It’s not just adorable; it’s practical, customizable, and sure to be a crowd-pleaser. Here’s why:
- Incredibly Easy to Make
You don’t have to be a master chef to pull this off. Mixing the ingredients, shaping the cheese ball, and decorating it all take less time than you’d think. Even if you’re a total beginner in the kitchen, this recipe is straightforward and forgiving. - Perfect for Any Occasion
Yes, it’s ideal for Easter, but it’s also a fun dish to make for springtime gatherings, potlucks, baby showers, or even birthday parties. And if you’re not into the chick theme, you can easily shape the cheese ball into something else. - Kid-Friendly and Crowd-Pleasing
Kids absolutely love the playful look of this chick cheese ball, and adults appreciate the creamy, cheesy flavor. It’s something that brings smiles to everyone’s faces before they even take a bite. - Customizable to Your Taste
Prefer a bit of heat? Add some chopped jalapeños. Want a vegetarian version? Leave out the deli meat. Love garlic? Add a clove or two of minced garlic to the mix. The options are endless, and the recipe is incredibly flexible. - Beautiful Presentation
When you place this bright, cheerful cheese ball on your serving platter, surrounded by crackers, veggies, and chips, it’s a guaranteed centerpiece. It adds a touch of fun and creativity to your holiday table without feeling like you’re trying too hard.
Health Benefits
While a cheese ball might not scream “health food,” there are actually some nutritional benefits to be found in this recipe, especially if you make a few smart choices. Here’s what you can feel good about:
- High-Quality Protein
Cheese, especially cream cheese and shredded cheddar, provides a decent amount of protein. Protein is essential for muscle growth, tissue repair, and overall body function. Each serving of this cheese ball offers a small protein boost that adds to your daily intake. - Rich in Calcium
Dairy products are known for their high calcium content, which is crucial for strong bones and teeth. A cheese ball like this one offers a delicious way to get some of your daily calcium requirements. - Good Fats for Satiety
The fats in cream cheese and cheddar cheese are satisfying, helping you feel fuller for longer. This can be beneficial when you’re trying to avoid overindulging in less nutritious snacks throughout the day. - Customizable for Health Needs
You can easily adjust this recipe to fit various dietary needs. For a lighter version, you can use reduced-fat cream cheese and cheddar cheese. You can also make it gluten-free by serving it with gluten-free crackers or fresh veggies. - Nutrient Boost from Veggies
The onions and optional roasted red bell peppers add vitamins, minerals, and antioxidants to the dish. You can also serve the cheese ball with fresh veggies to increase your nutrient intake.
Preparation Time, Servings, and Nutritional Information
Before you get started, let’s break down the essentials:
Total Time: 20 minutes
Servings: 8 to 10 (depending on serving size)
Calories per Serving: Approximately 220 kcal
Protein: 8 grams
Carbohydrates: 4 grams
Fats: 18 grams
For a lighter version, you can use reduced-fat cream cheese and cheddar cheese, which will lower the calories and fat content per serving. Additionally, if you choose to serve it with veggies instead of crackers or chips, you’ll be cutting down on carbs while adding valuable nutrients.
Ingredients List
Here’s everything you’ll need to bring this adorable cheese ball to life:
- Cream Cheese (8-ounce package, softened): The base of your cheese ball, providing a creamy and smooth texture.
- Shredded Cheddar Cheese (1 cup): Adds sharpness and richness to the overall flavor, while also giving the cheese ball its cheerful yellow color.
- Finely Chopped Onion (¾ cup): Brings a subtle crunch and a hint of savory flavor to balance the creaminess.
- Chopped Green Onion (½ cup): Adds freshness and a touch of mild onion flavor that brightens the dish.
- Thinly Sliced Beef Deli Meat (2–4 ounces, chopped – optional): Adds a salty, savory note that pairs well with the cheeses. Skip if you prefer a vegetarian option.
- Baby Carrots (7 pieces): Used for decoration to form the chick’s beak and feet.
- Black Olive Slices (2 pieces): These serve as the chick’s eyes, giving it that charming and playful appearance.
- Crackers, Pita Chips, or Veggies: For serving alongside the cheese ball.
Step-By-Step Cooking Instructions
Now that you have everything ready, let’s get to the fun part—putting this Easter Chick Cheese Ball together. You’ll be done before you know it!
Prepare the Cheese Ball Mixture
- In a large mixing bowl, combine the softened cream cheese, shredded cheddar cheese, finely chopped onion, green onion, and chopped beef deli meat (if using).
- Mix well until all ingredients are thoroughly combined. You can use a spoon, but a hand mixer makes it easier to achieve a smooth, well-blended texture.
- Taste the mixture and adjust seasoning if needed. Some people like to add a pinch of salt or garlic powder for extra flavor, but it’s totally optional.
Shape the Cheese Ball
- Scoop the cheese mixture out of the bowl and form it into a ball with your hands. Don’t worry if it’s not perfectly round—just do your best.
- Roll the ball in additional shredded cheddar cheese until it’s completely coated. Press gently to help the cheese stick well. This step not only enhances the look but also adds an extra layer of cheesy goodness.
Chill the Cheese Ball (Optional but Recommended)
- Place the cheese ball on a plate and refrigerate for about 30 minutes. This helps it firm up and makes it easier to decorate.
Decorate the Cheese Ball
- Place the chilled cheese ball on your serving platter.
- Use the baby carrots to create the chick’s feet and beak:
- Place three baby carrots under the front left and three under the front right to resemble feet.
- Insert one baby carrot near the top middle for the chick’s beak.
- Add the black olive slices above the carrot beak to form eyes. Gently press them into the cheese ball to secure them.
- Adjust the cheese coating if needed to make sure everything sticks well and looks smooth.
Serve and Enjoy
- Surround the cheese ball with your choice of crackers, pita chips, or fresh veggies.
- Serve immediately, or cover and refrigerate until ready to serve.
- When ready to dig in, simply scoop a bit with a cracker or veggie and enjoy!
And that’s it! Your adorable Easter Chick Cheese Ball is ready to impress your guests.
How to Serve
This cheese ball is versatile and pairs well with various sides and accompaniments. Here are some serving ideas:
- Classic Crackers: Go for buttery crackers, whole-grain crackers, or even flavored ones for a little extra zing.
- Pita Chips: Their crunchiness adds a great texture contrast to the creamy cheese ball.
- Veggies: Serve with sliced bell peppers, celery sticks, cucumber rounds, or baby carrots for a lighter, healthier option.
- Fresh Bread Slices: If you’re feeling fancy, toasted baguette slices make a great dipping vessel.
- Spring-Themed Platters: Arrange the cheese ball on a bed of fresh herbs like parsley or dill for a lovely presentation.
Pairing Suggestions
Want to make this cheese ball the star of a festive spread? Here are some great pairing ideas to complete your menu:
- Fresh Salads: A crisp, refreshing salad with a tangy vinaigrette balances the creamy richness of the cheese ball.
- Fruit Platters: Fresh fruits like grapes, strawberries, and apple slices provide a delightful contrast of sweetness.
- Savory Finger Foods: Pair with mini quiches, stuffed mushrooms, or chicken skewers for a hearty appetizer table.
- Non-Alcoholic Drinks: Lemonade, iced tea, or sparkling water with lemon slices work wonderfully.
Storage, Freezing & Reheating Instructions
The Easter Chick Cheese Ball is best enjoyed fresh, but you can definitely make it ahead of time if needed. Here’s how:
Storage:
- Place the cheese ball in an airtight container or wrap it tightly with plastic wrap.
- Store in the refrigerator for up to 3 days.
- If you’ve already decorated it, try to keep the decorations intact while storing, or simply add them right before serving.
Freezing:
- You can freeze the cheese ball before decorating.
- Wrap it tightly in plastic wrap and then place it in a freezer-safe bag or container.
- Freeze for up to 1 month. Thaw in the refrigerator overnight before decorating and serving.
Reheating:
- No need to reheat, but if you want the cheese ball to be softer for serving, let it sit at room temperature for about 20 minutes before serving.
These simple storage tips make it easy to prepare the cheese ball ahead of time and enjoy it whenever you’re ready.
Common Mistakes to Avoid
Even a simple recipe like this can go wrong if you’re not careful. Here are some common mistakes to avoid:
- Not Softening the Cream Cheese: If your cream cheese is too cold, it won’t mix well with the other ingredients. Let it sit at room temperature for at least 30 minutes before using.
- Overmixing the Ingredients: Mix until just combined. Overmixing can make the cheese ball too dense.
- Skipping the Chilling Step: While optional, chilling helps the cheese ball firm up and hold its shape better when decorating.
- Using Watery Ingredients: If you add veggies like bell peppers, make sure to pat them dry first to avoid excess moisture.
Pro Tips
Want to make sure your Easter Chick Cheese Ball turns out perfectly? Try these tips:
- Add Extra Flavor: For a little kick, mix in chopped jalapeños or roasted red bell peppers.
- Use Fresh Herbs: Adding fresh parsley or dill to the cheese mixture gives it a wonderful freshness.
- Play with Shapes: Not feeling the chick theme? Shape your cheese ball into a bunny, egg, or even a cute little sheep!
- Use Quality Cheese: Opt for high-quality cheddar cheese for the best flavor. Sharp cheddar works particularly well.
Frequently Asked Questions (FAQs)
Can I make this cheese ball in advance?
Yes! You can prepare the cheese mixture up to 2 days in advance. Just shape and decorate it right before serving for the best appearance.
What if I want a vegetarian version?
Simply skip the beef deli meat. The cheese ball will still be delicious and creamy without it.
Can I add other ingredients to the mix?
Absolutely. Chopped bell peppers, jalapeños, garlic, or even bacon bits can be great additions.
Can I use low-fat cream cheese and cheddar?
Yes, you can, but keep in mind the texture may be slightly less creamy.
How long can it sit out during serving?
Ideally, no longer than two hours at room temperature.
Conclusion & Call to Action
This Easter Chick Cheese Ball is more than just a cute centerpiece. It’s a delicious, creamy appetizer that brings joy to everyone around the table. It’s easy, fun to make, and the perfect addition to your Easter celebration or any spring gathering.
Why not give this recipe a try? And when you do, don’t forget to snap a photo and share it. I can’t wait to see how adorable your Easter Chick Cheese Ball turns out. Happy cooking and even happier eating!
Print
Easter Chick Cheese Ball
- Total Time: 20 minutes
- Yield: 8–10 servings
Description
This Easter Chick Cheese Ball is a delightful and creamy appetizer perfect for your holiday table. Made with just 7 ingredients, it’s incredibly easy to make and customize. Its charming chick design makes it a festive centerpiece for any spring celebration.
Ingredients
-
Cream Cheese (8-ounce package, softened)
-
Shredded Cheddar Cheese (1 cup)
-
Finely Chopped Onion (¾ cup)
-
Chopped Green Onion (½ cup)
-
Thinly Sliced Beef Deli Meat (2–4 ounces, chopped – optional)
-
Baby Carrots (7 pieces, for decoration)
-
Black Olive Slices (2 pieces, for eyes)
-
Crackers, Pita Chips, or Veggies (for serving)
Instructions
-
In a large mixing bowl, combine cream cheese, shredded cheddar cheese, onions, green onions, and beef deli meat (if using). Mix thoroughly.
-
Shape the cheese mixture into a ball. Roll the ball in additional shredded cheddar cheese to coat evenly.
-
Place the cheese ball on a serving platter.
-
Decorate with baby carrots (for the beak and feet) and black olive slices (for eyes).
-
Serve with crackers, pita chips, or fresh veggies.
Notes
- For a vegetarian version, skip the beef deli meat.
- Chill the cheese ball for 30 minutes before decorating for better shape retention.
- Add garlic powder, roasted red bell pepper, or jalapeños for extra flavor.
- Prep Time: 20 minutes
- Cook Time: 0 minutes (No cooking required)
- Category: Appetizer
- Method: No-Cook
- Cuisine: American