
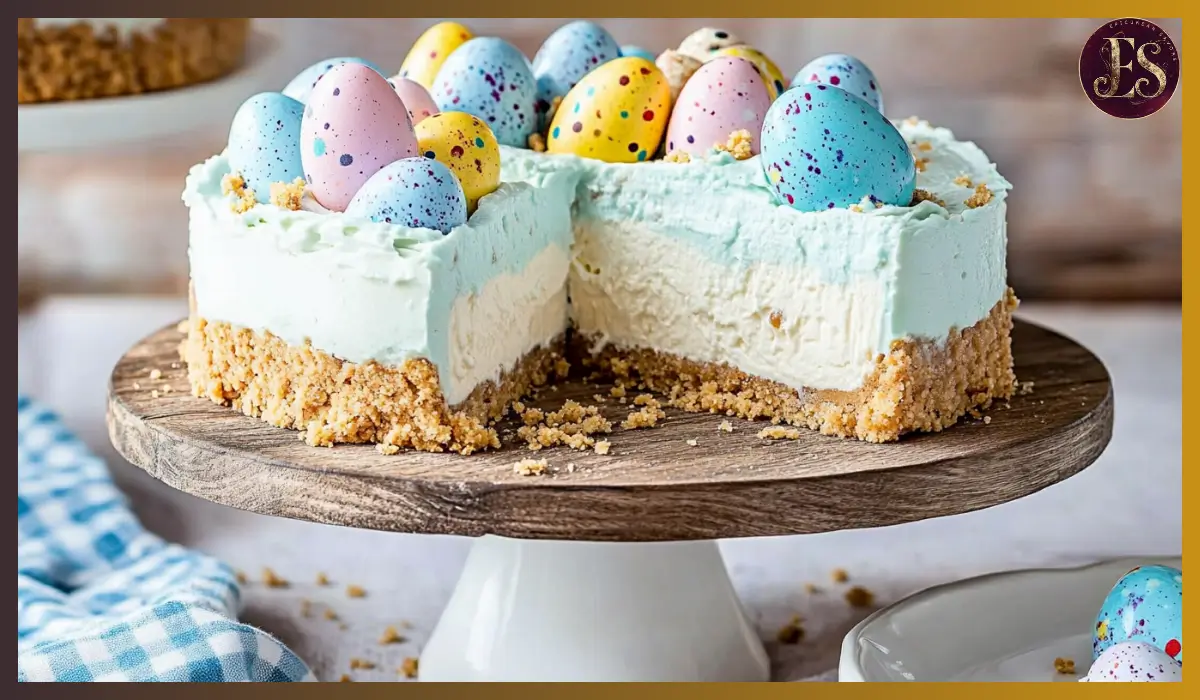
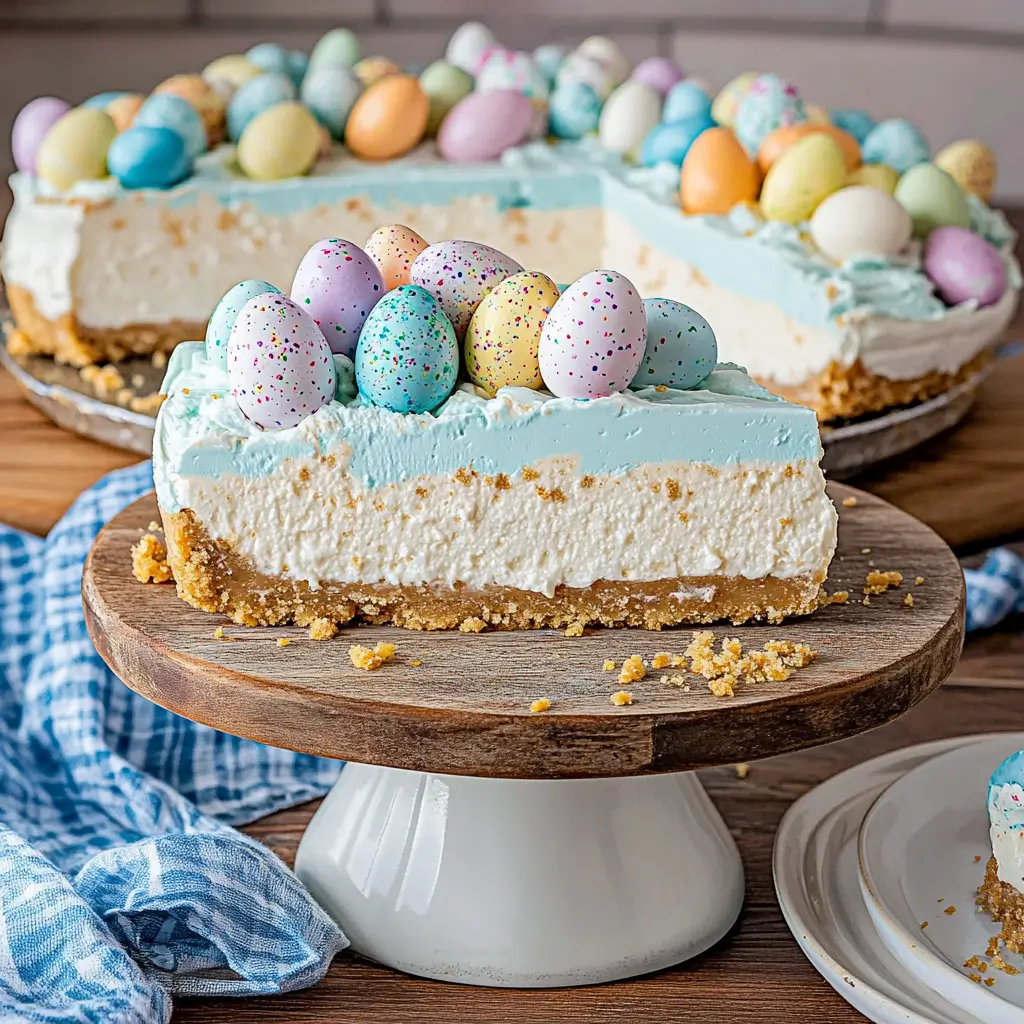
There’s something truly magical about the vibrant, cheerful desserts that hit the table during springtime. And when it comes to Easter treats, this Easter Egg Cheesecake takes the crown. It’s creamy, colorful, and wonderfully easy to make. You don’t even have to turn on your oven! This no-bake cheesecake is not only stunning with its bright blue layer and speckled effect but also irresistibly delicious.
Imagine serving a slice of this creamy cheesecake with its buttery graham cracker crust, topped with playful Robin’s Egg Malt Balls. It’s the kind of dessert that makes everyone at the table smile. Plus, it’s perfect for making ahead of time, so you can focus on enjoying the day with family and friends.
I first made this cheesecake for a spring brunch, and let me tell you, it was the star of the show. Everyone raved about how creamy it was, and the kids loved the speckled “egg” design. It’s quickly become a must-have for our Easter gatherings. And the best part? It’s a no-bake dessert that even beginner bakers can master with ease.
Whether you’re planning a big Easter feast or just want to whip up something fun and festive, this Easter Egg Cheesecake will deliver. Get ready to wow your guests with this gorgeous, foolproof treat!
Why You’ll Love This Recipe
There are so many reasons to fall in love with this Easter Egg Cheesecake recipe, but let’s break down the best parts:
- No-Bake Simplicity: Forget about turning on the oven. This recipe comes together with just a mixer, a bowl, and a bit of patience while it chills.
- Stunning Presentation: The speckled blue layer, creamy white base, and scattered Robin’s Eggs make this dessert as beautiful as it is tasty. It’s a showstopper at any Easter gathering.
- Creamy Dreamy Texture: The cheesecake filling is rich, smooth, and perfectly fluffy thanks to the combination of cream cheese, sweetened condensed milk, and Cool Whip.
- Customizable: Want to change the color or make a different theme? Swap the food coloring or decorations to suit any occasion.
- Perfect Make-Ahead Dessert: Since it needs to chill for at least 4-6 hours (preferably overnight), you can easily prepare it a day in advance, saving you precious time on the big day.
- Kid-Friendly: The decorating process is a blast for kids. They’ll love crushing the Robin’s Eggs and helping you create the speckled effect.
This dessert checks all the boxes: easy, beautiful, delicious, and fun to make. It’s the kind of recipe that’ll have everyone asking for seconds.
Health Benefits
While this Easter Egg Cheesecake isn’t exactly health food, it does have some redeeming qualities that make it worth indulging in on special occasions.
- Source of Protein: The cream cheese and Cool Whip used in the filling both provide some protein, which helps make the dessert feel satisfying and filling.
- Calcium Boost: Cream cheese and sweetened condensed milk contain calcium, which is essential for strong bones and teeth.
- Mood-Boosting Qualities: Let’s be honest—desserts like this bring joy. The experience of making and sharing a beautiful, festive cheesecake can boost your mood and create happy memories.
- Customizable Options: You can make slight adjustments to improve the nutritional profile. For example, using a reduced-fat cream cheese or sugar-free Cool Whip can lower the calorie count.
- Portion Control: Because the cheesecake is rich and satisfying, you’re likely to feel content with a smaller slice.
Of course, this cheesecake is best enjoyed as a treat, but knowing it has some positive attributes makes it even more enjoyable!
Preparation Time, Servings, and Nutritional Information
- Total Time: 20 minutes (plus 4-6 hours of chilling time)
- Servings: 12 slices
- Calories per Serving: Approximately 420 calories
- Nutritional Information (per serving):
- Protein: 7g
- Carbs: 37g
- Fat: 28g
- Sugars: 28g
- Calcium: 12% of the daily recommended value
This cheesecake is rich, creamy, and best served chilled. The nutritional content may vary depending on the specific brands and products you use.
Ingredients List
For the Crust:
- ⅓ cup salted butter (melted) – Helps bind the crust and adds richness.
- ¼ cup granulated sugar – Adds a touch of sweetness to the crust.
- 1 ½ cups graham cracker crumbs – Provides the classic buttery base we all love.
For the Filling:
- 3 packages cream cheese (8 ounces each, softened) – The backbone of any good cheesecake. Make sure it’s fully softened for a smooth texture.
- 1 can sweetened condensed milk (14 ounces) – Adds incredible sweetness and creaminess.
- 1 teaspoon vanilla extract – Enhances flavor and adds depth.
- 1 tablespoon lemon juice (freshly squeezed) – A hint of acidity to balance the sweetness and enhance the creaminess.
- 12 ounces Cool Whip (thawed) – Adds lightness and volume to the filling.
- 2-3 drops gel blue food coloring – Creates the beautiful robin’s egg effect.
- 1 ½ cups Robin’s Egg Malt Balls – The perfect festive topping that adds crunch and sweetness.
- 1 teaspoon unsweetened cocoa powder – Used for creating the speckled look on the cheesecake’s surface.
This ingredient list is straightforward and features pantry-friendly items that are easy to find. Now, let’s move on to the fun part—making this gorgeous dessert!
Step-By-Step Cooking Instructions
- Prepare the Crust:
- Line the bottom of a 9-inch springform pan with parchment paper.
- In a medium-sized bowl, combine the melted butter, graham cracker crumbs, and granulated sugar. Stir until the mixture resembles wet sand.
- Press the crumb mixture firmly into the prepared pan, spreading it evenly across the bottom. You can use the bottom of a glass or a measuring cup to flatten it smoothly.
- Place the crust in the refrigerator while you prepare the filling.
- Prepare the Filling:
- In a large mixing bowl, beat the softened cream cheese, sweetened condensed milk, vanilla extract, and freshly squeezed lemon juice. Use an electric mixer on medium speed for about 3-4 minutes until the mixture is completely smooth and creamy.
- Gently fold in the Cool Whip using a spatula. Be careful not to overmix, as you want to keep the filling light and airy.
- Remove the crust from the fridge and pour half of the cheesecake filling onto the crust. Spread it evenly with a spatula.
- Make the Blue Layer:
- Add 2-3 drops of blue gel food coloring to the remaining cheesecake filling. Stir well until the color is evenly distributed.
- Carefully spread the blue layer over the white cheesecake layer, smoothing the surface with a spatula.
- Create the Speckled Effect:
- Sprinkle unsweetened cocoa powder over the blue layer using a fork or a small sieve. Lightly tap the fork to create tiny speckles resembling robin’s eggs.
- Decorate:
- Place half of the Robin’s Egg Malt Balls in a plastic bag and crush them into chunky pieces using a mallet or rolling pin.
- Sprinkle the crushed eggs over the cheesecake.
- Arrange whole Robin’s Eggs on top, starting from the center and working outward for a beautiful presentation.
- Chill and Set:
- Refrigerate the cheesecake for at least 4-6 hours, but preferably overnight. This allows the filling to set firmly.
- Serve:
- Carefully remove the cheesecake from the springform pan.
- Slice and serve chilled. Enjoy the creamy, sweet, and festive treat!
How to Serve
Serving this Easter Egg Cheesecake is a breeze, and there are so many delightful ways to enhance the experience:
- Serve chilled on a beautiful cake stand for an elegant presentation.
- Pair with fresh fruits like strawberries or raspberries for a refreshing contrast.
- Drizzle with melted chocolate for extra indulgence.
- Top with whipped cream for a touch of creamy luxury.
This cheesecake makes a perfect centerpiece for your Easter dessert table. It’s a treat that feels both fancy and fun!
Pairing Suggestions
Choosing the right pairings can elevate this dessert even more:
- Beverages: Serve with hot coffee, creamy hot chocolate, or even a refreshing glass of milk.
- Side Dishes: For a lovely dessert spread, pair with fruit salads, lemon bars, or pastel-colored cookies.
- Occasions: While perfect for Easter, this cheesecake also shines at spring-themed birthdays, baby showers, or family gatherings.
The sweet, creamy filling pairs beautifully with rich or refreshing drinks and treats, making it a versatile dessert for any celebration.
Storage, Freezing & Reheating Instructions
To keep your cheesecake fresh and tasty, follow these simple guidelines:
- Refrigeration: Store leftovers in an airtight container in the fridge for up to 5 days.
- Freezing: Wrap the cheesecake tightly in plastic wrap, then aluminum foil. Freeze for up to 3 months.
- Thawing: When ready to serve, thaw in the refrigerator overnight.
- Decorating After Freezing: If freezing before decorating, wait until thawed before adding Robin’s Eggs to avoid color bleeding.
This dessert holds up well in the fridge and freezer, making it an excellent make-ahead option.
Common Mistakes to Avoid
Even the simplest recipes can go wrong if certain steps are missed. Here’s what to avoid:
- Using Cold Cream Cheese: Make sure it’s fully softened to avoid a lumpy filling.
- Overmixing the Filling: Fold in the Cool Whip gently to maintain a light texture.
- Skipping Chill Time: Allowing the cheesecake to chill completely is crucial for proper setting.
- Using Liquid Food Coloring: Gel food coloring works best to achieve a vibrant, speckled look.
- Not Preparing the Pan: Lining the bottom with parchment paper ensures easy removal and clean slices.
By keeping these common pitfalls in mind, you’ll end up with a flawless cheesecake every time.
Pro Tips
Want to take your Easter Egg Cheesecake to the next level? Try these expert tips:
- Use Quality Ingredients: High-quality cream cheese and vanilla extract make a noticeable difference in flavor.
- Create a Marbled Effect: Instead of two solid layers, swirl the white and blue fillings together for a pretty marble design.
- Add a Crunchy Twist: Toast the graham cracker crumbs before pressing them into the pan for a deeper, nuttier flavor.
- Chill Overnight for Best Results: While 4-6 hours is sufficient, letting the cheesecake chill overnight ensures the perfect texture.
- Use a Warm Knife for Slicing: Dip your knife in hot water and wipe it dry before slicing for smooth, clean cuts.
These tips are designed to help you achieve both beauty and flavor with this no-bake dessert.
Frequently Asked Questions (FAQs)
- Can I use homemade whipped cream instead of Cool Whip?
Yes, but make sure to whip it to stiff peaks before folding it into the mixture. - How do I prevent the cheesecake from cracking?
This is a no-bake cheesecake, so cracking isn’t an issue. Just ensure it chills long enough to set properly. - Can I make this recipe ahead of time?
Absolutely! It’s even better when made a day before serving. - What if I don’t have a springform pan?
You can use a regular pie dish, but serving will be more challenging. Use parchment paper for easier removal. - Can I use different colors?
Definitely! Customize the colors to fit any theme or occasion. - Can I use low-fat cream cheese?
Yes, but keep in mind that the texture will be slightly less creamy. - How long can it sit out at room temperature?
Try to keep it chilled as much as possible. It can sit out for about an hour, but it’s best served cold. - Can I freeze individual slices?
Yes, wrap them individually in plastic wrap and foil, then store in an airtight container. - Is it possible to make this gluten-free?
Use gluten-free graham crackers for the crust, and you’re good to go! - What if I accidentally overmix the filling?
The texture may be slightly denser, but it will still taste delicious. Just chill it well before serving.
Conclusion & Call to Action
This Easter Egg Cheesecake is the dessert of your springtime dreams. It’s creamy, colorful, and packed with flavor. Plus, it’s no-bake, which makes it a stress-free choice for anyone hosting Easter celebrations or just looking to brighten up a weekend meal.
The contrast of the smooth, rich filling with the crunchy malt ball topping is nothing short of heavenly. And that speckled blue layer? It’s pure fun! Your guests will be amazed not only by how gorgeous it looks but also by how amazing it tastes.
I can’t wait to see how your Easter Egg Cheesecake turns out! Don’t forget to snap a photo and share it. Whether you’re making it for a family gathering or just to treat yourself, this cheesecake is sure to impress.
Are you ready to make the most festive cheesecake ever? Gather your ingredients and get ready to create something truly special. Happy baking!
Print
Easter Egg Cheesecake
- Total Time: 4-6 hours (includes chilling time)
- Yield: 12 servings 1x
- Diet: Vegetarian
Description
This no-bake Easter Egg Cheesecake is a vibrant and delicious dessert perfect for your holiday table. It features a creamy cheesecake filling, a buttery graham cracker crust, and festive Robin’s Egg Malt Balls for a fun, springtime presentation.
Ingredients
For the Crust:
-
⅓ cup salted butter (melted)
-
¼ cup granulated sugar
-
1 ½ cups graham cracker crumbs
For the Filling:
-
3 packages cream cheese (8 ounces each, softened)
-
1 can sweetened condensed milk (14 ounces)
-
1 teaspoon vanilla extract
-
1 tablespoon lemon juice (freshly squeezed)
-
12 ounces Cool Whip (thawed)
-
2–3 drops gel blue food coloring
-
1 ½ cups Robin’s Egg Malt Balls
-
1 teaspoon unsweetened cocoa powder
Instructions
- Line the bottom of a 9-inch springform pan with parchment paper.
- Mix butter, graham cracker crumbs, and sugar; press into the pan. Chill.
- Beat cream cheese, condensed milk, vanilla, and lemon juice until smooth.
- Fold in Cool Whip and pour half over the crust.
- Add blue food coloring to the remaining filling and spread over the white layer.
- Sprinkle cocoa powder to create speckles.
- Crush some Robin’s Eggs and sprinkle over the top. Arrange whole eggs decoratively.
- Chill for 4-6 hours or overnight.
- Slice and serve chilled.
Notes
- To create the best texture, make sure the cream cheese is fully softened before mixing.
- Allowing the cheesecake to chill overnight ensures it sets properly.
- Prep Time: 20 minutes
- Cook Time: None (No-Bake)
- Category: Dessert
- Method: No-Bake
- Cuisine: American