
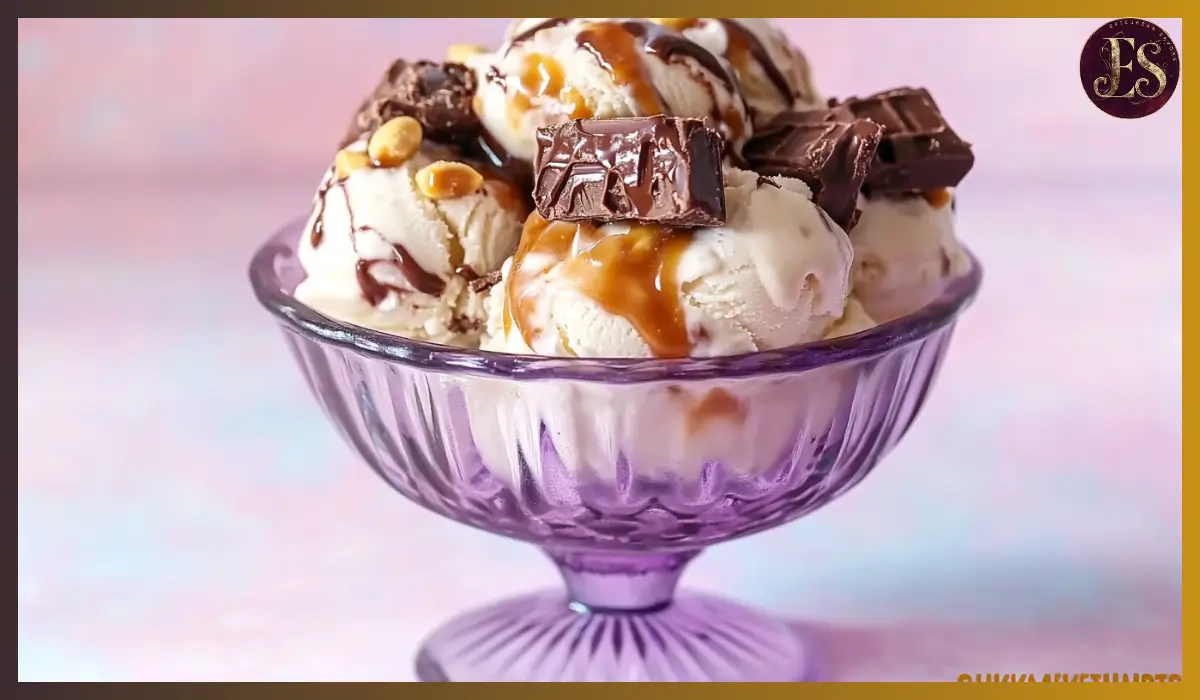
There’s something undeniably magical about the first bite of ice cream on a warm afternoon, and when that ice cream happens to taste like a Snickers bar—well, that’s a whole new level of joy. This homemade Snickers ice cream from Sugar, Spice and Glitter is the perfect no-churn treat that’s rich, creamy, and ridiculously easy to make. It takes everything you love about a Snickers—chocolate, caramel, nougat, peanuts—and folds it into a velvety frozen dessert you can whip up in your own kitchen without an ice cream maker.
What makes this Homemade Snickers Ice Cream recipe a standout is how accessible and fuss-free it is. If you’ve got heavy cream, sweetened condensed milk, and a couple of candy bars on hand, you’re more than halfway there. With no eggs to temper or ice cream machines to drag out, this is a fantastic option for beginners and seasoned home cooks alike. And best of all, it’s totally customizable.
This recipe became a fast favorite in my house after a spontaneous summer night experiment. One minute we were rummaging through the pantry, the next we were swirling caramel into creamy clouds of whipped sweet milk. The first batch was devoured before it even had time to fully set, and now it’s become a go-to dessert for celebrations, cookouts, or just a Friday night Netflix binge.
Whether you’re trying to cool down on a hot day or you’re simply in need of a sweet indulgence, this Snickers ice cream delivers big flavor with minimal effort. It’s like eating your favorite candy bar—only better.
Why You’ll Love This Recipe
There are so many reasons this Homemade Snickers Ice Cream will become a regular in your dessert rotation. Let’s break it down:
Easy to Make: No fancy appliances needed. If you can whip cream and stir in a few ingredients, you’ve got this. Seriously.
Ridiculously Creamy: The combination of heavy whipping cream and sweetened condensed milk creates a base that’s smooth, rich, and perfectly scoopable straight from the freezer.
Candy Bar Heaven: With actual chunks of Snickers bars inside, every bite gives you a mix of creamy ice cream, gooey caramel, chocolate, and crunchy peanuts. It’s a textural dream.
Make-Ahead Friendly: You can prepare this up to a week in advance, making it ideal for parties or get-togethers.
Customizable: Want more crunch? Add chopped roasted peanuts. Craving extra chocolate? Swirl in fudge sauce. This recipe is easy to tweak to suit your mood.
Kid-Approved and Crowd-Pleaser: This ice cream is one of those recipes that gets people asking, “Wait—you made this?” It tastes gourmet but feels homemade, which is the best kind of compliment.
So if you’re craving something sweet and satisfying, this no-churn Snickers ice cream is a treat that truly checks all the boxes.
Health Benefits
Okay, let’s be real—this is not a low-calorie, kale-packed superfood. But indulgence has its place, and even a dessert like this can fit into a balanced lifestyle when enjoyed in moderation. That said, there are still a few bright spots worth noting:
Homemade Advantage: Making your own ice cream means you know exactly what’s going into it. No mystery additives, stabilizers, or artificial flavors—just real ingredients.
Protein and Healthy Fats: Thanks to the heavy cream and peanuts in the Snickers bars, you’re getting a little protein and some satiating fats, which can help keep those sugar crashes at bay.
Custom Control: Want to lighten things up? You can reduce the amount of candy or use a lighter caramel sauce. Prefer a nut-free version? Leave out the peanuts entirely.
Remember, the best part about homemade desserts is the power to make them your own. And when it comes to enjoying a treat like this, a little balance and a big smile go a long way.
Preparation Time, Servings, and Nutritional Information
Total Time: 10 minutes prep + at least 6 hours freeze time
Servings: Makes 8 servings
Calories per serving: 420
Protein: 5g
Fat: 28g
Carbohydrates: 38g
Sugar: 33g
Ingredients List
Here’s everything you need to make this no-churn Homemade Snickers Ice Cream. Simple, pantry-friendly, and totally indulgent.
- 2 cups heavy whipping cream (35%)
This is the creamy base of your ice cream. Be sure it’s cold for the best whipping results. - 1 can (14 oz) sweetened condensed milk
This adds sweetness and richness while also keeping the texture ultra-smooth. - 1½ teaspoons pure vanilla extract
It boosts all the other flavors and gives that classic ice cream essence. - 1½ cups Snickers bites, chopped
You can also use full-size bars chopped into chunks. These give that signature candy bar flavor and texture. - ¼ cup caramel sauce
Swirled into the ice cream for gooey ribbons of flavor. - ¼ cup chocolate sauce
Adds a rich chocolate note that plays beautifully with the caramel and peanuts. - ¼ cup salted peanuts (optional)
For extra crunch and a little salty balance, especially if you’re skipping the candy bar pieces.
Step-By-Step Cooking Instructions
Here’s exactly how to make this luscious ice cream. You’ll be amazed at how quickly it comes together.
- Whip the Cream
Start by pouring the cold heavy cream into a large mixing bowl. Using a hand mixer or stand mixer with the whisk attachment, beat the cream on high speed until stiff peaks form. This usually takes about 3–4 minutes. Be careful not to overmix—it should look like soft clouds that hold their shape. - Add Condensed Milk and Vanilla
In a separate bowl, whisk together the sweetened condensed milk and vanilla extract until smooth. Then gently fold the condensed milk mixture into the whipped cream using a spatula. Be patient and light-handed here—you want to keep as much air in the mixture as possible. - Stir in the Snickers
Add your chopped Snickers pieces to the base and fold them in evenly. If you want extra crunch, add a small handful of chopped salted peanuts now too. - Swirl in the Sauces
Drizzle the caramel and chocolate sauces over the mixture. Use a butter knife or spoon to gently swirl them through without fully blending. This gives beautiful streaks of sauce in every scoop. - Freeze the Ice Cream
Pour the ice cream mixture into a loaf pan or freezer-safe container. Smooth the top with a spatula, then cover tightly with plastic wrap or a lid. Freeze for at least 6 hours or until firm. - Serve and Enjoy
When ready to serve, let the ice cream sit at room temperature for 5–10 minutes to soften slightly for easy scooping. Scoop into bowls or cones and add your favorite toppings.

How to Serve
There are so many fun and delicious ways to serve this Snickers ice cream. Here are some of our favorites:
- In a cone or waffle bowl for that classic ice cream shop experience
- Topped with extra caramel, chocolate, and chopped Snickers for maximum indulgence
- With a warm brownie or cookie for a dessert that’s next-level amazing
- Scoop it onto banana slices for a playful take on a banana split
- Layer it into a trifle or ice cream cake for special occasions
Pairing Suggestions
If you’re planning to serve this at a gathering or alongside a meal, here are some tasty pairings to consider:
- Drinks: A cold glass of milk, iced coffee, or a rich hot chocolate make great partners for this sweet treat
- Sides: Serve with a fruit salad to balance the richness, or pair it with a light sponge cake
- Kid-Friendly: Add a sprinkle of mini marshmallows or crushed pretzels to appeal to younger eaters
Storage, Freezing & Reheating Instructions
Storage: Keep your ice cream tightly covered in the freezer. It stays fresh and scoopable for up to two weeks, though it rarely lasts that long.
Freezing: Use a loaf pan or any freezer-safe container with a lid. For extra freshness, press a piece of parchment paper directly onto the surface before sealing.
Reheating: Ice cream doesn’t really reheat, but if it’s too firm to scoop, just leave it at room temperature for 5–10 minutes.
Common Mistakes to Avoid
Even a simple recipe like this can go sideways if you’re not careful. Here’s what to watch for:
- Over-whipping the cream: This can turn your base into butter. Stop as soon as stiff peaks form.
- Mixing too vigorously: Folding too roughly will deflate the whipped cream and lead to denser ice cream.
- Using warm ingredients: Start with cold cream and keep everything cool for the best texture.
- Adding too much sauce: Overdoing the caramel or chocolate can make the mixture too runny. Stick to the recommended amounts.
- Not freezing long enough: It needs a full 6 hours (or overnight) to set properly.
Pro Tips
To make your Snickers ice cream truly unforgettable, keep these tips in mind:
- Chill your mixing bowl: This helps the cream whip faster and better.
- Chop the candy small: Big chunks can become hard when frozen.
- Swirl sauces gently: Don’t overmix—you want ribbons, not muddy streaks.
- Use a metal pan: It freezes faster and more evenly than plastic or glass.
- Experiment with mix-ins: Try peanut butter chips, crushed pretzels, or even chocolate-covered almonds.
Frequently Asked Questions (FAQs)
Can I use a different candy bar?
Absolutely. Try Twix, Milky Way, or Kit Kat for a twist on the classic flavor.
Do I need an ice cream maker?
Nope! This is a no-churn recipe, so a hand mixer and a spatula are all you need.
Is there a low-sugar version?
You can use sugar-free condensed milk and low-carb chocolate sauce, but results may vary slightly.
How long does it take to freeze?
About 6 hours, but overnight is best for the perfect scoopable texture.
Can I make it dairy-free?
Yes, you can use coconut cream and a dairy-free condensed milk alternative, though the flavor will be slightly different.
Can I add peanut butter?
Definitely. Swirl in 2–3 tablespoons of creamy peanut butter for extra richness.
Is it safe for kids?
Yes, as long as there are no peanut allergies. You can even use peanut-free chocolate bars if needed.
Can I double the recipe?
Yes, just make sure you have a big enough container and enough freezer space.
How long does it keep in the freezer?
It’s best within 1–2 weeks, though it can technically last longer if stored properly.
Can I use store-brand candy bars?
Of course. Use whatever brand you like—they all melt into creamy goodness.
Conclusion & Call to Action
There’s just something so satisfying about creating a dessert that looks and tastes like it came from an ice cream shop—especially when it only takes 10 minutes of prep. This homemade Snickers ice cream is everything you want in a sweet treat: creamy, rich, full of texture, and bursting with familiar flavors.
If you try this recipe, I’d love to hear how it turned out. Leave a comment with your thoughts or share your version on social media. Don’t forget to tag me—I can’t wait to see your creamy, candy-studded creations. So go ahead, treat yourself to a scoop (or three). You deserve it.
Print
Homemade Snickers Ice Cream
- Total Time: 6 hours 10 minutes (including freeze time)
- Yield: 8 servings 1x
Description
A creamy, no-churn ice cream packed with chunks of Snickers bars, swirls of chocolate and caramel, and the perfect balance of salty and sweet.
Ingredients
-
2 cups heavy whipping cream (35%)
-
1 can (14 oz) sweetened condensed milk
-
1½ tsp vanilla extract
-
1½ cups Snickers bites, chopped
-
¼ cup caramel sauce
-
¼ cup chocolate sauce
-
¼ cup salted peanuts (optional)
Instructions
-
Whip cold heavy cream to stiff peaks.
-
In a separate bowl, mix condensed milk and vanilla.
-
Gently fold milk mixture into whipped cream.
-
Stir in chopped Snickers and optional peanuts.
-
Swirl in caramel and chocolate sauces.
-
Pour into a freezer-safe container.
-
Freeze for at least 6 hours.
-
Scoop and serve.
Notes
- Chill your mixing bowl for better results.
- Let sit 5–10 minutes before scooping.
- Don’t overmix sauces—swirl gently for best texture.
- Prep Time: 10 minutes
- Cook Time: 0 minutes
- Category: Dessert
- Method: No-churn
- Cuisine: American