
There is something magical about a banana split—the combination of sweet bananas, rich chocolate, juicy pineapple, and creamy goodness creates the perfect dessert. Now, imagine all of those flavors in a layered, no-bake dessert that requires minimal effort and delivers maximum satisfaction. This No-Bake Banana Split Dessert is the ultimate sweet treat for warm weather, family gatherings, and any occasion where you want to impress without turning on the oven.
This dessert is easy to prepare with simple ingredients like graham crackers, cream cheese, whipped topping, bananas, and crushed pineapple. Each bite is packed with smooth, creamy textures, the slight crunch of the crust, and the classic flavors of a banana split sundae. It’s a crowd-pleaser that doesn’t require fancy techniques or hours of baking.
One of the best parts about this recipe is its versatility. You can customize the layers, adjust the sweetness, or even add extra toppings to make it your own. Whether you are making it for a birthday, summer BBQ, or just a special treat for the family, this dessert is a guaranteed hit. Plus, the fact that it’s no-bake makes it even better—it’s as easy as mixing, layering, and chilling!
This recipe holds a special place in my heart. I remember my grandmother making a version of this when I was a kid, and it was always the highlight of our summer dinners. The combination of flavors is nostalgic and comforting, yet fresh and exciting every time I make it. If you love creamy, fruity, and slightly crunchy desserts, this No-Bake Banana Split Dessert will become a staple in your home, just like it has in mine.
Why You’ll Love This Recipe
There are plenty of reasons to fall in love with this No-Bake Banana Split Dessert. First, it’s incredibly easy to make. Since it requires no baking, you won’t have to worry about heating up the kitchen, making it perfect for warm summer months. Even beginners can master this recipe with ease.
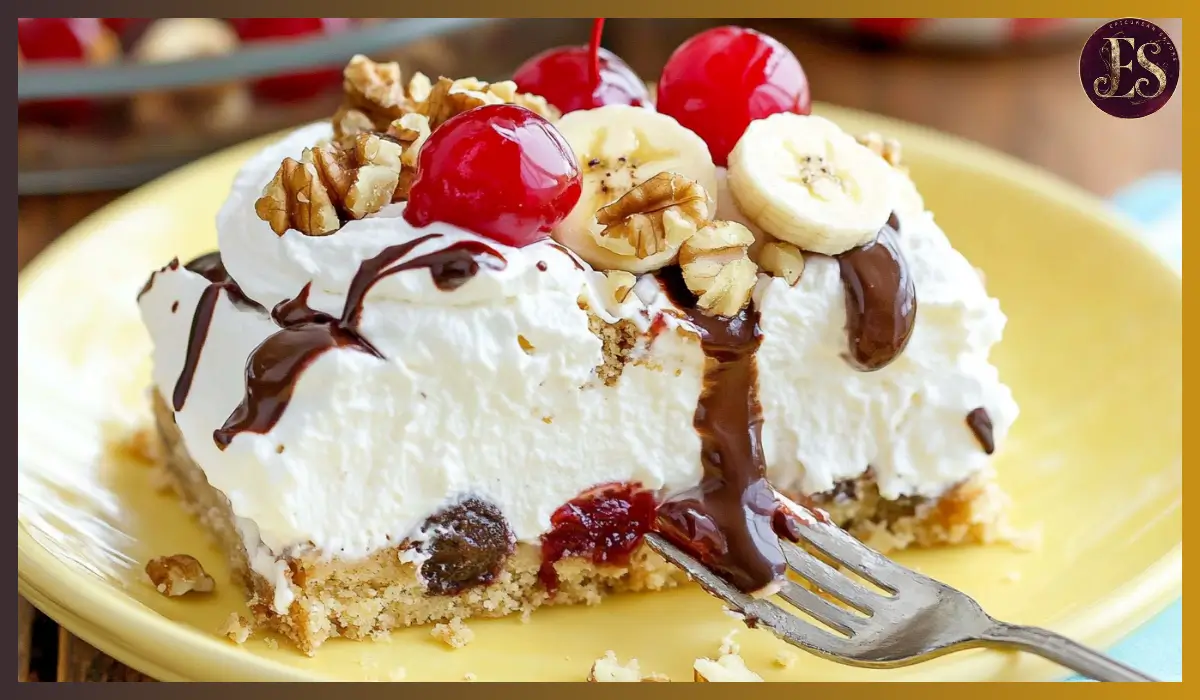
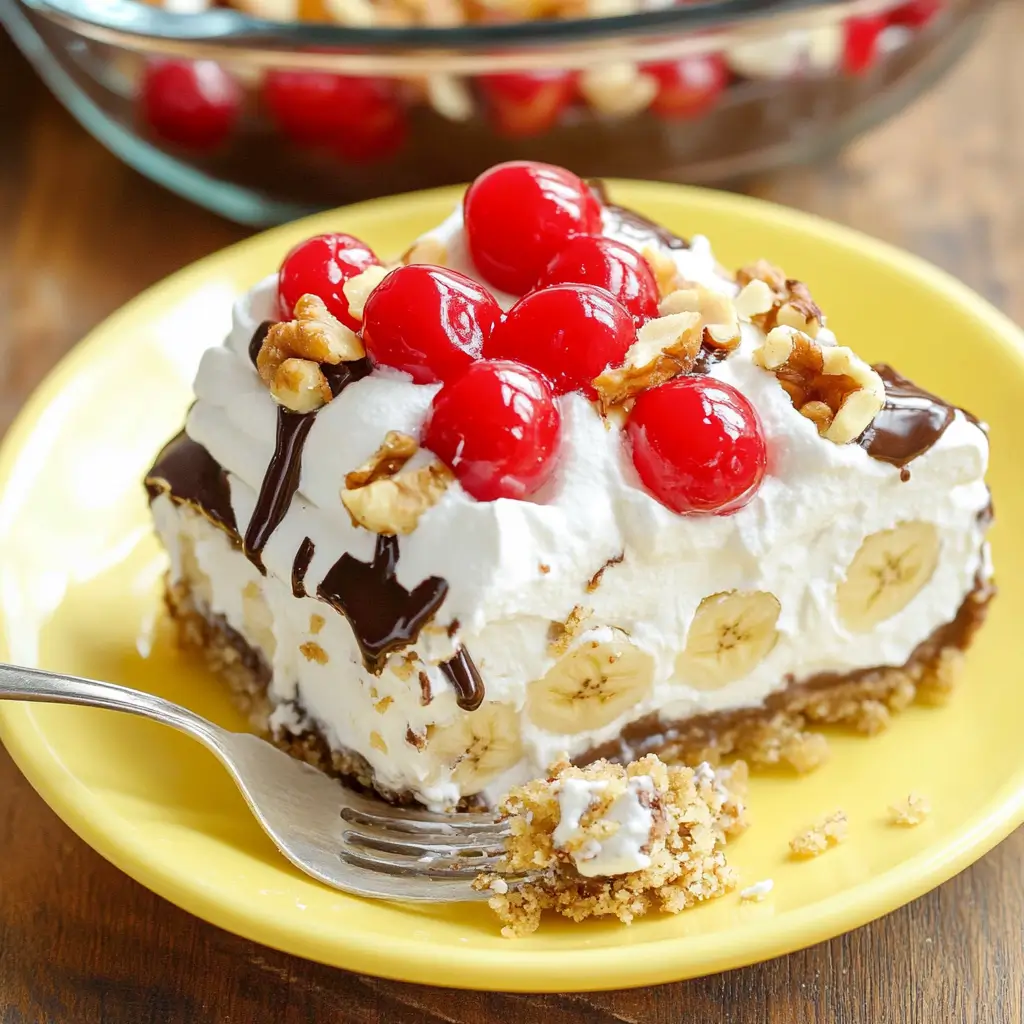
The flavor combination is irresistible. The creamy cheesecake layer balances perfectly with the sweetness of bananas and pineapple, while the buttery graham cracker crust provides just the right amount of texture. The final touch of chocolate syrup, cherries, and walnuts adds a delightful crunch and richness, making each bite even more delicious.
Another great feature of this dessert is that it is perfect for entertaining. Since it needs to chill before serving, you can make it ahead of time, allowing you to focus on enjoying time with friends and family. It’s great for potlucks, picnics, and barbecues—just assemble, refrigerate, and serve when ready.
Lastly, this dessert is light and refreshing despite its creamy layers. It’s not overly heavy, making it a great way to end a meal without feeling weighed down. The balance of fruit and creamy filling makes it satisfying yet not overpowering.
Health Benefits
While this dessert is undoubtedly indulgent, it also has some surprising health benefits. Bananas, one of the main ingredients, are a great source of potassium, fiber, and essential vitamins. They help maintain heart health, aid digestion, and provide a natural energy boost.
Pineapple is another nutritious ingredient in this dessert. It is rich in vitamin C, which supports a strong immune system, and bromelain, an enzyme known for its anti-inflammatory properties and digestive benefits. Pineapple also provides a sweet, tropical flavor without the need for added sugars.
Graham crackers, while often considered a treat, are a source of whole grains and can provide a bit of fiber. If you want a healthier twist, you can opt for whole wheat or reduced-sugar graham crackers to boost the nutritional profile.
Cream cheese and whipped topping bring calcium and protein to the mix. You can opt for light cream cheese and low-fat whipped topping to reduce the calorie count while still enjoying a creamy texture.
Even though this is a dessert, it offers some nutritional value from its fresh ingredients. If you want to make it even healthier, consider using Greek yogurt in place of cream cheese for a protein-packed alternative.
Preparation Time, Servings, and Nutritional Information
Preparation Time:
- Total Time: 4 hours (includes chilling time)
- Active Prep Time: 20 minutes
Servings:
- Yields 10 servings
Nutritional Information (Per Serving):
- Calories: 320
- Carbohydrates: 40g
- Protein: 4g
- Fat: 16g
- Saturated Fat: 9g
- Cholesterol: 30mg
- Fiber: 2g
- Sugar: 25g
Ingredients List
The Graham Cracker Crust:
- 2 cups graham cracker crumbs
- ½ cup unsalted butter, melted
The Creamy Layer:
- 1 (8-ounce) block plain cream cheese, softened
- ½ cup powdered sugar
- 1 teaspoon vanilla extract
- 16 ounces Cool Whip, thawed (or 4 cups homemade whipped cream)
The Fruit Layer:
- 4 bananas, sliced
- 1 (20-ounce) can crushed pineapple, drained
The Toppings (Optional but Recommended):
- Chopped walnuts
- Maraschino cherries
- Chocolate syrup or sprinkles
Step-By-Step Cooking Instructions
Prepare the Graham Cracker Crust
- Spray a 9×13-inch baking dish with non-stick cooking spray.
- In a mixing bowl, combine graham cracker crumbs and melted butter. Stir until the mixture resembles wet sand.
- Press the mixture firmly into the bottom of the baking dish to form a crust.
- Place the dish in the refrigerator while preparing the next layer.
Make the Creamy Layer
- In a large mixing bowl, beat cream cheese with a hand mixer until smooth and fluffy.
- Add powdered sugar and vanilla extract, then continue beating until fully combined.
- Fold in 8 ounces of Cool Whip (or 2 cups of homemade whipped cream) until smooth.
Assemble the Layers
- Spread the cream cheese mixture evenly over the graham cracker crust using a spatula.
- Arrange banana slices in a single layer over the cream cheese mixture, pressing them down slightly.
- Spread the drained crushed pineapple evenly over the bananas.
- Spoon the remaining Cool Whip (or whipped cream) over the fruit layer, spreading it out to fully cover the bananas and pineapple.
Chill & Serve
- Cover the dish with plastic wrap or aluminum foil and refrigerate for at least 4 hours (overnight is best for firm layers).
- Before serving, sprinkle chopped walnuts over the top.
- Drizzle with chocolate syrup and place maraschino cherries on top for a classic banana split look.
- Slice into squares and serve chilled.
How to Serve
This No-Bake Banana Split Dessert is best served cold and fresh. Here are some fun serving ideas:
- Serve as is for a classic dessert experience.
- Add a scoop of vanilla or chocolate ice cream on the side for an extra indulgent treat.
- Serve in individual dessert cups for a beautiful presentation at parties.
- Garnish with fresh strawberries or blueberries for an extra burst of flavor.
Pairing Suggestions
This No-Bake Banana Split Dessert is already a showstopper on its own, but pairing it with the right beverages and complementary dishes can take the experience to the next level. Here are some fantastic pairing ideas to enhance the flavors and make your dessert even more enjoyable.
Beverage Pairings
- Iced Coffee or Cold Brew: The rich, slightly bitter flavor of coffee balances the sweetness of the dessert beautifully. Try a lightly sweetened vanilla or caramel iced coffee for an extra treat.
- Milkshakes: A classic banana, strawberry, or chocolate milkshake complements the banana split flavors perfectly.
- Fruit Smoothies: A berry smoothie with strawberries, blueberries, and raspberries adds a refreshing contrast to the creamy dessert.
- Fresh Lemonade: A tart, homemade lemonade provides a bright, citrusy contrast to the rich, sweet layers of the dessert.
Food Pairings
- Grilled or BBQ Dishes: Since this dessert is light and refreshing, it pairs well with heavier, smoky dishes like grilled chicken, BBQ ribs, or even a juicy burger. The contrast of flavors makes for a satisfying meal.
- Fresh Fruit Salad: A simple fruit salad with strawberries, pineapple, and blueberries makes a great side dish to balance the creamy textures of the dessert.
- Cheese and Crackers: If you’re serving this at a gathering, offering a small cheese platter with mild cheeses like brie or cream cheese spreads can be a nice contrast before dessert.
No matter how you serve it, this No-Bake Banana Split Dessert will always be the star of the show.
Storage, Freezing & Reheating Instructions
How to Store
- Store leftovers in an airtight container or cover the baking dish with plastic wrap and keep it in the refrigerator.
- This dessert is best enjoyed within 2–3 days to ensure the bananas remain fresh and do not brown.
- If you are making this dessert ahead of time, try to fully cover the bananas with whipped topping to help prevent oxidation.
Can You Freeze No-Bake Banana Split Dessert?
Yes, but with some considerations:
- The cream cheese layer freezes well, but the bananas may become slightly mushy when thawed.
- If you plan to freeze, you might want to assemble the dessert without the bananas and add fresh banana slices when serving.
- To freeze, wrap the baking dish in plastic wrap and aluminum foil. Freeze for up to 1 month.
- When ready to serve, thaw in the refrigerator overnight, then add fresh bananas and toppings before serving.
How to Reheat (If Frozen)
- This dessert is meant to be eaten cold, so no reheating is needed. However, if you froze it, let it thaw in the fridge for at least 6–8 hours before serving for the best texture.
Common Mistakes to Avoid
Even though this No-Bake Banana Split Dessert is simple to make, there are a few mistakes that could affect the final result. Avoid these pitfalls to ensure a perfect dessert every time.
1. Not Draining the Pineapple Properly
Pineapple holds a lot of liquid, and if you don’t thoroughly drain it, your dessert may become watery. After draining, use a paper towel to press out excess juice before adding it to the layers.
2. Using Overripe Bananas
While ripe bananas add natural sweetness, overripe bananas can turn mushy and brown quickly. Use just-ripe bananas that are yellow with minimal brown spots for the best texture.
3. Not Chilling Long Enough
This dessert needs at least 4 hours of chilling time, but overnight is ideal. Chilling helps the layers set properly, ensuring clean slices when serving.
4. Skipping the Crust Refrigeration Step
Refrigerating the graham cracker crust before adding the cream cheese layer helps it firm up and prevents it from becoming soggy. Don’t skip this step!
5. Using Low-Quality Whipped Cream Substitutes
If making homemade whipped cream, be sure to whip it until stiff peaks form. Store-bought alternatives like Cool Whip provide stability, but if making fresh, add a little powdered sugar for structure.
Pro Tips
These expert tips will help you achieve the best texture, flavor, and presentation for your No-Bake Banana Split Dessert.
1. Use Freshly Whipped Cream for a More Natural Flavor
While store-bought whipped topping is convenient, making your own whipped cream with heavy cream and powdered sugar gives a fresher taste and fluffier texture.
2. Add a Splash of Lemon Juice to Bananas
To prevent banana slices from turning brown, lightly brush them with lemon juice before layering. This trick keeps them looking fresh longer.
3. Toast the Walnuts for Extra Crunch
Toasting the chopped walnuts for 5 minutes in a dry pan enhances their nutty flavor and gives a satisfying crunch.
4. Experiment with Different Crusts
While graham crackers are classic, try using crushed vanilla wafers, Oreos, or shortbread cookies for a different twist.
5. Add a Chocolate Drizzle Between Layers
For an extra decadent dessert, drizzle chocolate syrup or melted chocolate between the layers before chilling. This adds even more banana split magic!
Frequently Asked Questions (FAQs)
1. Can I Make This Dessert a Day in Advance?
Yes! In fact, making it the day before allows the flavors to meld and the layers to set properly. Just be sure to cover it tightly in the refrigerator.
2. Can I Use a Different Fruit Instead of Pineapple?
Absolutely! Try using strawberries, blueberries, or mangoes for a fun twist. Just be sure to drain any excess juice.
3. How Do I Keep the Bananas from Turning Brown?
Covering them completely with whipped cream helps, or you can toss them in lemon juice before adding them to the dessert.
4. Can I Make This Dessert Gluten-Free?
Yes! Simply use gluten-free graham crackers or cookies for the crust. The rest of the ingredients are naturally gluten-free.
5. What If I Don’t Have a 9×13 Baking Dish?
You can use individual dessert cups or a springform pan for a layered cheesecake-style presentation.
6. Can I Use Dairy-Free Alternatives?
Yes! Use dairy-free cream cheese, coconut whipped cream, and plant-based butter for a dairy-free version.
7. Is This Dessert Too Sweet?
If you prefer a less sweet version, reduce the powdered sugar in the cream cheese layer and use unsweetened whipped cream.
Conclusion & Call to Action
This No-Bake Banana Split Dessert is the perfect combination of nostalgia, ease, and irresistible flavor. With its creamy, fruity layers, buttery graham cracker crust, and classic banana split toppings, this dessert is guaranteed to be a hit at any gathering.
The best part? It requires no baking and can be made in advance, making it a stress-free dessert for any occasion. Whether you’re hosting a summer BBQ, celebrating a birthday, or just craving something sweet, this recipe delivers big flavor with minimal effort.
Now it’s your turn! Try making this No-Bake Banana Split Dessert, and let me know how it turns out. Leave a comment with your thoughts, share your experience, or tag me on social media—I’d love to see your delicious creations! Enjoy every bite of this creamy, fruity, and chocolatey masterpiece.
Print
No-Bake Banana Split Dessert
- Total Time: 4 hours 20 minutes (including chilling time)
- Yield: 10 servings 1x
- Diet: Vegetarian
Description
This no-bake banana split dessert is a quick and easy layered treat featuring a buttery graham cracker crust, a creamy cheesecake layer, fresh bananas, crushed pineapple, and whipped topping, finished with classic sundae toppings like walnuts, chocolate syrup, and cherries. Perfect for summer parties, BBQs, or a simple family dessert.
Ingredients
-
For the Crust:
- 2 cups graham cracker crumbs
- ½ cup unsalted butter, melted
-
For the Creamy Layer:
- 1 (8-ounce) block plain cream cheese, softened
- ½ cup powdered sugar
- 1 teaspoon vanilla extract
- 16 ounces Cool Whip, thawed (or 4 cups homemade whipped cream)
-
For the Fruit Layer:
- 4 bananas, sliced
- 1 (20-ounce) can crushed pineapple, drained
-
For the Toppings (Optional but Recommended):
- Chopped walnuts
- Maraschino cherries
- Chocolate syrup or sprinkles
Instructions
- Prepare the Crust: Mix graham cracker crumbs and melted butter. Press firmly into a greased 9×13-inch baking dish and refrigerate.
- Make the Creamy Layer: Beat cream cheese until smooth. Add powdered sugar and vanilla, then fold in 8 ounces of Cool Whip. Spread over the crust.
- Add the Fruit: Arrange banana slices evenly over the cream cheese layer. Spread drained crushed pineapple on top.
- Top It Off: Cover with the remaining Cool Whip, ensuring an even layer.
- Chill & Serve: Refrigerate for at least 4 hours (overnight is best). Before serving, garnish with walnuts, chocolate syrup, and cherries. Slice and enjoy!
Notes
- Store in the fridge for up to 3 days.
- Prevent bananas from browning by tossing them in a little lemon juice.
- Use gluten-free graham crackers for a gluten-free version.
- Prep Time: 20 minutes
- Cook Time: 0 minutes
- Category: Dessert
- Method: No-Bake
- Cuisine: American