
There’s just something magical about peanut butter and chocolate together, right? It’s that perfect balance of salty and sweet, smooth and rich, that hits all the right notes. Now imagine taking all that goodness and turning it into a dessert that’s not only delicious but also incredibly easy to make. That’s where these No-Bake Peanut Butter Bars come in. Think of them as a simplified version of Buckeye Balls—without the rolling, dipping, or baking. Just layer, chill, and slice. Easy peasy.
This No-Bake Peanut Butter Bars recipe was born out of a craving for something sweet on a hot day when turning on the oven was just not an option. I remembered the classic Buckeye Balls that my aunt used to make during the holidays—those creamy peanut butter centers dipped in rich chocolate—but I wanted something quicker and less fussy. So, I decided to turn the same flavors into a bar version with a crunchy chocolate cookie crust, a thick and creamy peanut butter center, and a silky chocolate topping. The result? A no-bake dessert that’s become a staple in our house for everything from after-school snacks to last-minute potluck treats.
Whether you’re whipping these up for a party, gifting them to a friend, or just treating yourself after a long day, these peanut butter bars deliver serious comfort and satisfaction without any complicated steps. Let’s dive into why you’re going to love them as much as I do.
Why You’ll Love This Recipe
These No-Bake Peanut Butter Bars are more than just easy to make—they’re truly irresistible. First off, they come together with everyday pantry ingredients. There’s no need for fancy tools or hard-to-find ingredients. Just grab some peanut butter, chocolate chips, and cookies, and you’re well on your way.
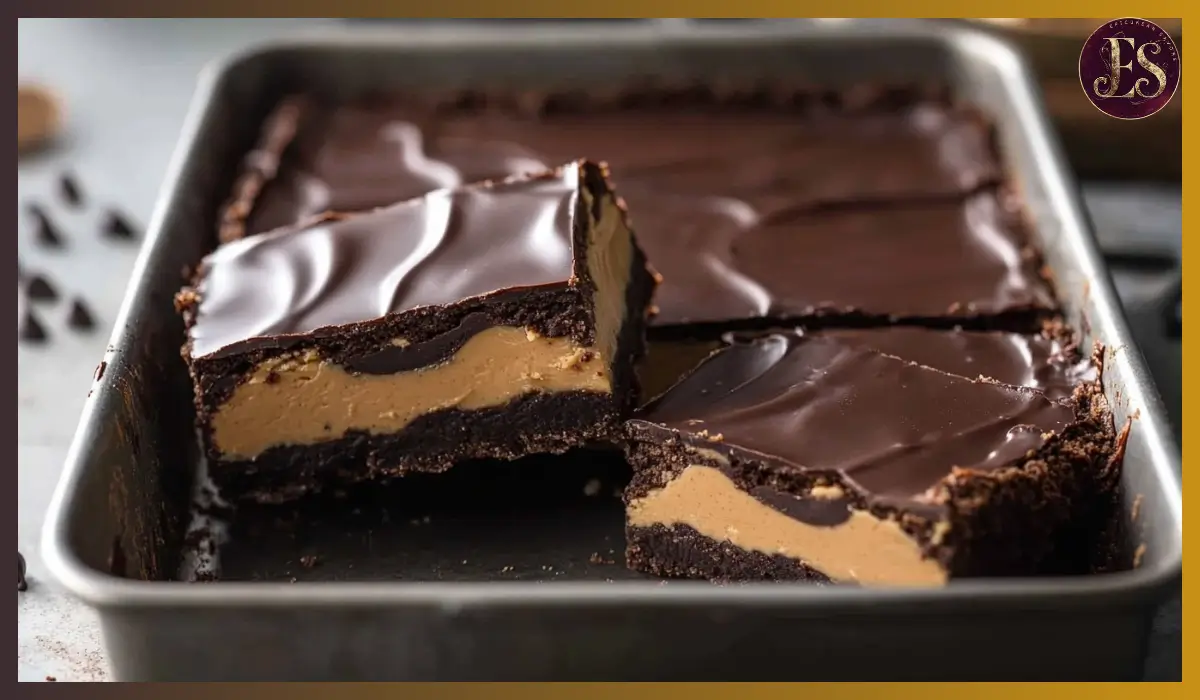
The texture is another reason to fall in love. The base is made from crushed Oreo cookies mixed with melted butter and chocolate, forming a slightly crunchy, chocolaty crust. On top of that sits a velvety peanut butter filling that’s just the right amount of sweet and salty. And then, the final layer: a smooth, glossy chocolate topping that melts in your mouth with every bite.
Another huge win? You don’t need to turn on the oven. That makes this recipe perfect for summer or whenever you’re short on time. You can even prep it in advance, which makes entertaining so much easier.
Kids love it. Adults ask for the recipe. And you can play around with different variations to make it your own. It’s truly one of those crowd-pleasing desserts that checks all the boxes: easy, tasty, and totally stress-free.
Health Benefits
While these No-Bake Peanut Butter Bars are definitely a treat, they’re not without some redeeming qualities. Peanut butter, the star of the show, is packed with protein and healthy fats. That means even though you’re indulging in dessert, you’re also getting a little boost of energy and satiety.
In addition to protein, peanut butter contains essential nutrients like vitamin E, magnesium, and niacin. If you use natural or low-sugar peanut butter, you can cut down on added sugars while still enjoying the creamy texture and flavor.
Using dark or semi-sweet chocolate chips can also add a touch of antioxidant power to your dessert. Chocolate, when not overly processed, contains flavonoids that can support heart health.
Of course, moderation is key. These bars are rich, so a small square is usually enough to satisfy a sweet tooth. But knowing that you’re getting some nutrients along with the indulgence makes them a little easier to justify.
Preparation Time, Servings, and Nutritional Information
Total Time: 1 hour 35 minutes
Prep Time: 5 minutes
Chill Time: 1 hour
Cook Time (for melting ingredients): 30 minutes
Servings: Makes 24 bars
Calories per Serving: Approximately 250
Protein: 4g
Carbohydrates: 22g
Fat: 17g
Ingredients List
For the Crust
- 1 ½ cups Oreo cookie crumbs (about 20 cookies, crushed with filling)
- 4 tablespoons butter, melted
- ½ cup semi-sweet chocolate chips
Why it works: The cookies provide a deep chocolate base while the butter and chocolate help bind everything together and add richness.
For the Peanut Butter Layer
- 1 cup creamy peanut butter (use natural if preferred)
- ½ cup butter, softened
- 2 tablespoons milk
- 1 teaspoon vanilla extract
- 2 cups powdered sugar
Why it works: The peanut butter is the star here—smooth, nutty, and full of flavor. The butter adds creaminess, and the sugar provides the structure to help it set properly.
For the Chocolate Topping
- 1 cup semi-sweet chocolate chips
- 2 tablespoons butter
Why it works: This simple ganache-like layer gives a smooth, glossy finish that firms up beautifully when chilled.
Step-By-Step Cooking Instructions
Step 1: Make the Crust
- In a medium saucepan, melt 4 tablespoons of butter with ½ cup of chocolate chips over low heat. Stir until fully melted and smooth.
- Remove from heat and stir in the crushed Oreo cookies until the mixture is fully combined.
- Press the mixture firmly into a greased or parchment-lined 9×9-inch pan. Use the back of a spoon or the bottom of a measuring cup to make sure it’s evenly packed.
- Place the pan in the refrigerator to chill while you prepare the peanut butter layer.
Step 2: Prepare the Peanut Butter Layer
- In a large bowl, beat the softened butter and peanut butter together until creamy.
- Add in the milk and vanilla extract, and beat again until smooth.
- Gradually add the powdered sugar, mixing on low speed at first to avoid a sugar cloud. Increase the speed once the sugar is mostly incorporated.
- Continue beating until the mixture is fluffy and thick but spreadable.
- Remove the crust from the fridge and spread the peanut butter mixture over the crust in an even layer. Use a spatula to smooth the top.
- Return the pan to the refrigerator for at least 15 minutes to firm up.
Step 3: Add the Chocolate Topping
- In a clean saucepan or microwave-safe bowl, melt 1 cup of chocolate chips with 2 tablespoons of butter. Stir until smooth and shiny.
- Pour the melted chocolate over the peanut butter layer and use a spatula to spread it evenly.
- Chill the entire pan for at least 1 hour, or until the chocolate topping is fully set.
Step 4: Slice and Serve
- Once everything is set, remove the bars from the pan using parchment paper overhang, if used.
- Use a sharp knife to cut into 24 even squares. For cleaner cuts, run the knife under hot water and wipe it dry between slices.
- Serve chilled or let them sit at room temperature for 10 minutes for a slightly softer bite.

How to Serve
These no-bake bars are perfect just as they are, but here are a few serving ideas to make them even more special:
- Serve them on a dessert platter with fresh berries for a pop of color.
- Pair with a scoop of vanilla or chocolate ice cream for a decadent dessert.
- Cut into smaller bite-sized pieces and add to a holiday cookie tray.
- Dust with powdered sugar for an extra festive touch.
Pairing Suggestions
To round out your dessert table, consider these simple and delicious pairings:
- A warm cup of coffee or hot cocoa complements the rich chocolate perfectly.
- For a refreshing contrast, serve with a glass of cold almond or oat milk.
- A fresh fruit salad with strawberries, bananas, or blueberries adds a bright, juicy note.
Storage, Freezing & Reheating Instructions
Storage: Keep leftovers in an airtight container in the refrigerator. They’ll stay fresh for up to 5 days.
Freezing: To freeze, place cut bars in a single layer on a baking sheet until solid. Transfer them to a freezer-safe bag or container and store for up to 2 months. Thaw in the fridge overnight or at room temperature for 30–60 minutes before serving.
Reheating: These bars are best served chilled or at room temperature. Reheating is not necessary and can affect the texture of the chocolate layer.
Common Mistakes to Avoid
- Over-melting chocolate: Use low heat or a double boiler to avoid burning the chocolate.
- Not chilling between steps: While you can skip chilling between layers for better adhesion, the final chill is essential for firm texture.
- Using watery peanut butter: Natural peanut butter should be stirred well. Avoid using peanut butter that’s too oily or runny, as it won’t set properly.
- Cutting before fully set: Give the bars enough time to chill. Cutting too soon will result in messy layers.
- Not lining the pan: Use parchment with overhang to make removing and slicing the bars much easier.
Pro Tips
- Use room-temperature ingredients: This helps everything blend smoothly and evenly.
- Toast the cookie crumbs: For extra depth, toast Oreo crumbs for a few minutes before mixing.
- Add texture to the peanut butter layer: Mix in chopped peanuts or Rice Krispies for a fun crunch.
- Try flavored extracts: A few drops of almond or maple extract can add a unique twist.
- Double the batch: These bars disappear fast, so consider making a double batch in a 9×13-inch pan for parties.
Frequently Asked Questions (FAQs)
Can I use crunchy peanut butter instead of creamy?
Yes, but it will change the texture of the filling. If you enjoy a bit of crunch, go for it.
What can I use instead of Oreo cookies for the crust?
You can try graham crackers, chocolate wafer cookies, or even crushed digestive biscuits.
Can I make this recipe dairy-free?
Absolutely. Use dairy-free butter and chocolate chips, and a plant-based milk for the filling.
What if my chocolate topping cracks when slicing?
Let the bars sit at room temperature for about 10 minutes before cutting. Also, use a hot knife for smoother slices.
Is it okay to use natural peanut butter?
Yes, but make sure it’s not too oily or runny. Stir it well before using and consider refrigerating it first.
Can I reduce the sugar?
You can reduce the powdered sugar slightly, but the texture may become softer. Taste as you go to find your ideal balance.
Do these bars travel well?
They do if kept chilled. Store them in a cooler if you’re bringing them to a gathering.
Can I add toppings?
Definitely. Try mini chocolate chips, chopped peanuts, or crushed pretzels sprinkled on top before the chocolate sets.
What pan size should I use if I want thicker bars?
Use a smaller 8×8-inch pan for thicker layers, but keep in mind the chilling time may be longer.
How long can I keep these at room temperature?
Up to 2 hours is fine, but they’ll start to soften. For best texture, serve chilled.
Conclusion & Call to Action
There’s something so satisfying about making a dessert that feels indulgent but comes together with almost no effort. These No-Bake Peanut Butter Bars hit that sweet spot. With their creamy, chocolatey, peanut buttery goodness, they’re a guaranteed hit every single time.
Whether you’re prepping for a party, bringing a treat to the office, or just making something special for yourself at home, these bars deliver big flavor with minimal fuss. They’re the kind of dessert you’ll make once and then keep making on repeat—because everyone will ask for them again and again.
If you try this recipe, I’d love to hear how it turns out. Leave a comment below and tell me what you think. And if you post a picture of your peanut butter bars on social media, be sure to tag me—I can’t wait to see your delicious creations!
Print
No-Bake Peanut Butter Bars
- Total Time: 1 hour 35 minutes (includes chilling)
- Yield: 24 bars
- Diet: Vegetarian
Description
These no-bake peanut butter bars are a fuss-free dessert inspired by Buckeye Balls, featuring a chocolate cookie crust, creamy peanut butter filling, and smooth chocolate topping. No oven needed!
Ingredients
-
Crust: 1½ cups Oreo crumbs, 4 tbsp butter (melted), ½ cup semi-sweet chocolate chips
-
Peanut Butter Layer: 1 cup creamy peanut butter, ½ cup butter (softened), 2 tbsp milk, 1 tsp vanilla extract, 2 cups powdered sugar
-
Topping: 1 cup semi-sweet chocolate chips, 2 tbsp butter
Instructions
-
Melt butter and chocolate chips, stir in Oreo crumbs, and press into a 9×9 pan. Chill.
-
Beat peanut butter, butter, milk, vanilla, and sugar. Spread over crust. Chill again.
-
Melt chocolate chips with butter, pour over the peanut butter layer. Smooth, then chill until set.
-
Slice into bars and serve.
Notes
- For clean cuts, use a hot knife and wipe between slices.
- Use parchment with overhang to easily lift from the pan.
- Customize with toppings like chopped nuts or candy pieces.
- Prep Time: 5 minutes
- Cook Time: 30 minutes
- Category: Dessert
- Method: No-Bake
- Cuisine: American