

There’s just something magical about homemade ice cream—especially when it’s loaded with chunks of soft, sweet cookie dough. And when you can make it without an ice cream machine, it becomes not only a treat but a total game-changer. This No Churn Chocolate Chip Cookie Dough Ice Cream is smooth, creamy, and dotted with generous bites of safe-to-eat cookie dough. It’s nostalgic, indulgent, and wonderfully easy to make.
I first started making this No Churn Chocolate Chip Cookie Dough Ice Cream recipe during a hot summer weekend when the ice cream shop down the street had a line out the door and my freezer was practically begging for something sweet. I didn’t have an ice cream maker (still don’t!), but I had heavy cream, a can of sweetened condensed milk, and a craving that could only be cured by cookie dough. What started as a kitchen experiment quickly turned into a family favorite—requested often and devoured even faster.
This No Churn Chocolate Chip Cookie Dough Ice Cream is now a staple in our house. Whether it’s for a late-night treat, a weekend gathering, or just a little pick-me-up after a long day, a scoop (or two) of this creamy, cookie-studded dessert never disappoints. And the best part? You don’t need fancy equipment or complicated steps. Just a bowl, a mixer, and a bit of freezer space.
With safe-to-eat, egg-free cookie dough and a creamy vanilla base that comes together in minutes, this dessert is both simple and show-stopping. If you’ve ever loved cookie dough ice cream but wanted to try your own version at home, this recipe is the perfect place to start.
Why You’ll Love This Recipe
This No Churn Chocolate Chip Cookie Dough Ice Cream recipe checks all the boxes for an unforgettable homemade dessert. Here’s why you’ll be reaching for your spoon before it even hits the freezer:
No special tools required
Forget the ice cream maker. All you need is a hand or stand mixer and a freezer-safe container. That’s it.
Creamy, dreamy texture
The base of whipped cream and sweetened condensed milk creates a lusciously smooth texture that mimics churned ice cream. It’s soft, scoopable, and completely satisfying.
Safe, edible cookie dough
We’ve taken out the raw eggs and heat-treated the flour so you can enjoy every bite of cookie dough with peace of mind. No risk, all reward.
Totally customizable
Stick with the classic chocolate chip version or get creative—try oatmeal raisin, peanut butter, or even brownie chunks. The sky’s the limit.
Great for make-ahead
Make it in the morning and it’s ready by evening. It stores beautifully and keeps for weeks in the freezer, making it perfect for planning ahead for guests or events.
Kid and adult approved
This is the kind of treat that brings out the kid in everyone. Whether it’s after-school dessert or a nostalgic adult indulgence, it’s always a hit.
Health Benefits
Now, we’re not calling ice cream a health food—but there are a few silver linings here if you’re choosing this homemade version over store-bought.
No preservatives or additives
This no churn ice cream contains just a few simple ingredients. You control what goes in, which means no artificial flavors, colors, or preservatives.
Lower sodium
Many commercial ice creams include extra salt and stabilizers. Here, you get the natural creaminess without unnecessary extras.
Portion control
Making it at home means you can scoop smaller servings, or load up your bowl—it’s up to you. Either way, it’s easier to enjoy in moderation because you’re more mindful of what goes into it.
Customizable ingredients
Want to use organic cream or reduce the sugar in the cookie dough? You can adapt it to your preferences without sacrificing flavor.
Of course, this is still a dessert, and it’s meant to be enjoyed as a treat. But making it at home allows you to enjoy it with more awareness and fewer mystery ingredients.
Preparation Time, Servings, and Nutritional Information
Prep Time: 25 minutes
Freeze Time: 6 hours (or overnight)
Total Time: Approximately 6 hours 25 minutes
Servings: 8 servings
Calories per serving: 420
Protein: 4g
Carbohydrates: 35g
Fat: 30g
Sugar: 27g
Ingredients List
For the Ice Cream Base:
- 2 cups heavy whipping cream, cold – This is the secret to the fluffy, airy texture. Cold cream whips better and faster.
- 1 can (14 oz) sweetened condensed milk – Adds sweetness and that creamy mouthfeel without the need for churning.
- 1 tablespoon vanilla extract – Rounds out the flavor with a warm, fragrant note.
For the Edible Cookie Dough:
- ½ cup unsalted butter, softened – Gives that rich, buttery base.
- ¼ cup granulated sugar – Adds a little crunch and sweetness.
- ¼ cup brown sugar, packed – Provides depth and a caramelized taste.
- 1 teaspoon vanilla extract – Enhances the dough’s flavor.
- 1 tablespoon milk – Loosens the mixture just enough to hold together.
- 1 cup all-purpose flour, heat-treated – For safety; instructions below.
- ½ cup mini chocolate chips – Adds melty, sweet bits in every bite.
Optional Add-ins:
- A pinch of salt – Enhances the flavors.
- Swirls of caramel or fudge – For an even more indulgent treat.
- Crushed cookies or candy – To personalize your creation.
Note: To heat-treat flour, spread it on a baking sheet and bake at 350°F for 5-7 minutes. Let it cool before using.
Step-By-Step Cooking Instructions
1. Make the Edible Cookie Dough
- In a medium bowl, beat the softened butter with the granulated and brown sugars until light and fluffy.
- Add the vanilla extract and milk, then mix again until smooth.
- Gradually stir in the heat-treated flour and mix until combined. The dough should come together but not be overly sticky.
- Fold in the mini chocolate chips.
- Use a small spoon or your hands to roll the dough into small balls or chunks. Place them on a parchment-lined plate and set them in the freezer while you prep the ice cream base.
2. Whip the Cream
- In a large bowl, pour in the cold heavy cream.
- Using a hand mixer or stand mixer fitted with the whisk attachment, whip the cream on high speed until stiff peaks form. This takes about 3–4 minutes.
- You’ll know it’s ready when you lift the beaters and the cream holds its shape.
3. Make the Ice Cream Base
- In another large bowl, pour in the sweetened condensed milk and vanilla extract.
- Gently fold in the whipped cream using a spatula. Be careful not to deflate it—you want to preserve that airiness.
- Mix until no streaks remain and the mixture is smooth and fluffy.
4. Fold in the Cookie Dough
- Take the chilled cookie dough chunks and fold them gently into the ice cream base.
- Stir just enough to distribute the pieces throughout the mixture.
5. Freeze
- Pour the mixture into a freezer-safe container (a loaf pan works perfectly).
- Smooth the top with a spatula, then press a piece of parchment paper or plastic wrap directly onto the surface.
- Freeze for at least 6 hours or overnight for best results.
6. Serve
- Let the ice cream sit at room temperature for 5–10 minutes before scooping to soften slightly.
- Scoop, serve, and enjoy.

How to Serve
There are endless ways to serve this No Churn Chocolate Chip Cookie Dough Ice Cream. Here are a few favorites:
- Scoop into cones or bowls and top with extra cookie dough pieces.
- Drizzle with chocolate or caramel sauce.
- Sandwich between two cookies for the ultimate ice cream sandwich.
- Serve alongside warm brownies or cakes for a dreamy hot-and-cold dessert.
Pairing Suggestions
Desserts:
Pair with fudgy brownies, blondies, or banana bread for an extra sweet treat.
Beverages:
Serve with iced coffee, milkshakes, or even a creamy hot chocolate for chilly evenings.
Kid-friendly extras:
Top with rainbow sprinkles, mini marshmallows, or crushed graham crackers for a fun sundae bar.
Storage, Freezing & Reheating Instructions
Storage:
Store leftover ice cream in an airtight container in the freezer. It will keep for up to 2 weeks, although it’s often gone long before then.
Freezing Tips:
Press a layer of parchment paper directly on top of the ice cream before sealing with a lid to prevent ice crystals from forming.
Reheating (or softening):
Remove from the freezer 5–10 minutes before serving for easy scooping. Avoid microwaving as it can melt unevenly.
Common Mistakes to Avoid
- Skipping the heat treatment on flour: Raw flour can carry bacteria. Always bake it briefly before using in the dough.
- Overmixing the whipped cream: Stop mixing once you reach stiff peaks, or the cream could turn grainy.
- Using warm ingredients: Start with cold cream and chilled mixing bowls to help whip the cream properly.
- Too much mix-in: While it’s tempting to load up on cookie dough, adding too much can affect the ice cream’s texture.
- Not covering the ice cream: Leaving it exposed in the freezer can lead to freezer burn. Always use parchment or plastic wrap.
Pro Tips
- Chill the mixing bowl and beaters: This helps the cream whip up faster and stay firm.
- Make mini cookie dough chunks: Smaller pieces are easier to scoop and distribute evenly throughout the ice cream.
- Use a loaf pan: It’s the perfect shape for even freezing and easy scooping.
- Customize the dough: Add nuts, switch up the chocolate chips, or use flavored extracts like almond or coconut.
- Double the batch: This ice cream disappears fast, so consider making two batches if you’re serving a crowd.
Frequently Asked Questions (FAQs)
Can I make this dairy-free?
Yes! Use coconut cream in place of heavy cream and a dairy-free sweetened condensed milk substitute. Use plant-based butter for the cookie dough.
Can I skip the cookie dough?
Absolutely. The base itself is delicious on its own. You can also swap in other add-ins like fruit, nuts, or chocolate chunks.
What’s the best way to heat-treat flour?
Spread the flour on a baking sheet and bake at 350°F for 5–7 minutes. Let it cool before using in the dough.
How long does the ice cream need to freeze?
At least 6 hours, but overnight is best for a firm texture.
Can I use full-size chocolate chips?
Mini chips are easier to eat when frozen, but full-size chips work too if that’s what you have.
Is sweetened condensed milk the same as evaporated milk?
No. Sweetened condensed milk is thicker and much sweeter. Don’t substitute them.
What kind of container should I use?
A metal loaf pan works great, but any freezer-safe container with a lid will do.
Can I make this gluten-free?
Yes. Just use gluten-free flour in the cookie dough.
How long does it last in the freezer?
About 2 weeks for best texture and flavor. Be sure to keep it covered tightly.
Can I add swirls or sauces?
Definitely! Add caramel, fudge, or peanut butter swirls before freezing for extra layers of flavor.
Conclusion & Call to Action
If you’ve ever dreamed of making ice cream at home but thought it was too complicated, this No Churn Chocolate Chip Cookie Dough Ice Cream is the perfect recipe to change your mind. It’s rich, creamy, and packed with bits of soft, safe-to-eat cookie dough that make every scoop a delight.
So what are you waiting for? Give it a try, and make sure to stash a few extra cookie dough chunks for yourself. When you do make it, I’d love to hear how it turns out! Leave a comment below or tag your creation on social media. This is one of those recipes that’s just too good not to share.
Happy scooping!
Print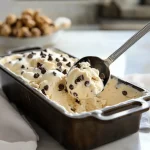
No Churn Chocolate Chip Cookie Dough Ice Cream
- Total Time: 6 hours 25 minutes
- Yield: 8 servings 1x
- Diet: Vegetarian
Description
A rich and creamy no churn ice cream filled with chunks of safe-to-eat chocolate chip cookie dough. No machine required—just simple ingredients and big flavor.
Ingredients
-
2 cups heavy whipping cream (cold)
-
1 can (14 oz) sweetened condensed milk
-
1 tbsp vanilla extract
-
½ cup unsalted butter (softened)
-
¼ cup granulated sugar
-
¼ cup packed brown sugar
-
1 tsp vanilla extract
-
1 tbsp milk
-
1 cup all-purpose flour (heat-treated)
-
½ cup mini chocolate chips
-
Optional: pinch of salt, swirls of caramel, extra cookie bits
Instructions
-
Cream together butter, sugars, vanilla, and milk.
-
Add heat-treated flour and fold in mini chocolate chips. Shape into small dough chunks and freeze.
-
Whip heavy cream until stiff peaks form.
-
Fold in sweetened condensed milk and vanilla.
-
Gently mix in cookie dough chunks.
-
Transfer to freezer-safe container and freeze for at least 6 hours or overnight.
-
Let sit 5–10 minutes before serving.
Notes
- Always heat-treat the flour to ensure safety.
- Use mini chips for easier bites.
- Chill the bowl for faster whipping.
- Great for make-ahead desserts or summer treats.
- Prep Time: 25 minutes
- Cook Time: 0 minutes
- Category: Dessert
- Method: No Churn, Freezing
- Cuisine: American