

Patriotic Mini Ice Cream Sandwiches are the perfect way to celebrate any festive occasion while indulging in a delightful treat. Combining fun colors and flavors, these mini delights are not only visually appealing but also irresistibly delicious. Made with layers of creamy ice cream sandwiched between soft cookies, they also embody the spirit of national pride. Whether you’re hosting a barbecue, a Fourth of July party, or simply enjoying a warm day, these sandwiches are guaranteed to impress family and friends alike.
Imagine the joy on the faces of your loved ones as they sink their teeth into these adorable mini sandwiches. The vibrant colors evoke a sense of celebration, making them an essential treat for festive gatherings. Plus, you’ll find that making these sandwiches is a remarkably simple and straightforward process that will leave you with more time to enjoy your celebrations.
In this article, we will explore why you’ll love this recipe, the preparation and cooking times, the essential ingredients, and provide you with a step-by-step guide to whipping up these patriotic treats. So, let’s dive into the incredible world of making Patriotic Mini Ice Cream Sandwiches!
Why You’ll Love This Recipe
There are plenty of reasons to fall head over heels for Patriotic Mini Ice Cream Sandwiches. Here are the main highlights that make this recipe truly special:
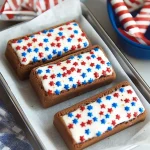
1. Festive Appeal: Their red, white, and blue appearance instantly adds a celebratory vibe to any event.
2. Easy to Make: The recipe involves simple steps, making it easy for cooks of all skill levels.
3. Customizable Flavors: You can choose from various ice cream flavors and cookie types to suit your taste preferences.
4. Fun for All Ages: Children and adults alike will enjoy this tasty treat, offering a sense of nostalgia.
5. Perfect for Groups: The mini size makes them easy to serve at parties and gatherings without mess.
6. Delightful Pairing: These sandwiches can be paired well with a range of other desserts or enjoyed solo.
It’s easy to see why these Patriotic Mini Ice Cream Sandwiches need to be part of your celebrations. Each bite is not only a culinary delight but a symbol of festive fun!
Preparation and Cooking Time
Getting your Patriotic Mini Ice Cream Sandwiches ready is a fast and fun process. Here’s the breakdown of the total estimated time you’ll need:
– Preparation Time: 20-30 minutes
– Freezing Time: 2-3 hours (to ensure proper setting)
– Assembly Time: 15 minutes
The total time from start to finish will be approximately 2.5 to 3 hours, primarily due to the freezing time. However, the initial preparation and assembly process can fit into a shorter span, allowing you to get back to celebration preparations!
Ingredients
– 1 ½ cups all-purpose flour
– ½ teaspoon baking soda
– ¼ teaspoon salt
– ½ cup unsalted butter, softened
– ½ cup granulated sugar
– ½ cup packed brown sugar
– 1 large egg
– 1 teaspoon vanilla extract
– ½ cup red and blue sprinkles (for decoration)
– 2 cups of your favorite ice cream (vanilla, strawberry, and blueberry suggested)
Step-by-Step Instructions
Creating these Patriotic Mini Ice Cream Sandwiches is a fun-filled activity. Just follow these steps to get delicious results:
1. Preheat the Oven: Begin by preheating your oven to 350°F (175°C). Line a baking sheet with parchment paper to prevent sticking.
2. Mix the Dry Ingredients: In a bowl, whisk together the all-purpose flour, baking soda, and salt. Set this mixture aside.
3. Cream the Butter and Sugars: In a large mixing bowl, combine the softened butter, granulated sugar, and brown sugar. Mix until smooth and creamy.
4. Add Egg and Vanilla: Beat in the egg and vanilla extract to the butter mixture until well combined.
5. Combine Mixtures: Gradually add the dry ingredients to the wet ingredients, stirring until everything is combined into a dough.
6. Form Cookies: Scoop out tablespoon-sized portions of dough onto the prepared baking sheet, spacing them about 2 inches apart.
7. Add Sprinkles: Before baking, gently press sprinkles onto the top of each cookie for a festive touch.
8. Bake the Cookies: Bake in the preheated oven for 10-12 minutes, or until the edges are golden. Allow the cookies to cool on a wire rack.
9. Prepare Ice Cream: While cookies cool, soften your chosen ice cream by letting it sit at room temperature for about 10 minutes.
10. Assemble the Sandwiches: Place one cookie on a flat surface, add a scoop of softened ice cream on top, then place another cookie on top of the ice cream, gently pressing down to create a sandwich.
11. Wrap in Plastic: Wrap each sandwich in plastic wrap to maintain its shape. Repeat until all sandwiches are assembled.
12. Freeze: Place your assembled sandwiches in the freezer for at least 2-3 hours to firm up.
How to Serve
Presenting your Patriotic Mini Ice Cream Sandwiches is all about enhancing their visual appeal and deliciousness:
1. Use Decorative Plates: Place the sandwiches on festive plates or platters to enhance the presentation.
2. Add Garnishes: Consider arranging fresh fruit or whipped cream alongside the sandwiches for added flavor and color.
3. Cool Presentation: Serve the sandwiches directly from the freezer for a refreshingly cool treat on hot summer days.
4. Ice Cream Bar Option: Create a DIY ice cream sandwich bar where guests can make their custom sandwiches with various ice cream flavors and toppings.
5. Occasion-Specific Touches: For gatherings like the Fourth of July, add themed decorations like mini flags or red, white, and blue table settings.
By implementing these serving suggestions, you will elevate the experience of enjoying these vibrant and delicious Patriotic Mini Ice Cream Sandwiches!
With these key points, you now have everything you need to create an incredible mini ice cream sandwich experience that’s not only tasty but also fun! Enjoy your festivities with this amazing treat!
Additional Tips
– Use Ice Cream at Room Temperature: Allow the ice cream to soften slightly before assembling the sandwiches. This makes it much easier to scoop and spread.
– Experiment with Colors: Mixing various flavors of ice cream can enhance the visual appeal. Try alternating colors for a fun surprise in each bite.
– Make Ahead: Prepare and freeze your sandwiches a day or two before your event. This way, they will be ready to serve when your guests arrive.
– Customize Toppings: Consider adding granola or chopped nuts for an extra crunch, or drizzle chocolate syrup over them for an indulgent finish.
Recipe Variation
Feel free to get creative with these mini ice cream sandwiches! Here are some fun variations to try:
1. Chocolate Lovers: Use chocolate cookies with chocolate or cookies and cream ice cream for a double chocolate delight.
2. Fruit-Flavored Sensation: Swap in fruit-flavored ice creams, like raspberry or lemon, and pair them with sugar cookies for a refreshing twist.
3. Sandwich with a Crunch: Add crushed candy canes or toffee bits to the cookies before baking for an exciting textural contrast.
4. Seasonal Twist: Incorporate seasonal flavors, such as pumpkin or eggnog ice cream in the fall and winter months, for a festive adaptation.
Freezing and Storage
– Storage: Keep your assembled Patriotic Mini Ice Cream Sandwiches in an airtight container in the freezer. They will stay fresh for up to three weeks.
– Freezing: If you want to extend their freshness, consider individually wrapping each sandwich in plastic wrap before placing them in an airtight container, which helps prevent freezer burn.
Special Equipment
You won’t need too much specialized equipment for this recipe, but here are a few tools that will make the process easier:
– Baking sheets for cookie placement
– Parchment paper to prevent sticking
– Mixing bowls for your ingredients
– Ice cream scoop for portioning the ice cream
– Plastic wrap or wax paper for wrapping the sandwiches
Frequently Asked Questions
Can I use store-bought cookies?
Yes! You can simplify the process by using pre-made cookies, allowing you to focus on the ice cream filling.
How can I make these sandwiches healthier?
You can opt for whole grain cookies and low-fat or dairy-free ice cream. This can make a lighter version of your treats.
What if I don’t have sprinkles?
No worries! You can decorate the cookies with colored sugar, mini chocolate chips, or omit decorations altogether.
Can these be made gluten-free?
Absolutely! Substitute all-purpose flour with a gluten-free blend for a gluten-free version.
How do I know when the cookies are the right texture?
The cookies should be soft but firm enough to hold the ice cream. Remove them from the oven when they are just golden at the edges.
Conclusion
Patriotic Mini Ice Cream Sandwiches are a delightful way to celebrate any occasion. Their vibrant colors and customizable flavors make them a treat that everyone can appreciate. With easy preparation steps, a variety of flavors to experiment with, and a fun presentation, these sandwiches are sure to be a hit. Whether you’re enjoying them at a gathering or as a personal indulgence, these mini treats embrace the spirit of celebration in every bite.
Patriotic Mini Ice Cream Sandwiches: An Incredible 3-Step Recipe
- Total Time: 7 minute
Ingredients
– 1 ½ cups all-purpose flour
– ½ teaspoon baking soda
– ¼ teaspoon salt
– ½ cup unsalted butter, softened
– ½ cup granulated sugar
– ½ cup packed brown sugar
– 1 large egg
– 1 teaspoon vanilla extract
– ½ cup red and blue sprinkles (for decoration)
– 2 cups of your favorite ice cream (vanilla, strawberry, and blueberry suggested)
Instructions
Creating these Patriotic Mini Ice Cream Sandwiches is a fun-filled activity. Just follow these steps to get delicious results:
1. Preheat the Oven: Begin by preheating your oven to 350°F (175°C). Line a baking sheet with parchment paper to prevent sticking.
2. Mix the Dry Ingredients: In a bowl, whisk together the all-purpose flour, baking soda, and salt. Set this mixture aside.
3. Cream the Butter and Sugars: In a large mixing bowl, combine the softened butter, granulated sugar, and brown sugar. Mix until smooth and creamy.
4. Add Egg and Vanilla: Beat in the egg and vanilla extract to the butter mixture until well combined.
5. Combine Mixtures: Gradually add the dry ingredients to the wet ingredients, stirring until everything is combined into a dough.
6. Form Cookies: Scoop out tablespoon-sized portions of dough onto the prepared baking sheet, spacing them about 2 inches apart.
7. Add Sprinkles: Before baking, gently press sprinkles onto the top of each cookie for a festive touch.
8. Bake the Cookies: Bake in the preheated oven for 10-12 minutes, or until the edges are golden. Allow the cookies to cool on a wire rack.
9. Prepare Ice Cream: While cookies cool, soften your chosen ice cream by letting it sit at room temperature for about 10 minutes.
10. Assemble the Sandwiches: Place one cookie on a flat surface, add a scoop of softened ice cream on top, then place another cookie on top of the ice cream, gently pressing down to create a sandwich.
11. Wrap in Plastic: Wrap each sandwich in plastic wrap to maintain its shape. Repeat until all sandwiches are assembled.
12. Freeze: Place your assembled sandwiches in the freezer for at least 2-3 hours to firm up.
- Prep Time: 15 minutes
- Cook Time: 10-12 minutes
Nutrition
- Serving Size: 24 mini sandwiches (approximately)
- Calories: 150 kcal (per sandwich)
- Fat: 6g
- Protein: 2g