
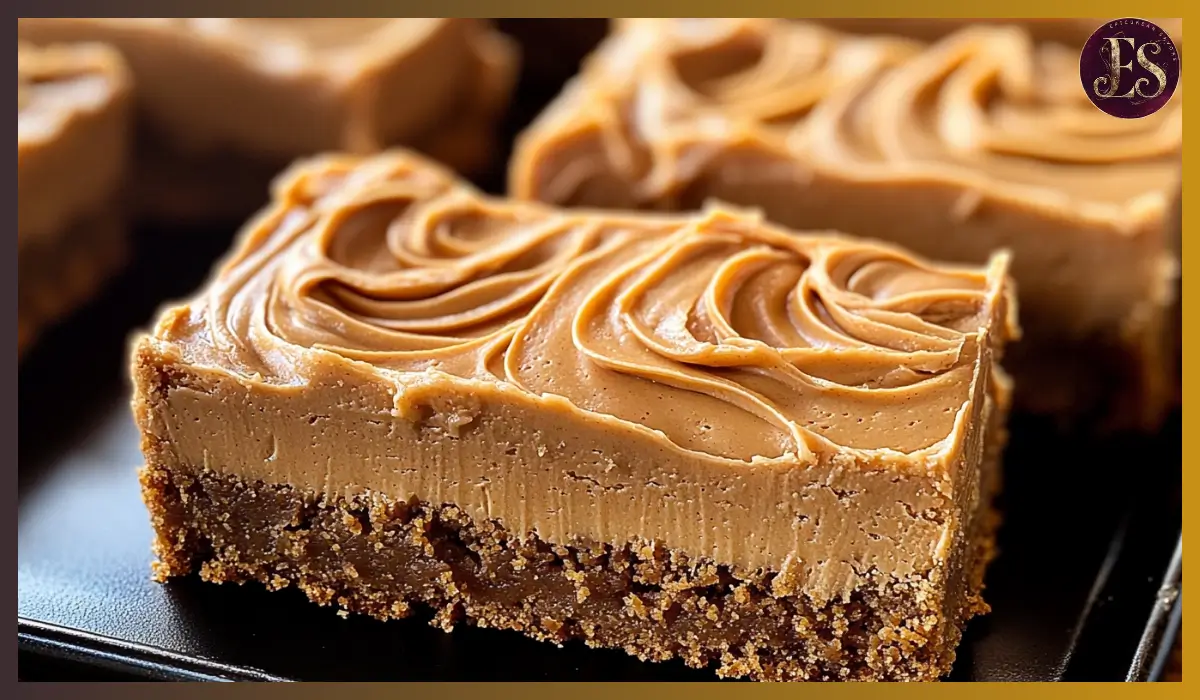
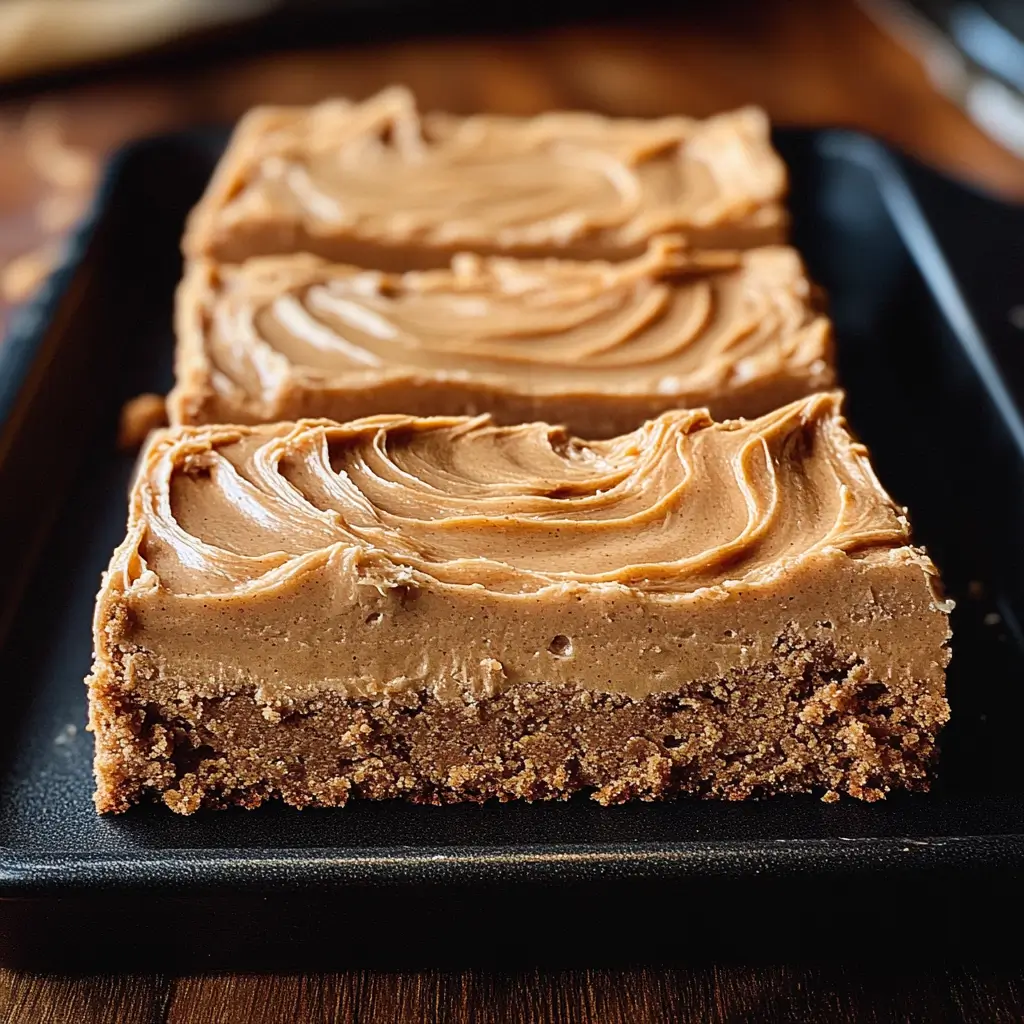
There’s something incredibly nostalgic about peanut butter cookie bars, especially when they’re baked up thick, soft, and chewy—just like the ones the lunch ladies used to serve in school cafeterias. If you grew up looking forward to dessert days in the lunch line, then this recipe is about to bring all that joy back, right into your kitchen.
These Classic Peanut Butter Lunch Lady Cookie Bars are a timeless treat that blend the cozy richness of peanut butter with a soft, oat-packed cookie base. Every bite is buttery, perfectly sweet, and carries that signature peanut butter flavor that hits just the right spot. They’re made with simple, pantry-friendly ingredients, and best of all, they come together quickly without any fancy equipment or hard-to-find items.
I first made these Peanut Butter Cookie Bars on a rainy Saturday when I was craving something warm and comforting—but didn’t want to deal with the whole process of rolling cookie dough into balls. One bite took me straight back to elementary school, sitting with friends, trading snacks, and savoring those peanut butter squares that were always the highlight of the meal.
Whether you’re baking these for a family gathering, a cozy weekend treat, or a lunchbox surprise, they deliver on both taste and texture. They’re also ideal for casual potlucks, game nights, or anytime you need a crowd-pleasing dessert with minimal fuss. This is a recipe you’ll find yourself turning to again and again—because who doesn’t love a good cookie bar?
Why You’ll Love This Recipe
There are plenty of cookie bar recipes out there, but this one stands out for a few simple yet important reasons.
Super easy to make: No need to chill the dough or roll out cookies. You just mix everything, spread it in a pan, and bake.
Family-friendly and kid-approved: With its soft texture and familiar flavor, this is a dessert that both kids and adults will adore.
Full of flavor and texture: Creamy peanut butter gives richness, while oats add a bit of chew. The combination is nothing short of addictive.
Perfect for sharing: These bars cut cleanly and hold their shape, making them ideal for parties, bake sales, or gifts.
Customizable: You can easily jazz them up with chocolate chips, chopped nuts, or even a drizzle of melted chocolate on top.
Freezer-friendly: You can bake these ahead and freeze for later, which is a lifesaver when you want dessert on hand at a moment’s notice.
So if you’re looking for an easy dessert that brings comfort, flavor, and a little nostalgia to the table, this is the one.
Health Benefits
While these Peanut Butter Cookie Bars are definitely a sweet treat, they do have some redeeming qualities that make them more than just dessert.
Protein from peanut butter: Peanut butter is a good source of plant-based protein and healthy fats, which help keep you full and satisfied.
Oats for fiber: The quick oats in the dough offer fiber, which supports digestion and adds a more hearty texture to the bars.
No artificial ingredients: Made with real, wholesome ingredients, these bars skip the preservatives and additives found in many packaged snacks.
Easily adjustable sweetness: You can cut back slightly on the sugar or use natural sweeteners if you want a slightly lighter version.
Of course, these bars are still a treat, so moderation is key. But it’s nice knowing they offer a little more than just empty calories.
Preparation Time, Servings, and Nutritional Information
Total Time: 35 minutes
Prep Time: 10 minutes
Cook Time: 20–25 minutes
Cooling Time: 10 minutes
Servings: 24 bars
Per Serving:
Calories: 280
Protein: 5g
Carbohydrates: 30g
Fat: 16g
Fiber: 2g
Sugar: 18g
Ingredients List
Here’s everything you’ll need to make these soft, chewy bars. All ingredients are easy to find, and you probably already have most of them in your pantry.
- 1 cup unsalted butter, softened
Butter gives these bars their rich, tender texture. Make sure it’s soft for easier creaming. - 1 cup granulated sugar
Provides sweetness and helps the bars hold their structure. - 1 cup packed brown sugar
Adds depth of flavor and extra moisture, giving the bars a chewier bite. - 1 cup creamy peanut butter
The star of the show—rich, nutty, and irresistibly smooth. - 2 large eggs
Bind everything together and add moisture. - 2 teaspoons vanilla extract
Brings out the flavors and adds a warm, aromatic note. - 2 cups all-purpose flour
Provides structure without making the bars too dense. - 1 teaspoon baking soda
Gives the bars a bit of lift so they don’t turn out flat. - ½ teaspoon salt
Balances the sweetness and enhances the peanut butter flavor. - 2 cups quick oats
Add a satisfying chew and a slightly nutty texture.
Optional Add-ins:
- 1 cup semi-sweet chocolate chips
- ½ cup chopped roasted peanuts
Step-By-Step Cooking Instructions
Follow these detailed steps to ensure your bars come out perfect every time.
1. Preheat the oven and prep the pan
Set your oven to 350°F (175°C). Grease a 9×13-inch baking dish with nonstick spray or line it with parchment paper for easier removal.
2. Cream the butter and sugars
In a large mixing bowl, beat the softened butter, granulated sugar, and brown sugar together until light and fluffy. This usually takes 2–3 minutes using an electric mixer.
3. Add peanut butter, eggs, and vanilla
Mix in the creamy peanut butter until smooth and fully combined. Then add the eggs and vanilla extract, beating until the mixture is well blended.
4. Mix the dry ingredients separately
In another bowl, whisk together the flour, baking soda, and salt. This ensures even distribution of the leavening agent and prevents clumps.
5. Combine the wet and dry ingredients
Gradually add the flour mixture to the wet ingredients, mixing just until no streaks of flour remain. Avoid overmixing, as this can lead to tough cookie bars.
6. Stir in the oats
Fold in the quick oats with a spatula. The dough will be thick but should come together easily.
7. Add any optional mix-ins
If you’re using chocolate chips or chopped nuts, gently fold them into the dough at this stage.
8. Spread the dough in the pan
Use a spatula to evenly spread the dough into the prepared baking dish. Smooth out the top so it bakes evenly.
9. Bake
Bake for 20–25 minutes, or until the edges are golden brown and a toothpick inserted in the center comes out with a few moist crumbs. Don’t overbake—these bars continue to cook slightly as they cool.
10. Cool and slice
Let the bars cool completely in the pan. Then slice into squares or rectangles, depending on your preferred serving size.
How to Serve
There are so many fun and tasty ways to serve these bars. Here are a few ideas:
- Cut into small squares and serve as a snack with milk or hot chocolate
- Top with a dollop of whipped cream for an easy dessert
- Serve warm with a scoop of vanilla ice cream
- Pack into lunchboxes for a sweet midday treat
- Plate them for dessert at potlucks or gatherings
These bars are versatile and crowd-pleasing, perfect for any occasion.
Pairing Suggestions
To complement the flavors of these cookie bars, consider these pairings:
Beverages
- A tall glass of cold milk
- Hot cocoa or spiced chai for a cozy afternoon snack
- Unsweetened almond milk or oat milk for a dairy-free option
Savory Snacks
- Fresh fruit like sliced apples or strawberries to balance the sweetness
- Cheese cubes or a mild savory snack to round out a lunchbox combo
Other Desserts
- Drizzle with melted dark chocolate and a sprinkle of sea salt for a gourmet twist
- Layer with banana slices and a smear of extra peanut butter for a decadent treat
Storage, Freezing & Reheating Instructions
Storing
Once the bars have cooled completely, store them in an airtight container at room temperature. They’ll stay fresh for up to 5 days.
Freezing
These cookie bars freeze beautifully. Place cooled bars in a single layer on a baking sheet and freeze until solid. Then transfer them to a freezer-safe container or bag. They’ll keep for up to 3 months.
Reheating
To enjoy warm, microwave a single bar for 10–15 seconds. For a slightly crispier edge, reheat in a 300°F oven for 5–7 minutes.
Common Mistakes to Avoid
To get perfect bars every time, steer clear of these common pitfalls:
- Overbaking: The bars should be slightly soft in the center when you remove them from the oven. They’ll continue to firm up as they cool.
- Using natural peanut butter: For best texture, use a commercial creamy peanut butter. Natural peanut butter can make the dough too oily or dry.
- Skipping the cooling step: Cutting too early can cause the bars to fall apart. Give them time to set.
- Overmixing the dough: Mix just until the ingredients are combined to avoid tough, dense bars.
- Wrong oats: Quick oats give the best texture. Rolled oats can be too chewy, while instant oats may break down too much.
Pro Tips
These small tweaks can take your cookie bars from good to great:
- Use parchment paper: Lining the pan makes for easier removal and cleaner cuts.
- Chill the dough: If you want thicker bars, chill the dough for 15 minutes before baking.
- Try half chocolate chips, half chopped nuts: It gives the bars more flavor variety and texture.
- Double the batch: These freeze well, so you can make two pans at once and stash one away.
- Cool completely before storing: This prevents condensation from making the bars soggy.
Frequently Asked Questions (FAQs)
Can I use crunchy peanut butter instead of creamy?
Yes, if you like a bit of texture. Just keep in mind that it will change the consistency slightly.
Can I make these gluten-free?
Absolutely! Substitute a gluten-free all-purpose flour blend and make sure your oats are certified gluten-free.
Can I reduce the sugar?
You can reduce each sugar by ¼ cup without compromising texture too much, but the bars will be less sweet.
Do I have to use quick oats?
Quick oats are best, but if all you have is old-fashioned oats, you can pulse them a few times in a food processor.
Can I double the recipe?
Yes! Use a larger baking pan or two 9×13 pans. Just watch your baking time—it may need a few extra minutes.
Do these bars need to be refrigerated?
No, they’re fine at room temperature. Only refrigerate if you want them to last longer than 5 days.
How do I know they’re done baking?
The edges will be golden brown, and a toothpick inserted in the center should come out mostly clean.
Can I add chocolate frosting?
Yes, and it’s delicious! A thin layer of chocolate frosting turns these into more of a peanut butter brownie bar.
What’s the best way to cut clean bars?
Use a sharp knife and wipe it clean between cuts. Let the bars cool fully before slicing.
Can I make them dairy-free?
You can use dairy-free butter alternatives, but the taste and texture may vary slightly.
Conclusion & Call to Action
These Classic Peanut Butter Lunch Lady Cookie Bars are the kind of feel-good treat that brings smiles with every bite. Whether you’re baking them for your family, gifting them to a friend, or simply enjoying them on a quiet afternoon with a cup of tea, they’re bound to become a staple in your kitchen.
If you try this recipe, I’d love to hear how it turned out. Share your experience in the comments, or tag your photos online so I can see your delicious creations. Happy baking!
Print
Peanut Butter Cookie Bars
- Total Time: 35 minutes
- Yield: 24 bars 1x
- Diet: Vegetarian
Description
These soft and chewy peanut butter cookie bars are a nostalgic school lunch favorite made with creamy peanut butter, oats, and simple pantry staples.
Ingredients
-
1 cup unsalted butter, softened
-
1 cup granulated sugar
-
1 cup packed brown sugar
-
1 cup creamy peanut butter
-
2 large eggs
-
2 teaspoons vanilla extract
-
2 cups all-purpose flour
-
1 teaspoon baking soda
-
½ teaspoon salt
-
2 cups quick oats
Instructions
-
Preheat oven to 350°F (175°C). Grease or line a 9×13 baking pan.
-
Cream together butter, white sugar, and brown sugar until fluffy.
-
Mix in peanut butter, eggs, and vanilla extract.
-
In a separate bowl, whisk together flour, baking soda, and salt.
-
Gradually combine dry ingredients with wet mixture.
-
Stir in oats until evenly mixed.
-
Spread dough in prepared pan and smooth the top.
-
Bake for 20–25 minutes or until edges are golden and center is set.
-
Cool completely before cutting into bars.
Notes
- For extra flavor, add chocolate chips or chopped nuts.
- Don’t overbake to keep the bars soft and chewy.
- Store in an airtight container.
- Prep Time: 10 minutes
- Cook Time: 25 minutes
- Category: Dessert
- Method: Baking
- Cuisine: American