
Red White Blue Layered Jello Cups are an incredible treat that captures the essence of celebration. Whether it is the Fourth of July, Memorial Day, or any festive occasion, these delightful cups bring joy and vibrancy to your gatherings. The combination of flavors and colors not only provides a visual feast but also satisfies the sweet tooth in anyone who indulges.
The beauty of these jello cups lies not just in their appearance but also in their ease of preparation. Layers of red, white, and blue jello can transform any event into a memorable affair. This recipe is perfect for parties, picnics, or even as a cool summer dessert to enjoy with family and friends.
With the right balance of sweetness and a fun presentation, Red White Blue Layered Jello Cups are bound to impress. Dive into this ultimate guide and discover why you’ll love making this dessert and how it can add that wow factor to your next event!
Why You’ll Love This Recipe
Creating Red White Blue Layered Jello Cups is more than just a cooking task; it’s an experience that captivates your senses. Here are some reasons why this recipe is a must-try:
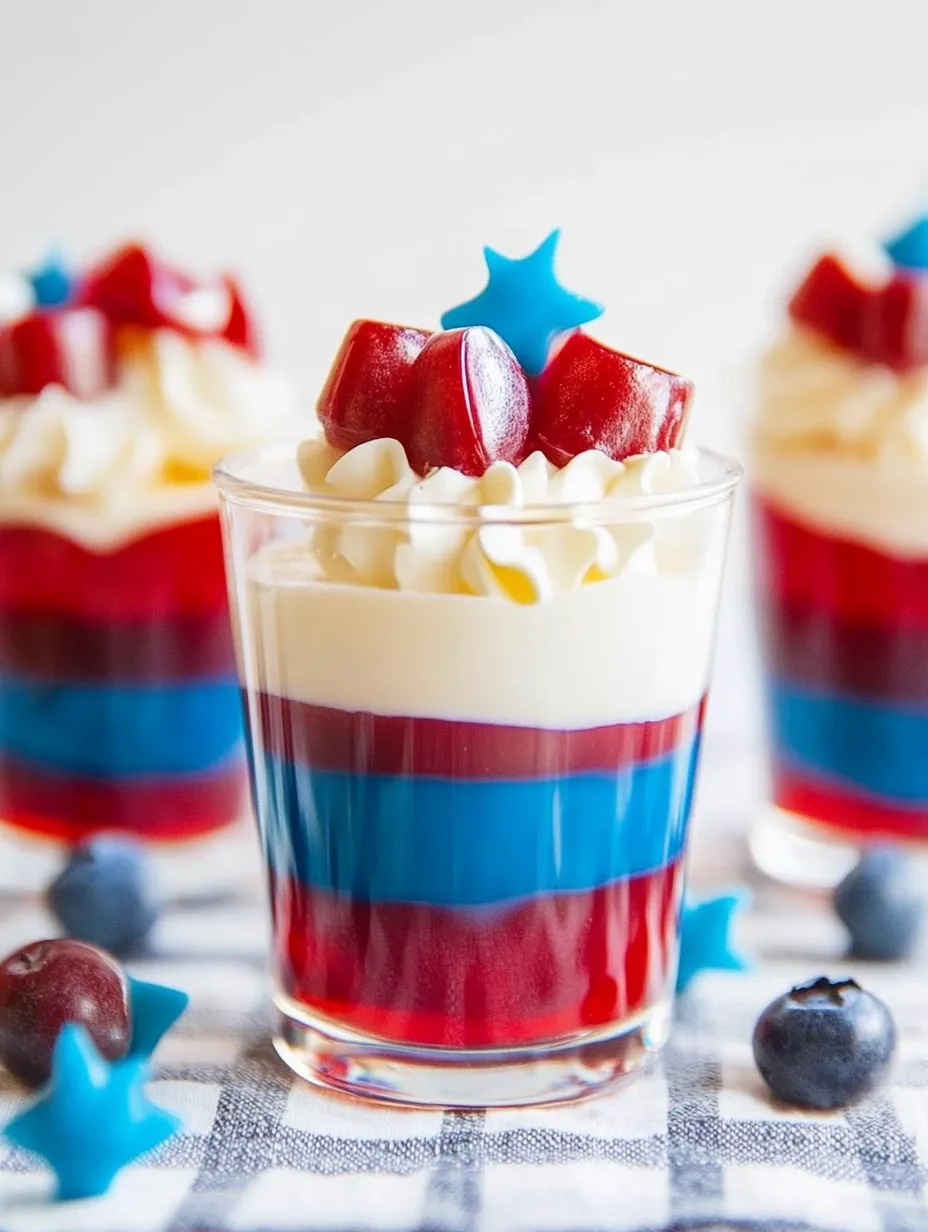
1. Visually Appealing: The striking colors create a stunning presentation that will surely attract attention.
2. Simple Ingredients: Most of the ingredients are easy to find and inexpensive, making them accessible for everyone.
3. No-Bake Dessert: There’s no baking required, which means less time spent in the kitchen.
4. Fun for Everyone: Kids and adults alike will love the fun textures and flavors of this dessert.
5. Customizable: You can experiment with different flavors of Jello to match any occasion.
6. Great for Events: These jello cups are perfect for parties, potlucks, and family gatherings, making them a versatile option.
By choosing this recipe, you are setting the stage for a delightful culinary journey that promises to be enjoyable for both the maker and the eater!
Preparation and Cooking Time
Preparing Red White Blue Layered Jello Cups is relatively quick, but it does require some time for the layers to set properly. Here’s a breakdown of the time needed:
– Preparation Time: Approximately 30 minutes
– Setting Time: 4 hours (or overnight for best results)
– Total Time: About 4 hours and 30 minutes
Keep in mind that the setting time allows all the layers to firm up perfectly, ensuring that your jello cups hold together beautifully when served.
Ingredients
– 1 package (3 oz) strawberry-flavored Jello
– 1 package (3 oz) blue raspberry-flavored Jello
– 1 package (3 oz) berry blue Jello
– 2 cups hot water (divided)
– 1 cup cold water (divided)
– 1 cup sweetened condensed milk
– Whipped cream (for topping, optional)
– Fresh berries (for garnish, optional)
Step-by-Step Instructions
Creating Red White Blue Layered Jello Cups can be a fun and straightforward process. Follow these steps for amazing results:
1. Prepare the Red Layer:
– In a mixing bowl, dissolve the strawberry Jello in 1 cup of hot water. Stir until fully dissolved.
– Add ½ cup of cold water and mix well.
– Pour the mixture into clear cups, filling them about one-third full. Place them in the refrigerator to set for about 30 minutes.
2. Prepare the White Layer:
– While the red layer sets, mix the sweetened condensed milk with 1 cup of hot water in a bowl. Stir well until smooth.
– After the red layer has set, pour the white mixture over the red layer in each cup, filling them to about two-thirds full.
– Return the cups to the refrigerator and let this layer set for an additional 30 minutes.
3. Prepare the Blue Layer:
– In a separate mixing bowl, dissolve both the blue raspberry and berry blue Jello in 1 cup of hot water.
– Stir until fully dissolved and mix in ½ cup of cold water.
– Once the white layer has set, slowly pour the blue Jello mixture over the white layer in each cup, filling the cups to the rim.
– Place the cups back into the refrigerator and let them set for at least 4 hours, or overnight for optimal firmness.
4. Serve:
– Once fully set, top each cup with whipped cream and a few fresh berries for garnish if desired.
– Use a spoon to scoop gently from the bottom, allowing the layers to blend together as you taste.
By following these steps, you will have a stunning dessert that captures the spirit of any celebration while tasting delicious!
How to Serve
Serving Red White Blue Layered Jello Cups is all about presentation and ensuring a delightful experience for your guests. Here are some tips to consider:
1. Individual Cups: Serve the jello in clear cups to showcase the beautiful layers. This allows everyone to see the vibrant colors.
2. Garnish with Fresh Produce: Add a few berries on top to enhance both the flavor and the aesthetics.
3. Include Spoons: Provide small spoons for easy serving and encourage your guests to mix the colors as they enjoy.
4. Thematic Serving: Consider creating a themed table setting that matches the colors of the jello or the occasion, such as red, white, and blue decorations for patriotic holidays.
5. Pair with Drinks: Serve these jello cups alongside refreshing beverages like lemonade or fruit-infused waters to complement the dessert.
By concentrating on both presentation and taste, you will ensure that your Red White Blue Layered Jello Cups create a lasting impression. Enjoy using this recipe to celebrate and create wonderful moments with friends and family!
Additional Tips
– Use Clear Cups: The clearer the cup, the better the layers will show. Choose transparent cups to enhance the visual appeal.
– Chill Between Layers: Ensure each layer is completely set before adding the next. This prevents mixing and helps maintain clean lines.
– Experiment with Flavors: While strawberry and blue raspberry are classic choices, feel free to try other flavors that suit your taste.
– Create Mini Versions: Use smaller cups for mini jello servings. This can be a fun and portion-controlled option for events.
– Add a Layer of Fun: Consider adding a layer of candy or fruit between layers for added texture and surprise!
Recipe Variation
Feel free to explore these variations when making Red White Blue Layered Jello Cups:
1. Different Flavor Combinations: Swap out the strawberry and blue raspberry Jello for other flavors like orange and lime for a refreshing twist.
2. Add Fruit: Layer in diced strawberries or blueberries between the jello layers for a fruitier dessert.
3. Make It a Parfait: Use Greek yogurt between the jello layers for a healthier, creamier option.
Freezing and Storage
– Storage: Keep the jello cups covered in the refrigerator to maintain their freshness. Ideally, consume them within 3-4 days for the best taste.
– Freezing: Freezing jello cups is not recommended, as the texture may change once thawed. It’s best to enjoy them fresh.
Special Equipment
To create your Red White Blue Layered Jello Cups, you will need:
– Clear plastic or glass cups for serving
– Mixing bowls for preparing each layer
– Measuring cups for accurate liquid measurements
– A whisk or spoon for mixing
– Refrigerator for setting each layer
Frequently Asked Questions
Can I prepare these jello cups a day in advance?
Yes, preparing them a day ahead is a great idea. Just ensure that they are kept refrigerated.
Can I use gelatin instead of Jello?
Certainly! You can use flavored gelatin if you’re looking for a different texture or a sugar-free alternative.
What can I use to enhance the flavor?
Consider adding a splash of flavor extracts like vanilla or almond in the white layer for extra depth of flavor.
Can I make a larger batch for a big event?
Absolutely! Just scale up the ingredients proportionately and use bigger cups or more servings.
Is there a vegan option for the white layer?
You can substitute sweetened condensed milk with coconut cream or a vegan evaporated milk for a vegan-friendly version.
Conclusion
Red White Blue Layered Jello Cups are not just a delightful treat but also an eye-catching dessert perfect for any celebration. Their vibrant colors and diverse flavors make them a festive addition to your table that everyone will enjoy. With easy preparation and endless variations, you can craft a dessert that reflects your creativity while bringing joy to guests of all ages. So, gather your ingredients and make your next event truly unforgettable!

Red White Blue Layered Jello Cups: An Amazing Ultimate 7-Layer Recipe
- Total Time: 15 minutes
Ingredients
– 1 package (3 oz) strawberry-flavored Jello
– 1 package (3 oz) blue raspberry-flavored Jello
– 1 package (3 oz) berry blue Jello
– 2 cups hot water (divided)
– 1 cup cold water (divided)
– 1 cup sweetened condensed milk
– Whipped cream (for topping, optional)
– Fresh berries (for garnish, optional)
Instructions
Creating Red White Blue Layered Jello Cups can be a fun and straightforward process. Follow these steps for amazing results:
1. Prepare the Red Layer:
– In a mixing bowl, dissolve the strawberry Jello in 1 cup of hot water. Stir until fully dissolved.
– Add ½ cup of cold water and mix well.
– Pour the mixture into clear cups, filling them about one-third full. Place them in the refrigerator to set for about 30 minutes.
2. Prepare the White Layer:
– While the red layer sets, mix the sweetened condensed milk with 1 cup of hot water in a bowl. Stir well until smooth.
– After the red layer has set, pour the white mixture over the red layer in each cup, filling them to about two-thirds full.
– Return the cups to the refrigerator and let this layer set for an additional 30 minutes.
3. Prepare the Blue Layer:
– In a separate mixing bowl, dissolve both the blue raspberry and berry blue Jello in 1 cup of hot water.
– Stir until fully dissolved and mix in ½ cup of cold water.
– Once the white layer has set, slowly pour the blue Jello mixture over the white layer in each cup, filling the cups to the rim.
– Place the cups back into the refrigerator and let them set for at least 4 hours, or overnight for optimal firmness.
4. Serve:
– Once fully set, top each cup with whipped cream and a few fresh berries for garnish if desired.
– Use a spoon to scoop gently from the bottom, allowing the layers to blend together as you taste.
By following these steps, you will have a stunning dessert that captures the spirit of any celebration while tasting delicious!
- Prep Time: 15 minutes
- Cook Time: 0 minutes
Nutrition
- Serving Size: 6 cups
- Calories: 210 kcal
- Fat: 5g
- Protein: 3g