
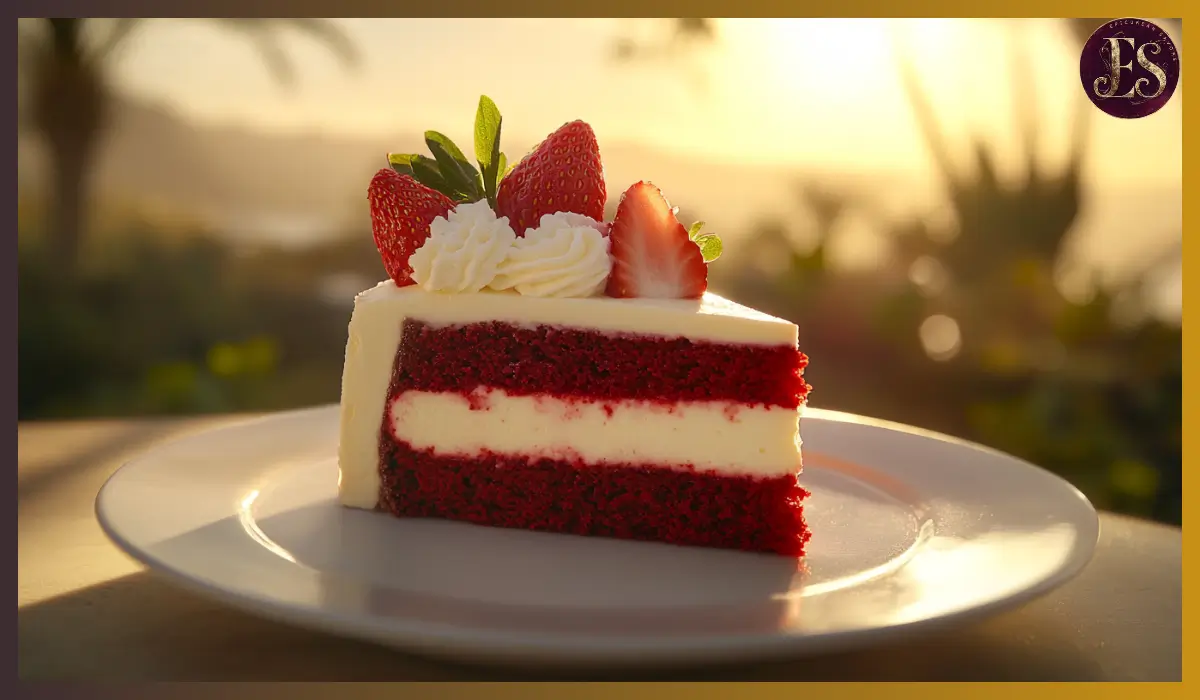
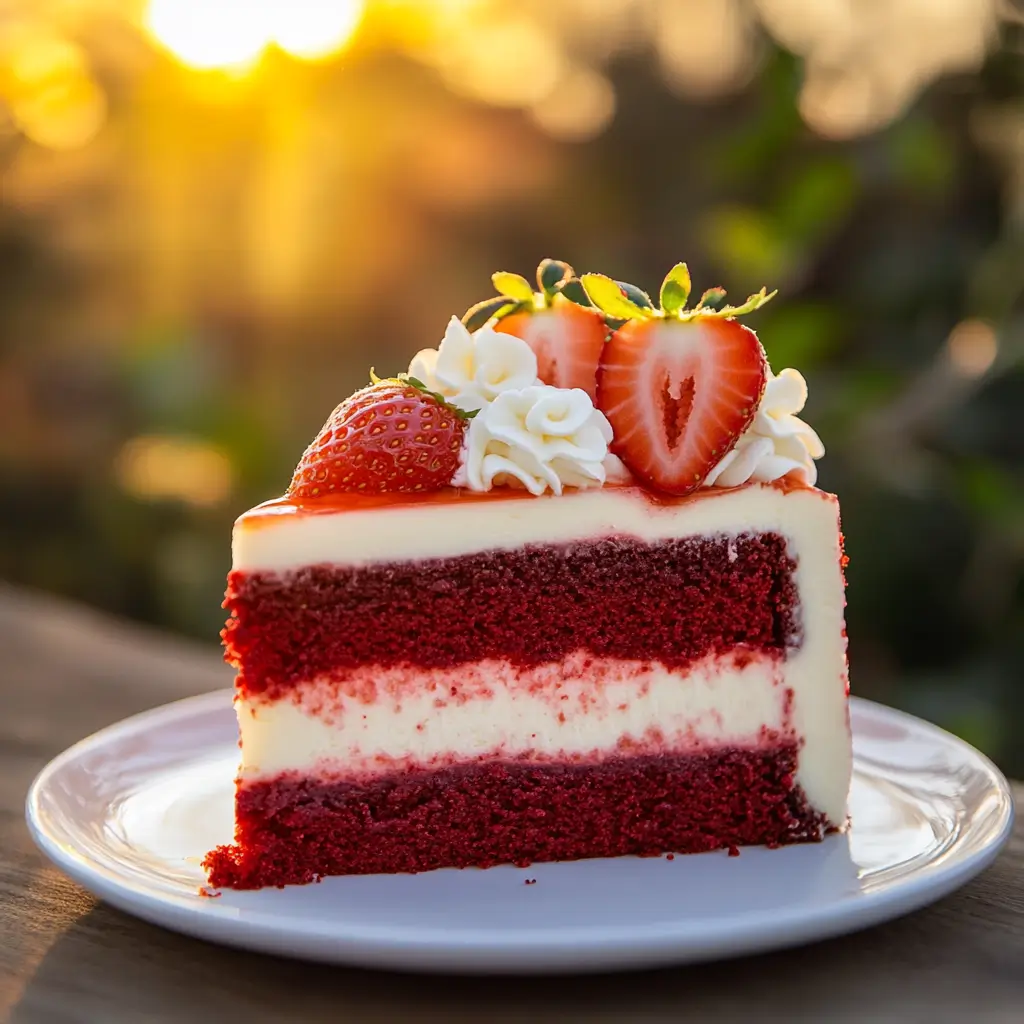
Few desserts are as visually stunning and indulgent as a Strawberry Red Velvet Cheesecake. This elegant dessert combines three luscious layers: a rich, moist red velvet cake base, a smooth and creamy cheesecake filling, and a fresh strawberry topping that adds brightness and sweetness. Each bite is a harmonious blend of flavors and textures, making it a perfect treat for special occasions, holidays, or simply when you want to impress your guests with a homemade masterpiece.
This cheesecake is not only delicious but also a true showstopper. The deep red hue of the red velvet base contrasts beautifully with the creamy white cheesecake layer, while the vibrant strawberries on top complete the look. It’s a dessert that captures attention the moment it hits the table.
One of the best things about this recipe is that it is surprisingly easy to make. The red velvet layer is soft and chocolatey with just a hint of vanilla, serving as a sturdy and flavorful base for the cheesecake. The cheesecake itself is made with simple ingredients—cream cheese, sugar, eggs, sour cream, and vanilla—yet it has a velvety texture that melts in your mouth. The strawberry topping provides the perfect finishing touch, adding a burst of freshness to balance the richness of the cake.
This recipe is ideal for any occasion where you want to impress. Whether you’re celebrating a birthday, Valentine’s Day, or a holiday gathering, this Strawberry Red Velvet Cheesecake is guaranteed to be a hit. With a little patience and some basic baking skills, you can create a professional-quality dessert right in your own kitchen.
Why You’ll Love This Recipe
This cheesecake is an absolute dream for anyone who loves layered desserts. The combination of red velvet cake and cheesecake is already indulgent, but the fresh strawberries take it to another level. Here are a few reasons why you’ll love this recipe:
1. Perfectly Balanced Flavors
The red velvet base is slightly chocolatey and pairs wonderfully with the tangy, creamy cheesecake filling. The strawberry topping adds a fresh, slightly tart contrast that keeps the dessert from being overly sweet.
2. Stunning Presentation
This dessert is as beautiful as it is delicious. The bold red velvet layer, creamy cheesecake, and bright strawberries create a visually striking dessert that’s perfect for special occasions.
3. Surprisingly Easy to Make
While this cheesecake may look complicated, it’s actually quite simple. Each layer is easy to prepare, and with a few helpful tips, you can create a flawless dessert without the stress.
4. Great for Make-Ahead Desserts
Since cheesecake needs to be chilled before serving, this is the perfect dessert to make a day in advance. It actually tastes better after it has had time to set in the refrigerator.
5. Customizable
Not a fan of strawberries? Swap them for raspberries, blueberries, or even a chocolate drizzle. You can also add a layer of whipped cream or a dusting of cocoa powder for an extra touch of elegance.
Health Benefits
Although this is an indulgent dessert, there are a few health benefits hidden within its ingredients.
1. Rich in Protein
Cream cheese and eggs are excellent sources of protein, which helps keep you full and satisfied.
2. Antioxidant Boost from Cocoa Powder
Red velvet cake contains cocoa powder, which is known for its antioxidants. These compounds help reduce inflammation and support overall health.
3. Fresh Strawberries for Vitamins
Strawberries are packed with vitamin C and antioxidants, which help boost your immune system and improve skin health.
4. Healthy Fats from Dairy
Sour cream and cream cheese provide essential healthy fats that are beneficial for brain function and energy.
While this dessert should be enjoyed in moderation, it does have a few nutritional perks that make it a slightly less guilty indulgence.
Preparation Time, Servings, and Nutritional Information
Preparation Time:
- Prep Time: 30 minutes
- Cook Time: 1 hour
- Cooling Time: 4+ hours (or overnight)
- Total Time: 5+ hours
Servings:
- Yields: 10–12 slices
Nutritional Information (Per Slice):
- Calories: 350
- Carbohydrates: 42g
- Fat: 18g
- Protein: 6g
- Sugar: 28g
Ingredients List
The Red Velvet Base:
- 1 cup all-purpose flour
- ¼ cup unsweetened cocoa powder
- ½ teaspoon baking soda
- ¼ teaspoon salt
- ½ cup unsalted butter, softened
- 1 cup granulated sugar
- 1 large egg
- 1 teaspoon vanilla extract
- ½ cup buttermilk
- 1 tablespoon red food coloring
The Cheesecake Layer:
- 16 ounces cream cheese, softened
- ¾ cup granulated sugar
- 2 large eggs
- ⅓ cup sour cream
- 1 teaspoon vanilla extract
The Strawberry Topping:
- 1 cup fresh strawberries, sliced
- ½ cup strawberry preserves or jam
- Whipped cream (optional, for garnish)
Step-By-Step Cooking Instructions
1- Prepare the Red Velvet Base
Preheat the oven to 350°F (175°C). Grease a 9-inch springform pan and line the bottom with parchment paper.
In a medium bowl, whisk together the flour, cocoa powder, baking soda, and salt.
In a separate bowl, cream the butter and sugar until light and fluffy. Add the egg, vanilla extract, buttermilk, and red food coloring. Mix until well combined.
Gradually add the dry ingredients to the wet ingredients and mix until smooth.
Pour the batter into the prepared springform pan and spread evenly. Bake for 15–18 minutes, or until a toothpick inserted into the center comes out clean. Let the cake cool completely.
2- Prepare the Cheesecake Layer
Reduce the oven temperature to 325°F (160°C).
In a large bowl, beat the cream cheese and sugar until smooth and creamy.
Add the eggs one at a time, mixing well after each addition. Stir in the sour cream and vanilla extract.
Pour the cheesecake batter over the cooled red velvet base and spread evenly.
Bake for 40–45 minutes, or until the cheesecake is set but slightly jiggly in the center.
3- Chill the Cheesecake
Let the cheesecake cool at room temperature for about an hour, then transfer it to the refrigerator to chill for at least 4 hours or overnight.
4- Add the Strawberry Topping
Once the cheesecake is fully chilled, spread a thin layer of strawberry preserves over the top. Arrange the sliced strawberries in a decorative pattern.
For an extra touch of elegance, pipe whipped cream rosettes around the edges.
5- Serve and Enjoy
Carefully remove the cheesecake from the springform pan. Slice and serve chilled.
How to Serve
- Serve as a showstopping dessert for birthdays, Valentine’s Day, or holiday gatherings.
- Pair with a cup of coffee or tea for a luxurious afternoon treat.
- Garnish with extra berries or a dusting of powdered sugar for an elegant finish.
Pairing Suggestions
This cheesecake pairs beautifully with:
- A glass of cold milk
- Hot coffee or espresso
- A berry-infused herbal tea
Storage, Freezing & Reheating Instructions
- Store in an airtight container in the refrigerator for up to 5 days.
- Freeze slices individually for up to 1 month. Thaw in the refrigerator overnight before serving.
The History Behind Red Velvet Cheesecake
Red velvet cake has long been a favorite in Southern baking, known for its striking red color and subtle cocoa flavor. The origins of red velvet cake can be traced back to the early 20th century when bakers started adding cocoa powder to cake batters for a softer texture. The cake’s signature red hue was initially a result of a natural reaction between cocoa powder and acidic ingredients like buttermilk and vinegar. However, during the 1940s, food coloring became more popular, giving red velvet cake its bold, unmistakable appearance. Over time, creative bakers began pairing it with different fillings and frostings, leading to the luxurious combination of red velvet and cheesecake. This blend of flavors and textures has now become a beloved choice for birthdays, holidays, and weddings, making red velvet cheesecake a true showstopper on any dessert table.
How to Achieve a Perfectly Creamy Cheesecake Texture
A smooth and creamy cheesecake is all about technique. First, make sure all your ingredients—especially the cream cheese, eggs, and sour cream—are at room temperature before mixing. This helps create a lump-free batter. When mixing, avoid overbeating the batter, as too much air can cause cracks while baking. For the best texture, consider using a water bath by placing your springform pan inside a larger pan filled with hot water. This gentle baking method helps the cheesecake bake evenly, preventing it from drying out or forming cracks. Once baked, allow the cheesecake to cool gradually—first in the oven with the door slightly open, then at room temperature before chilling in the fridge. These simple steps ensure a velvety, creamy texture every time.
Variations and Creative Twists on This Cheesecake
One of the best things about this recipe is its versatility. If you want a deeper chocolate flavor, increase the amount of cocoa powder in the red velvet layer. For a fun twist, try adding a chocolate ganache topping instead of the strawberry layer, making it a decadent red velvet chocolate cheesecake. If you love citrus flavors, add a bit of orange zest to the cheesecake filling for a refreshing contrast. For a different fruit topping, swap strawberries for raspberries or even a mixed berry compote. If you want an even more festive look, drizzle white chocolate over the finished cheesecake. Whether you stick to the original or customize it to your preference, this cheesecake is guaranteed to be a delicious treat.
The Best Tools for Making Cheesecake Like a Pro
Using the right tools can make a significant difference when making cheesecake. A springform pan is essential for easy removal of the cheesecake without damaging its layers. A hand mixer or stand mixer helps achieve a smooth, creamy filling without overmixing. A fine mesh sieve can be useful if you want to sift dry ingredients like cocoa powder to prevent lumps in the red velvet base. To ensure even baking, a water bath setup (placing the cheesecake pan in a larger pan filled with hot water) can help prevent cracks and maintain moisture. If you want precise slicing for a clean presentation, use a sharp knife warmed with hot water and wipe it clean between cuts. Investing in these simple tools ensures your cheesecake turns out bakery-quality every time.
Frequently Asked Questions (FAQs)
Can I make this cheesecake in advance?
Yes! In fact, it tastes even better the next day.
Can I use a different fruit topping?
Absolutely. Blueberries, raspberries, or even a chocolate drizzle work well.
Conclusion & Call to Action
This Strawberry Red Velvet Cheesecake is the perfect combination of rich flavors and stunning presentation. Try it for your next celebration, and don’t forget to share your creation. Happy baking!
Print
Strawberry Red Velvet Cheesecake
- Total Time: 5+ hours (including cooling)
- Yield: 10–12 slices 1x
- Diet: Vegetarian
Description
A decadent three-layered dessert featuring a moist red velvet cake base, a creamy cheesecake center, and a fresh strawberry topping. Perfect for birthdays, holidays, and special occasions.
Ingredients
For the Red Velvet Base:
- 1 cup all-purpose flour
- ¼ cup unsweetened cocoa powder
- ½ teaspoon baking soda
- ¼ teaspoon salt
- ½ cup unsalted butter, softened
- 1 cup granulated sugar
- 1 large egg
- 1 teaspoon vanilla extract
- ½ cup buttermilk
- 1 tablespoon red food coloring
For the Cheesecake Layer:
- 16 ounces cream cheese, softened
- ¾ cup granulated sugar
- 2 large eggs
- ⅓ cup sour cream
- 1 teaspoon vanilla extract
For the Strawberry Topping:
- 1 cup fresh strawberries, sliced
- ½ cup strawberry preserves or jam
- Whipped cream (optional)
Instructions
- Preheat the oven to 350°F (175°C) and grease a 9-inch springform pan.
- Prepare the red velvet cake by whisking together the dry ingredients, then mixing the wet ingredients separately. Combine and bake for 15–18 minutes. Let cool.
- Lower oven temperature to 325°F (160°C) and prepare the cheesecake batter by beating cream cheese and sugar until smooth. Add eggs, sour cream, and vanilla.
- Pour cheesecake batter over the cooled red velvet layer and bake for 40–45 minutes until set. Let cool and refrigerate for at least 4 hours.
- Spread strawberry preserves over the cheesecake and arrange fresh strawberries on top. Garnish with whipped cream if desired.
- Chill before serving and enjoy this indulgent treat!
Notes
- Use room temperature ingredients for a smoother cheesecake texture.
- If you want a crack-free cheesecake, bake with a water bath.
- For a different topping, try raspberries or a drizzle of white chocolate.
- Prep Time: 30 minutes
- Cook Time: 1 hour
- Category: Dessert
- Method: Baking
- Cuisine: American, Southern